Microsoft thought they were being helpful when they set up notifications for new email. However, a constant barrage of notifications can also disrupt your train of thought. You can turn the notifications off completely, or--better yet--you can set up Outlook to only notify you about important emails.
How to Create a Simple Rule
If you need to be responsive to certain people, such as clients, your boss, or your family members, you can use Rules in Outlook to receive notifications about certain messages only. Here's how to set up a rule that only shows email notifications from a certain sender.
The easiest way to set up this rule is to find an email from that person. For this example, I’ll set up a rule to notify me when I receive an email from my boss, because emails from your boss are always important, right? So, I'd right-click on the email from How-To Geek's editor-in-chief, Whitson Gordon, and select “Rules” and then “Create Rule” from the popup menu.

In the “Create Rule” dialog box, select the conditions on which you want to receive notifications about new email. I want to get immediate notifications about emails I receive from Whitson, so I select the first check box.

I also select the “Sent to” check box and make sure my name is selected from the drop-down list, so I’ll receive notifications for emails sent from Whitson directly to me. If you don’t want to be notified of emails where you’re CC’ed or one of several recipients, select “me only” from the “Sent to” drop-down list. Click “OK” once you’ve made your choices.

A “Success” dialog box displays with an option to “Run this rule now on messages already in the current folder”. Click “OK”. I want to find out what emails are in my inbox from Whitson, so I select the check box.

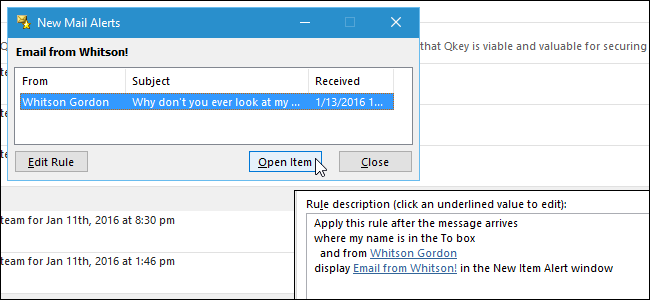
The “New Mail Alerts” dialog box will appear, demanding immediate action. I currently only have one email from Whitson in my inbox, so that’s the only one listed on this dialog box. However, if there were more emails from Whitson, they would all be listed here. If you want to view an email directly from this dialog box, select the email to view and click “Open Item”. Click “Close” to close the dialog box.
The “New Mail Alerts” dialog box stays open until you click “Close”, even when you open an email message from the dialog box and then close the message.

How to Create More Advanced Rules
When creating rules, you can select from additional, more specific options than are available on the main “Create Rule” dialog box. To do so, open the “Create Rule” dialog box, as described earlier in this article. Then click “Advanced Options”.

The first screen on the “Rules Wizard” dialog box displays a list of detailed conditions to check. Select the check boxes for the conditions you want to check for email notifications. I want to receive notifications when I receive emails from Whitson sent only to me, so I select those conditions.
The blue underlined text are links you click to specify the value(s) you want checked for in that condition. Once you select that condition, click the blue link on that condition in the “Step 2” box to edit the values.
Once you’ve selected the conditions you want to check, click “Next”.

Now, select options to indicate what should be done with a message you receive that matches the selected conditions. You can do things like move the message to a specific folder, forward it to one or more people, reply using a template, or mark it as read. I want to receive a Desktop Alert when I get an email message from Whitson, so I select the last option on the list, “display a Desktop Alert”. Once you’ve selected what you want done with the message, click “Next”.

The next screen provides options for setting exceptions to the rule, such as if you don’t want to get a notification if the message is a meeting invitation or update. Choose any exceptions you want to apply to your rule and click “Next”. I don’t want any exceptions, so I just click “Next” to skip this screen.

The last screen allows you to specify a name for the rule, and set up some rule options, including one to “Turn on this rule” immediately. If you want to run the rule immediately on messages already in the inbox, select the “Run this rule now on messages already in ‘Inbox’”.
Review the rule description under “Step 3” and click “Finish” when you’re done.

Now, when I receive an email from Whitson, a desktop alert displays on the Windows desktop. Note that this is different from the “New Mail Alerts” dialog box--instead, it's a native Windows notification. If you prefer this style of notification, you'll have to go through "Advanced Options" for every rule you create".

How to Edit Your Rules
Modifying, deleting, or even temporarily turning off your rules is easy. I want to modify my rule to display the “New Mail Alerts” dialog box rather than a “Desktop Alert”. To do this, I click the “Home” tab.

Click the “Rules” button in the “Move” section and select “Manage Rules & Alerts” from the drop-down menu.

The “Rules and Alerts” dialog box displays. On the “E-mail Rules” tab, click “Change Rule” and select “Edit Rule Settings” from the drop-down menu.

As discussed earlier, the first screen of the “Rules Wizard” displays a list of conditions you can check for on incoming email messages. The selections I made when I first set up the rule display at the top of the list and the description with the current settings displays in the box under “Step 2”. I don’t want to change the conditions, so I click “Next”. If you want to change the conditions on your rule, make your changes and then click “Next”.

On the screen listing the actions to take on incoming email messages (depending on the conditions), I disable the “display a Desktop Alert” option, which displays at the top of the list, and then click "Next".

Let's say you want to display the more in-your-face “New Mail Alerts” dialog box instead. Scroll down to the bottom of the list of actions and select “display a specific message in the New Item Alert window” check box. To customize the message that displays on the “New Mail Alerts” dialog box, click the “a specific message” link in the box under “Step 2”.

On the “Alert Message” dialog box, enter a message to display on the “New Mail Alerts” dialog box and click “OK”.

If you want to add or remove any exceptions, click "Next" to access the list of exceptions and make your changes. To change the name of the rule or change other options on the last screen of the "Rules Wizard", click "Next" again on the exceptions screen. I don't want to change anything else, so I click "Finish" on the actions screen to accept my changes and close the "Rules Wizard".

You’re returned to the “Rules and Alerts” dialog box. Click “OK” to close it. To run the rule immediately, click “Run Rules Now” at the top of the “E-mail Rules” tab.

On the “Run Rules Now” dialog box, in the “Select rules to run” box, select the check box for the rule you want to run and click “Run Now”.
NOTE: Once you’ve run the rule, the “Run Rules Now” dialog box does not close automatically. You must click “Close” to close it. The “Rules and Alerts” dialog box does not close automatically either, so click “OK” to close it.

The “New Mail Alerts” dialog box displays with your custom message at the top.

The Rules feature in Outlook provides many options for automatically handling your email messages. You can have specific messages moved into specific folders, perform actions on email messages with certain text in the subject line, or even delete messages automatically based on certain conditions. Outlook Rules may seem overwhelming at first because of all the options available. However, if you know how you want to manage certain email messages, it’s not that hard to create and manage your own rules.