Quick Links
The Lord of the Rings is easily my favorite movie of all time. (Which one, you ask? All three, obviously.) But the latest Blu-Ray collection has one glaring problem.
The Blu-Ray version of the Fellowship of the Ring: Extended Edition has a significantly altered color timing, resulting in a green hue across the entire movie. It only exists in Fellowship of the Ring, only in the Extended Edition, and only on Blu-Ray. The extended DVD version of Fellowship does not have this problem, nor does the theatrical Blu-Ray version of Fellowship, nor do the other two Extended Edition Blu-Rays. Check out the video below, which compares Fellowship's Extended and Theatrical Blu-Rays, to see what the change looks like (watch it in full screen, trust me). You can read more about the green tint issue here.
Thankfully, there is a fix. Editing master You_Too (the same person who did the color correction on the fantastic Star Wars: Despecialized Edition) wrote an AviSynth script to fix some of the more glaring color issues. His solution, however, only exists in a buried forum post and a now-dead blog post that, if you aren't versed in AviSynth and other tools, may sound like Chinese. So I figured I'd put together a little how-to that explains a) how to run the script, and b) improves on it in a couple small ways. But to be clear: 99% of the credit for this process goes to You_Too and his hard work. I just added a small tweak here and there.
What You'll Need
To perform this process, you'll need to grab a few tools:
- A Windows PC (I imagine this is possible on other platforms, but I haven't looked into how to do it.)
- Your Blu-Ray copy of Fellowship of the Ring: Extended Edition
- A Blu-Ray drive, to rip the discs
- MakeMKV, to rip the discs
- AviSynth, a scripting language for video editing tasks
- MeGUI, a GUI for running AviSynth scripts
- The GiCocu plug-in for AviSynth (scroll down on this page to find it)
- The Dither package for AviSynth. Download the dither-1.27.1.zip file from this forum post.
- The MaskTools package for AviSynth, available in this forum post.
- The RemoveGrain v1.0b Plugin for AviSynth
- MKVToolNix to merge the resulting files into one movie (I recommend downloading the portable version.)
That seems like a lot, but don't worry, everything has a purpose, and it will all come together in the steps below. Just save all these files to your desktop for now.
Step One: Rip Your Blu-Ray Discs
Before you start the color correction, you'll need to rip the movie to your computer. So hook up your Blu-Ray drive and install MakeMKV before continuing.
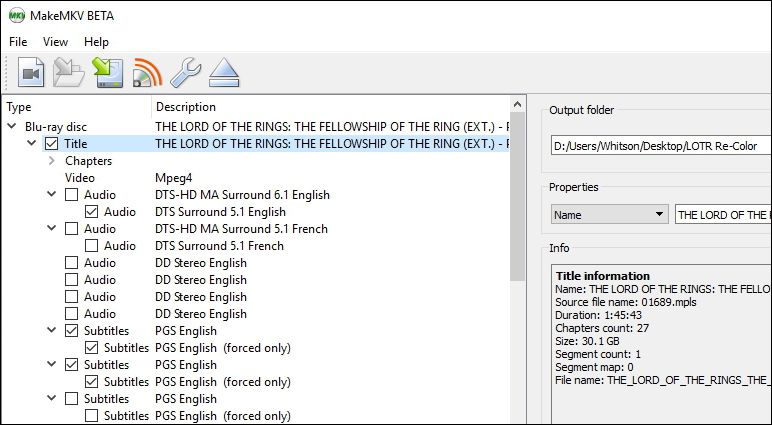
Start MakeMKV, insert Disc One of the movie, and press "Open Disc". When it's done reading the disc, pick the title, language, and subtitles you want to rip. The title you want is the largest one, and you'll definitely want the main DTS English audio (some may want the full DTS-HD MA audio as well, and that's fine--I generally only rip the 5.1 DTS "core" to save space). I also recommend checking the first four subtitle boxes, as shown above. This will include English subtitles for the whole movie, and English subtitles just for the Elvish parts. If you just want subtitles for Elvish lines, select the second set of checkboxes.
With those settings selected, your window should look exactly like this:
Next, choose your output folder on the left-hand side and press the "Make MKV" button. It'll take awhile to rip, but when it's done, you'll have a big ol' MKV file on your hard drive--with the first half of the movie. Rename it to FOTR-D1.mkv and put it in a folder wherever you want. I created a folder on my desktop called "LOTR Re-Color", where I recommend storing all the video files, audio files, and scripts you end up creating for this project.
Repeat this whole process for Disc Two, and name the resulting file FOTR-D2.mkv. You can get started on Step Two below while the discs are ripping.
Step Two: Set Up AviSynth and Its Plugins
You'll need to install a couple programs and plugins before going through the rest of this process, so let's do that now.
If you haven't already, download AviSynth, MeGUI, GiCocu, the Dither package, the MaskTools package, RemoveGrain, and MKVToolNix from the links in the "What You'll Need" section of this guide.
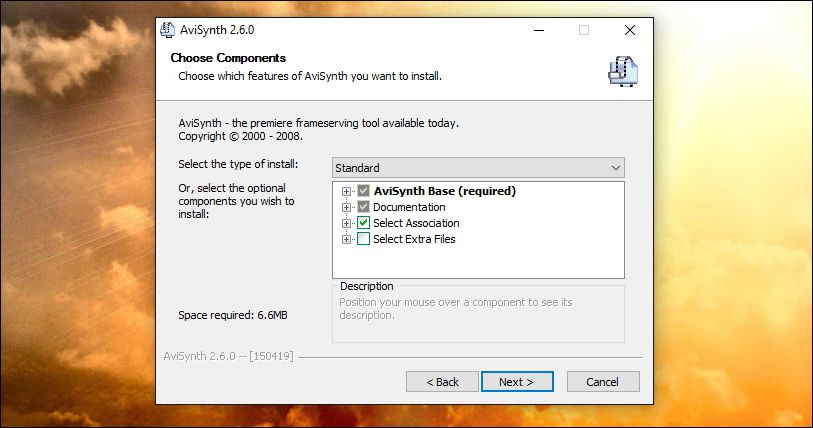
First, install AviSynth. It's a normal Windows program, so just double-click the EXE file and follow the prompts to install it to your system.
MeGUI and MKVToolNix are portable applications, which means you don't need to install them--just unzip the files to any folder you want (I created folders called "MeGUI" and "MKVToolNix" in my "LOTR Re-Color" folder from Step One).
GiCocu, Dither, MaskTools, and RemoveGrain are all plugins for AviSynth that come packaged in ZIP files. Open each ZIP file, and extract the following files into AviSynth's plugins folder (by default located in
C:\Program Files (x86)\AviSynth\plugins
):
- GiCoCu.dll (from the GiCoCu ZIP file)
- dither.avsi (from the Dither ZIP file)
- mt_xxpand_multi.avsi (from the Dither ZIP file)
- dither.dll (from the win32 folder in the Dither ZIP file)
- avstp.dll (from the win32 folder in the Dither ZIP file)
- mt_masktools-26.dll (from the MaskTools ZIP file)
- RemoveGrainS.dll (from the RemoveGrain ZIP file)
The final folder will probably look something like this:
Those should be the only plugins you need for this process, along with what's already in AviSynth's plugins folder.
Step Three: Create Your Scripts
You'll need to create four text files for this process: a "Curves" file, which holds the color correction information; an AviSynth script, which runs the commands; and two "qp files", which will help us remove the pause in the middle of the movie.
First, open Notepad and paste in the following text:
# GIMP Curves File

            0 0 16 20 -1 -1 45 65 -1 -1 81 106 -1 -1 -1 -1 -1 -1 -1 -1 -1 -1 -1 -1 -1 -1 -1 -1 225 240 -1 -1 255 255

            0 0 -1 -1 -1 -1 -1 -1 -1 -1 -1 -1 -1 -1 -1 -1 -1 -1 -1 -1 -1 -1 -1 -1 -1 -1 -1 -1 -1 -1 246 255 -1 -1

            0 0 -1 -1 -1 -1 -1 -1 -1 -1 -1 -1 -1 -1 -1 -1 -1 -1 -1 -1 -1 -1 -1 -1 -1 -1 -1 -1 -1 -1 -1 -1 255 246

            0 0 -1 -1 -1 -1 -1 -1 -1 -1 -1 -1 -1 -1 -1 -1 -1 -1 -1 -1 -1 -1 -1 -1 -1 -1 -1 -1 -1 -1 232 255 -1 -1

            0 0 -1 -1 -1 -1 -1 -1 -1 -1 -1 -1 -1 -1 -1 -1 -1 -1 -1 -1 -1 -1 -1 -1 -1 -1 -1 -1 -1 -1 -1 -1 255 255
Save the file as curves.cur in the same folder as the movie files.
Next, create a new file in Notepad and paste in the following text:
DirectShowSource("FOTR-D1.mkv", fps=23.976, audio=false, convertfps=true).AssumeFPS(24000,1001)

            ConvertToRGB(matrix="rec709")

            GiCoCu("curves.cur")

            ConvertToYV12(matrix="rec709")

            Tweak(startHue=140.0, endHue=200.0, sat=0.95)

            Tweak(startHue=200.0, endHue=270.0, sat=0.90)

            Tweak(startHue=270.0, endHue=340.0, hue=-10, sat=0.80)

            crop( 0, 140, 0, -140)

            gradfun3(thr=1.3)
Save the file as FOTR-D1.avs in the same folder as the movie files.
Now, create a new script with the exact same text, but with FOTR-D2.mkv in the first line instead of FOTR-D1.mkv. Name the script FOTR-D2.avs, and put it in the same folder as the movie files and other scripts.
Lastly, create two new text files: one called D1-pause.txt and one called D2-pause.txt. D1-pause.txt should contain the following:
151969 K
And D2-pause.txt should contain this text:
48 K
This will create "keyframes" at the end of Disc One and the beginning of Disc Two, so we can remove the five second pause in between the two halves of the movie.
At this point, here's what my project folder looked like with everything in place:
Make sure you have all of these files before continuing.
Step Four: Run the Scripts
Open MeGUI.exe and, on the AviSynth Script line at the top, click the "..." button. Choose the FOTR-D1.avs script you created in the last step and click OK. If all goes well, a video preview window should open, showing you what the resulting video will look like. You can close this window.
If, instead of a video preview, you get an error, make sure the correct plug-ins are installed and that you did everything else correctly up until this point.
On the "Video Output" line of MeGUI's main window, rename the output file to FOTR-D1-CC.mkv (or whatever you prefer). DO NOT overwrite or delete the original FOTR-D1.mkv file; we will need it later!
Then, click the Config button on the "Encoder Settings" line. Change the Target Playback Device to "DXVA". In the Quality box, type 16.5 and set the Preset to Medium. You can set the quality to a slightly higher number for a smaller file, but 16.5 is what I found to be the best balance between quality and file size (and will fit perfectly on a 25GB Blu-ray disc when we're done). Click OK.
Lastly, check the "Show Advanced Settings" box, and go to the "Misc" tab that appears along the top of the window. Check the "Use qp File" box, and press "..." to browse to the first qp file we created in the last step (D1-pause.txt).
Click the OK button to return to the main MeGUI window.
Now it's time for the main event! Click the "Queue" button in the top half of the window--the one next to the "Queue Analysis Pass" button--to start the encoding process.
This will take awhile (on my overclocked six-core i7, it took a little over three hours, so on typical machines it'll take even longer). Go take a break, grab a cup of tea, and let it do its thing. You can also continue using your computer during this time if you want.
When it's done, repeat all of step four using FOTR-D2.avs and D2-pause.txt. Note that the resulting files will not have any audio--that's okay, we're going to fix that in the final step.
Step Five: Merge the Files Into One Movie
At this point you should have four video files:
-
FOTR-D1.mkv(Disc One's original video and DTS audio) -
FOTR-D1-CC.mkv(Disc One's color corrected video, with no audio) -
FOTR-D2.mkv(Disc Two's original video and DTS audio) -
FOTR-D2-CC.mkv(Disc Two's color corrected video, with no audio)
Now it's time to merge them all together into one beautiful movie.
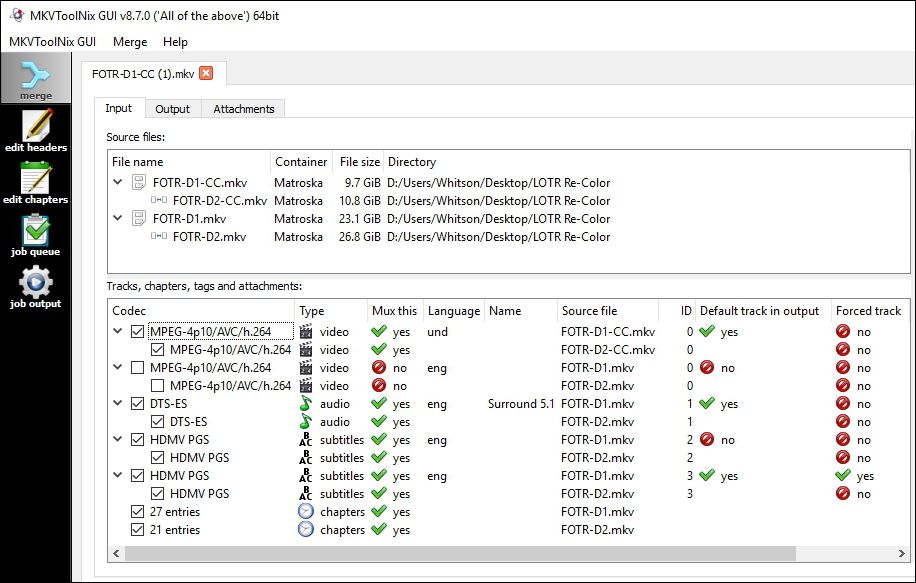
Open mkvtoolnix-gui.exe and click the "Add Source Files" button. Select FOTR-D1-CC.mkv. Then press Add Source Files again and select FOTR-D1.mkv. You should see both files show up in the top pane, and all the different tracks (video, audio, subtitles, and chapters) in the bottom pane.
Click on the second subtitle track, and in the right-hand pane, set "Default track flag" and "Forced track flag" to "Yes". This ensures the elvish subtitles always show up when you watch the movie.
Next, right-click on FOTR-D1-CC.mkv in the top pane and choose "Append Files". Select FOTR-D2-CC.mkv. Then, right-click on FOTR-D1.mkv, choose "Append Files" again, and select FOTR-D2.mkv.
Uncheck Disc One's original video in the bottom pane (both checkboxes). We don't want that in our final movie--we just want its audio and other stuff.
At this point, your window should look like the screenshot below.
Now, click the "Output" tab along the top, and click on the "Split Mode" dropdown. Choose "by parts based on timecodes" and enter the following into the box:
00:00:00-01:45:37,+01:45:45-03:48:18
You can also change the File Title if you like.
Lastly, give the resulting movie a filename in the Output File box at the bottom of the window. I used like FOTR-FINAL.mkv.
When everything is ready, click the "Start Muxing" button. It will combine the color corrected video and the original audio for both discs into one 208-minute epic.
Step Six (Optional): Burn the Color Corrected Movie to a Blu-Ray Disc
I use a home theater PC for all my movie watching, so if you're like me, you can stop here. Just open the final MKV file in your favorite video player, and you're done.
However, if you want to watch the movie on a Blu-Ray player (and your Blu-Ray player doesn't support a thumb drive with video files), you can burn your finished, color-corrected movie to a Blu-Ray disc. With the recommended settings in this post, it should be the perfect size for a 25GB Blu-ray. You'll just need a Blu-Ray burner, some blank discs, and two free programs: tsMuxeR and ImgBurn.
Unzip tsMuxeR wherever you want (it's portable, just like MeGUI and MKVToolNix) and install ImgBurn like a normal Windows program. Next, launch the tsMuxeR GUI. Click the "Add" button in the upper right-hand corner and add your FOTR-FINAL.mkv video to the project. Under Output, select "Blu-ray ISO", and click "Browse" next to the File Name box to select a location on your hard drive. Click the "Start Muxing" button to create the Blu-ray image.
When it's finished, open ImgBurn and select "Write Image File to Disc". Under Source, click the Browse button and select your newly-created ISO. Insert a blank Blu-ray disc and click the big Write button.
When it finishes, pop the disc in a Blu-ray player and fire it up. If all goes well, it should start playing movie right away. Enjoy!
What This Script Does
The information in this section isn't necessary to perform the above steps, but if you're curious what's happening in this process, here's an explanation of each line in the script.
The first line of the script, DirectShowSource("FOTR-D1.mkv", selects the video AviSynth will use as a source. You_Too's original script used the mt2s file from the Blu-Ray, but I ripped it as an MKV, since it's a little easier. So that line has been slightly altered.
The next few lines of the script are the actual color correction, and remain unchanged from You_Too's original script. You can read You_Too's forum post for information on how he found the ideal curves in Photoshop, but here's his explanation of what that portion of the script does:
First [the script] applies the curves, then reduces yellows by 5%, greens by 10% and shifts cyan towards blue and reduces it's saturation by 20%. This removes a bit of the oversaturation-look of yellow and neon-green, and makes the movie look less cyan-tinted in certain parts, with skies and water looking more natural. (Don't expect colorimetric precision though, since this film has already been badly recolored!)
Next, You_Too added a Blur(0.4) line, which I removed for my script:
It adds a very slight blur (almost not noticeable) to reduce the oversharpening which for no reason appears randomly throughout the movie.
You can add it back in if you want, just under the Tweak lines.
The crop( 0, 140, 0, -140) line does just what it sounds like:
Finally, it crops the black borders since they actually have colored artifacts in them which is brightened by the other adjustments.
I made one other change to the script at the end. In order to use GIMP curves, You_Too had to convert the video from YUV12 to RGB, apply the curves, then convert it back to YUV12 (as you can see in lines 2-4 of the script). Unfortunately, converting between YUV12 and RGB naturally creates some pretty awful color banding in gradients, which is very noticeable in certain scenes of Fellowship. But, that conversion is a necessary step in this script, which means I couldn't just remove it.
So, with the help of a few extra plugins, I added some dithering to fix the problem (represented by the Gradfun3(thr=1.3) line at the end of the script). Now, scenes with gradients look much more like the original Blu-Ray.
Lastly, I added the two qp files to the process, which remove the pause in the middle of the movie (where you'd switch from Disc One to Disc Two). The qp files tell AviSynth to turn the named frames--in this case, frame 151969 from Disc One and frame 48 from Disc Two--into "keyframes". When we split by timecode in MKVToolNix in Step Five, it will look for the nearest keyframes at those timecodes, and split it at those points. 151969 is the first frame of Disc One's black pause, and frame 48 is the first frame of the movie after Disc Two's black pause. With that pause out of the way, the movie will go straight from one scene to the next, as in the one-disc theatrical version.
If you have any issues with your final video not removing the pause correctly--either including some of the pause or cutting off part of the movie in the middle--try different frames here to see if it works. I had some weirdness in getting mine to work, but these frame numbers should, in theory, work for everyone going through this process.
I'd love to hear about any other ideas people have for this script, but I'm really happy with the resulting video. I watched the movie recently with some buddies and it looked fantastic. Many thanks again to You_Too for his original scripts and (I imagine) tireless work on this little project. Finally, we can watch Fellowship as it deserves to be seen!


