The new Windows Home Server Beta is available to the public for testing, and you might not have an extra machine to install it on. Here we take a look at using the free VMware Player to install it so you can test it out. In our final article on the series of installing WHS Vail in VMware products, today we look at installing it in the free VMware Player. So fare we have covered how to install Vail in VMware Workstation which offers a free 30 day trial, but requires a license after that. We also took a look at installing Vail on VMware Server which is completely free for personal use. Installing WHS Vail on VMware Player is pretty straight-forward, though you need to make sure to follow the correct steps and settings. Getting Started You'll need the following items to get started.
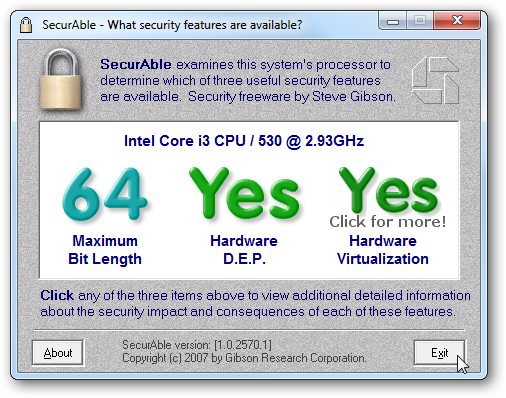
For this article we used a machine with a Core i3 processor and 8GB of RAM running Windows 7 Ultimate x64 and VMware Player 3.1. Verify Hardware Virtualization You will need to make sure your machine is capable of Hardware Virtualization and can use either SecurAble... Or Microsoft Hardware-Assisted Virtualization Detection Tool. If your machine isn't capable of Hardware Virtualization, it might be turned off so check your BIOS settings. Also you can update the BIOS and find the setting to enable it.
![sshot-2010-07-26-[20-03-00]](https://static1.howtogeekimages.com/wordpress/wp-content/uploads/2010/07/sshot201007262003001.png?q=50&fit=crop&w=750&dpr=1.5)
Install VMware Player If you don't already have it, you'll need to download and install the latest version of VMware Player (link below) where registration is required. First, download and install VMware Player (link below). It's a free download, but requires registration. Install it following the install wizard and accepting the defaults.

After it's finished, a restart will be required to complete the setup.
![sshot-2010-02-16-[19-14-34]](https://static1.howtogeekimages.com/wordpress/wp-content/uploads/2010/02/sshot20100216191434.png?q=50&fit=crop&w=750&dpr=1.5)
Setup VMware Player for WHS Vail The trick to getting it to install successfully is to make sure to go through the correct steps and not use the Easy Install Wizard. Open VMware Player and click on Create a New Virtual Machine.
![sshot-2010-07-28-[01-14-48]](https://static1.howtogeekimages.com/wordpress/wp-content/uploads/2010/07/sshot20100728011448.png?q=50&fit=crop&w=750&dpr=1.5)
When the New Virtual Machine Wizard starts, select I will install the operating system later.
![sshot-2010-07-28-[05-12-53]](https://static1.howtogeekimages.com/wordpress/wp-content/uploads/2010/07/sshot20100728051253.png?q=50&fit=crop&w=750&dpr=1.5)
For the Guest Operating System select Windows Server 2008 x64 and click Next.
![sshot-2010-07-28-[02-32-40]](https://static1.howtogeekimages.com/wordpress/wp-content/uploads/2010/07/sshot20100728023240.png?q=50&fit=crop&w=750&dpr=1.5)
Give the VM a name...
![sshot-2010-07-28-[02-33-01]](https://static1.howtogeekimages.com/wordpress/wp-content/uploads/2010/07/sshot20100728023301.png?q=50&fit=crop&w=750&dpr=1.5)
Now you need to Specify Disk Capacity where the minimum for Vail is 160GB. We had best results creating the disk as a single file versus splitting them into multiple files.
![sshot-2010-07-28-[02-33-32]](https://static1.howtogeekimages.com/wordpress/wp-content/uploads/2010/07/sshot20100728023332.png?q=50&fit=crop&w=750&dpr=1.5)
Look over everything and make sure it looks correct, if not you can go back and make adjustments. You can click Finish and customize the hardware later or go ahead and make the selections now.
![sshot-2010-07-28-[02-33-45]](https://static1.howtogeekimages.com/wordpress/wp-content/uploads/2010/07/sshot20100728023345.png?q=50&fit=crop&w=750&dpr=1.5)
When customizing the hardware select Network Adapter and for the network connection select Bridged and check Replicate physical network connection state. This will make the server act as if it were a separate physical machine on your network.
![sshot-2010-07-30-[00-30-04]](https://static1.howtogeekimages.com/wordpress/wp-content/uploads/2010/07/sshot20100730003004.png?q=50&fit=crop&w=750&dpr=1.5)
For memory the minimum requirement is 1GB but if you have extra RAM you might want to bump it up a bit.
![sshot-2010-07-28-[02-35-19]](https://static1.howtogeekimages.com/wordpress/wp-content/uploads/2010/07/sshot20100728023519.png?q=50&fit=crop&w=750&dpr=1.5)
For the CD/DVD select to use an ISO and browse to the location of your VailInstallDVD.iso file.
![sshot-2010-07-30-[00-30-04]](https://static1.howtogeekimages.com/wordpress/wp-content/uploads/2010/07/sshot201007300030041.png?q=50&fit=crop&w=750&dpr=1.5)
Review your settings and if everything looks good click Finish.
![sshot-2010-07-28-[02-36-05]](https://static1.howtogeekimages.com/wordpress/wp-content/uploads/2010/07/sshot20100728023605.png?q=50&fit=crop&w=750&dpr=1.5)
Now that everything is setup you can start the VM.
![sshot-2010-07-28-[02-39-45]](https://static1.howtogeekimages.com/wordpress/wp-content/uploads/2010/07/sshot20100728023945.png?q=50&fit=crop&w=750&dpr=1.5)
If you get a hardware devices message just check Do not show this hint again then click OK.
![sshot-2010-07-28-[02-40-24]](https://static1.howtogeekimages.com/wordpress/wp-content/uploads/2010/07/sshot20100728024024.png?q=50&fit=crop&w=750&dpr=1.5)
Also, if you get an Software Update message click on Remind Me Later.
![sshot-2010-07-29-[19-25-44]](https://static1.howtogeekimages.com/wordpress/wp-content/uploads/2010/07/sshot20100729192544.png?q=50&fit=crop&w=750&dpr=1.5)
Now you can start the installation process of WHS Vail.
![sshot-2010-07-28-[02-40-43]](https://static1.howtogeekimages.com/wordpress/wp-content/uploads/2010/07/sshot20100728024043.png?q=50&fit=crop&w=750&dpr=1.5)
During the installation a message will come up at the bottom of Player prompting you to run VMware Tools. We don't need to install that now while we have Vail installing, so click Remind me later.
![sshot-2010-07-29-[00-39-57]](https://static1.howtogeekimages.com/wordpress/wp-content/uploads/2010/07/sshot20100729003957.png?q=50&fit=crop&w=750&dpr=1.5)
The message will leave the screen and the Vail installation will continue.
![sshot-2010-07-28-[02-44-24]](https://static1.howtogeekimages.com/wordpress/wp-content/uploads/2010/07/sshot20100728024424.png?q=50&fit=crop&w=750&dpr=1.5)
The amount of time it takes to install will vary based on your hardware. On our Core i3 system with 8GB of RAM the install took about a half hour. Remember that the VM will restart multiple times, there isn't much interaction you need to do while Vail installs. For more details check out our article on how to install WHS Vail.
![sshot-2010-07-28-[03-34-44]](https://static1.howtogeekimages.com/wordpress/wp-content/uploads/2010/07/sshot20100728033444.png?q=50&fit=crop&w=750&dpr=1.5)
After several restarts and entering in the correct data, you can start using your new Virtual Vail Server! At the CTRL+ALT+DELETE screen to log on screen click Virtual Machine and Send Ctrl+Alt+Del.
![sshot-2010-07-28-[03-51-21]](https://static1.howtogeekimages.com/wordpress/wp-content/uploads/2010/07/sshot20100728035121.png?q=50&fit=crop&w=750&dpr=1.5)
Now you can login to Vail with the credentials you entered in during the install.
![sshot-2010-07-28-[03-51-51]](https://static1.howtogeekimages.com/wordpress/wp-content/uploads/2010/07/sshot20100728035151.png?q=50&fit=crop&w=750&dpr=1.5)
Success! Now we can start exploring what the new version of WHS has to offer, and can connect other VM's or physical machines on your network to it. We will be covering how to do that in future articles.
![sshot-2010-07-28-[03-36-31]](https://static1.howtogeekimages.com/wordpress/wp-content/uploads/2010/07/sshot20100728033631.png?q=50&fit=crop&w=750&dpr=1.5)
Keep in mind that you won't be able to connect to it if your machine already has the WHS Version 1 connector software installed.

Install VMware Tools The final thing we need to do is install VMware Tools for a more fluid experience while testing it out. Click on Virtual Machine and Install VMware Tools.
![sshot-2010-07-28-[03-37-27]](https://static1.howtogeekimages.com/wordpress/wp-content/uploads/2010/07/sshot20100728033727.png?q=50&fit=crop&w=750&dpr=1.5)
When AutoPlay comes up click on Run setup.exe.
![sshot-2010-07-28-[03-38-18]](https://static1.howtogeekimages.com/wordpress/wp-content/uploads/2010/07/sshot20100728033818.png?q=50&fit=crop&w=750&dpr=1.5)
Just follow the install wizard using the Typical Setup Type.
![sshot-2010-07-28-[03-39-25]](https://static1.howtogeekimages.com/wordpress/wp-content/uploads/2010/07/sshot20100728033925.png?q=50&fit=crop&w=750&dpr=1.5)
A restart of the VM will be required to complete the installation process.
![sshot-2010-07-28-[03-42-01]](https://static1.howtogeekimages.com/wordpress/wp-content/uploads/2010/07/sshot20100728034201.png?q=50&fit=crop&w=750&dpr=1.5)
Test Vail Out If you go to another machine on your network, you will see the WHS Vail server listed under Network...just like it were a real machine. You will be able to RDP into it and use the Dashboard which is replacing the Console from version 1.
![sshot-2010-07-29-[01-23-00]](https://static1.howtogeekimages.com/wordpress/wp-content/uploads/2010/07/sshot20100729012300.png?q=50&fit=crop&w=750&dpr=1.5)
You should be able to double click on the virtual Vail server, enter user name and password then have access to it's shared folders from other machines.
![sshot-2010-07-30-[01-13-48]](https://static1.howtogeekimages.com/wordpress/wp-content/uploads/2010/07/sshot20100730011348.png?q=50&fit=crop&w=750&dpr=1.5)
Here we are using the Dashboard on a physical machine and backing it up to the virtual Vail server. You can use it just like you would use it if it were on an actual box on your network.
![sshot-2010-07-28-[217-30-16]](https://static1.howtogeekimages.com/wordpress/wp-content/uploads/2010/07/sshot201007282173016.png?q=50&fit=crop&w=750&dpr=1.5)
Conclusion There is a lot to explore in the new version of Home Server and using it on a VM is a great way to test it, without having to worry about crashing an actual box. If you're a home server enthusiast or just curious about trying it out, installing Vail as a virtual machine is a great way to do it, without the need for an extra physical machine. Also, the Vail beta and VMware Player are both free which is always cool. Download VMware Player -- Registration Required Download Windows Home Server Vail from Microsoft Connect