The ability to automate tracks is one of GarageBand's more powerful features. Automation allows you to adjust the volume, panning, echo, and other effects at different points in your song. The way GarageBand implements this feature is actually very straightforward and intuitive, and easy to get started with.
How to Automate a Track
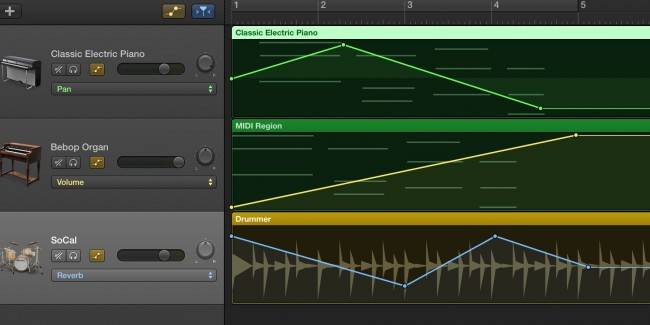
To begin automating a track, click the unlabeled "Automation Button" at the top of the instrument list, which should toggle and turn yellow. Make sure you have at least one track and at least one loop in that track, or you won't have anything to automate.

Your loops will turn dark, and you should now see a dropdown window of all the different options you can automate for each instrument. We'll start by automating the track's volume.
Note that if you want to add new loops or edit existing ones, you will have to disable the automation editor by clicking the button again.

Start by holding down Command and clicking anywhere in the track region, which will create a new point. You can make new points by Command-clicking and dragging existing points around with your mouse. By creating slopes in between points, you can automatically adjust the volume as the track plays, creating a fade-in or fade-out effect. With sharp drops, you can effectively mute certain areas of a track.

If you click the dropdown menu, you can see a list of the options you can automate.
The basic options for every instrument are Volume, Pan, Echo and Reverb. Volume controls how loud a track is, Pan shifts a track's sound towards one ear, and Echo and Reverb are very similar with a key difference: an echo on a track is distinct from the original track, almost like the track was copied and delayed for a short time, and a reverb on the track is a very short echo that sounds blended together with the original track.

The "Smart Controls" section of the options vary from instrument to instrument. For example, the options to configure for the drums are completely different from the piano. Actually, the options for the drums provide a level of control over the Apple's automatic drums that you wouldn't have otherwise.

In this example, the volume of the drum's Hi Hats starts high and slowly decreases over the course of the track. You can control each piece of the drum individually, adjusting the volume or turning elements on and off.

How to Automate the Equalizer
The built in Visual equalizer (or EQ) is a very powerful tool, and gets even more powerful with the ability to automate it. If you don't already have the EQ enabled, you can enable it by double-clicking on an instrument and clicking the "EQ" button.

Now that the EQ is enabled, it will show up in the dropdown for the possible automations, with its own expandable menu. This menu contains over 30 options to automate, but you'll only really use a few. You can configure the EQ however you want, and anything that you don't automate will stay the same throughout the track.

The EQ has a high and low shelf, a high and low cutoff, and 4 peaks. For each of these, you can automate the frequency, which controls the horizontal position on the EQ. For the shelfs and peaks, you can control the gain, which controls how much quieter or louder that frequency will be. You can switch each point on and off with the On/Off setting, and you can even control the Q-factor, which controls the tightness of the peak, something you can't do without automation in the Visual EQ.