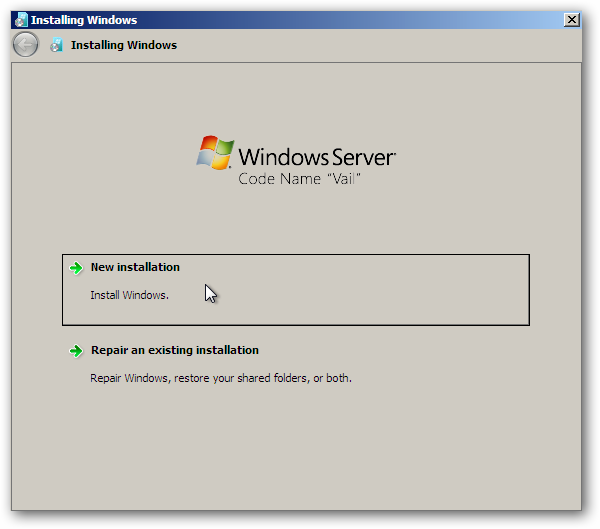
The newest version of Windows Home Server code named "Vail" is available for the public to test through Microsoft Connect. Here we take a screenshot tour of the install process on a VM or physical machine. This week we covered how to setup and install WHS Beta "Vail" on VMware Workstation and the free VMware Server. However, we haven't gone through the actual installation process of the server. The installation process is pretty straight-forward and here we take a look at the steps. Install WHS Vail The install process is the same whether you're running it on a VM or physical machine. The Install Wizard starts click on New Installation. Select the disk you want to install it on. You will need to make sure to have a minimum of 160GB allocated for the install, preferably a fresh and clean formatted drive. Check I understand that if I click Install, all files and folders on my primary hard drive will be deleted then click the Install button.
![sshot-2010-07-26-[22-17-52]](https://static1.howtogeekimages.com/wordpress/wp-content/uploads/2010/07/sshot20100726221752.png?q=50&fit=crop&w=750&dpr=1.5)
The install process kicks off and your machine will restart several times during the process.
![sshot-2010-07-29-[19-30-52]](https://static1.howtogeekimages.com/wordpress/wp-content/uploads/2010/07/sshot20100729193052.png?q=50&fit=crop&w=750&dpr=1.5)
![sshot-2010-07-26-[22-36-48]](https://static1.howtogeekimages.com/wordpress/wp-content/uploads/2010/07/sshot201007262236481.png?q=50&fit=crop&w=750&dpr=1.5)
After a few restarts, you'll be presented with the screen to select your Region or Country Settings.
![sshot-2010-07-26-[23-36-34]](https://static1.howtogeekimages.com/wordpress/wp-content/uploads/2010/07/sshot20100726233634.png?q=50&fit=crop&w=750&dpr=1.5)
Agree to the Terms of Service and the EULA.
![sshot-2010-07-26-[23-37-13]](https://static1.howtogeekimages.com/wordpress/wp-content/uploads/2010/07/sshot20100726233713.png?q=50&fit=crop&w=750&dpr=1.5)
Enter in your product key. A key wasn't needed when the beta first came out, but they now offer them through Windows Connect so we went ahead and entered it in.
![sshot-2010-07-26-[23-42-09]](https://static1.howtogeekimages.com/wordpress/wp-content/uploads/2010/07/sshot20100726234209.png?q=50&fit=crop&w=750&dpr=1.5)
When you get to the Personalize your server screen enter in the name for your server, password, and PW hint.
![sshot-2010-07-26-[23-43-24]](https://static1.howtogeekimages.com/wordpress/wp-content/uploads/2010/07/sshot20100726234324.png?q=50&fit=crop&w=750&dpr=1.5)
Select how you want to keep your server up-to-date, this is completely up to you on what setting to use and you can change them later in the Vail Dashboard.
![sshot-2010-07-29-[19-58-55]](https://static1.howtogeekimages.com/wordpress/wp-content/uploads/2010/07/sshot20100729195855.png?q=50&fit=crop&w=750&dpr=1.5)
Now installation will continue with updating and preparing the server. In our tests it actually did take about 30 minutes to fully complete.
![sshot-2010-07-26-[23-54-25]](https://static1.howtogeekimages.com/wordpress/wp-content/uploads/2010/07/sshot20100726235425.png?q=50&fit=crop&w=750&dpr=1.5)
Again you will notice it restart a few times before it's ready to use.
![sshot-2010-07-26-[23-48-01]](https://static1.howtogeekimages.com/wordpress/wp-content/uploads/2010/07/sshot20100726234801.png?q=50&fit=crop&w=750&dpr=1.5)
Success! Vail has been successfully installed and is ready to use. Close out of this message and you'll be taken to the Vail desktop and can start setting it up.
![sshot-2010-07-27-[00-01-59]](https://static1.howtogeekimages.com/wordpress/wp-content/uploads/2010/07/sshot20100727000159.png?q=50&fit=crop&w=750&dpr=1.5)
![sshot-2010-07-29-[20-17-22]](https://static1.howtogeekimages.com/wordpress/wp-content/uploads/2010/07/sshot20100729201722.png?q=50&fit=crop&w=750&dpr=1.5)
That is all there is to it! You can then get started by installing the latest updates, connecting machines on your network, schedule backups...etc. If you don't have an extra machine to test Vail, make sure to check out our articles on installing it on VMware Workstation and VMware Server. Just remember that if you already have Windows Home Server Version 1, don't replace it with Vail because it's still in Beta and isn't as stable as the Windows 7 Beta was. There is also news that Vail Beta 2 should be released in the next few weeks...hopefully. Download Windows Home Server Code Named Vail from Microsoft Connect