Quick Links
The Amazon Echo is a fantastic tool for using your voice to manage everything from shopping lists to music play lists, but what if you have other people in your household? Read on as we show you how to link multiple Amazon accounts to the Echo for shared music, lists, and more.
Why Do I Want To Do This?
If you're the only one in your household and/or the only person who does any purchasing through Amazon, then this tutorial probably isn't for you (but you may still find that multiple profiles are useful for your family or roommates, so we'd encourage you to keep reading).
For people with multi-person households, especially where members of that household all have purchased various content on Amazon like music and audio books, it makes sense to enable shared profiles so that you can, for example, play songs and albums through the Echo system that your spouse or roommate have purchased.
In addition to sharing music you also can share shopping lists, to-dos, calendar entries, and other useful features available on the Echo/Alexa system, perfect for ensuring that whoever does the shopping has full access to everything added to the collective shopping list and other shared household tasks.
Note: There is one minor caveat worth noting: giving someone access via shared profiles also gives them access to the purchasing capacity of your Amazon Echo. You may with to turn off voice-based purchasing (or enable a PIN code) in the Settings section of the Amazon Alexa app.
Adding A Profile To Your Amazon Echo
Let's take a look at how to add a profile to your Amazon Echo. You can perform all these actions either by using the Amazon Alexa app on your smart device or by visiting echo.amazon.com while logged into the Amazon account of the primary Echo user. For easier to read and larger screenshots we opted to use echo.amazon.com for the tutorial but the menu layout and function is identical.
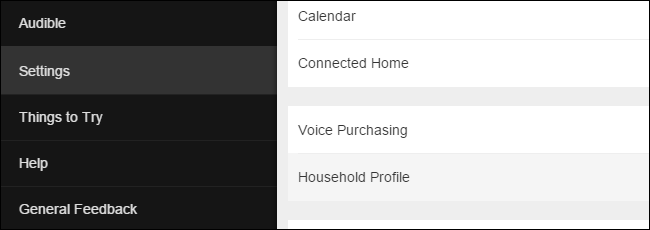
To get started navigate to the menu by tapping the menu button on the Amazon Alexa app or simply loading the echo.amazon.com portal. Select "Settings" from the side menu and then select "Household Profile".
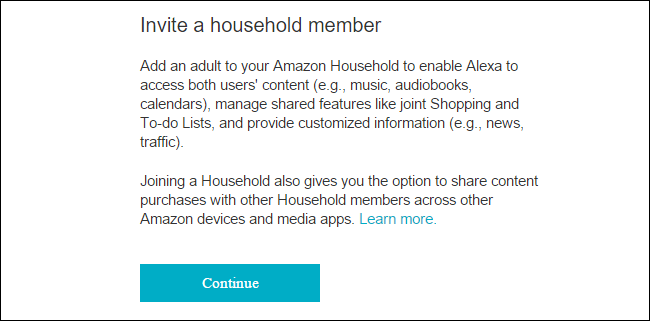
You'll be prompted with a summary of the Amazon Household system and asked if you want to continue. Select "Continue" once you've read over the summary.
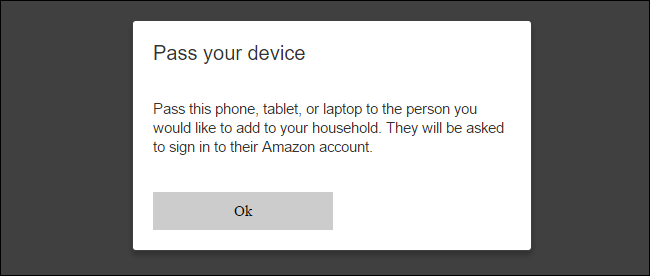
Next you'll be prompted to pass the device or computer to the other person, as seen above. Once you click "OK" they'll need to input their Amazon login credentials to authorize their addition to your Amazon Echo.
After their credentials are verified they'll be presented with a summary of the Amazon Echo/Alexa sharing experience that runs through everything that will be shared (music, audio books, calendars as well as joint-managed to-do and shopping lists). After reading over the summary and the information about Alexa voice processing and data collection, select "Join Household" to complete the process. You'll see a confirmation process welcoming you to the household of the primary account holder.
Although it looks like you're all done here, there's one final step before the process is officially over. The user you just added to your Echo needs to either download and install the Amazon Alexa app on their smart device (a recommended step, regardless) or visit echo.amazon.com while logged into their Amazon account so that they may accept the terms and agreements of the Alexa voice assistant program. Until they agree to the user agreement their profile will not be accessible on the Echo and all profile-related commands will be met with a prompt for the user to go accept the terms of service.
Now that we've invited the user, set up the profile sharing, and accepted the terms of service, it's time to take a look at how to actually use multiple profiles on the Echo.
Switching Between Profiles
Once you've completed all the steps in the previous section it's easy to jump between profiles. When using commands related to the profile system you can use the word "account" or "profile" interchangeable as Alexa responds to both terms. We prefer using "profile" as it most naturally fits with the function of the profile system on the Echo.
First, if you're not sure which profile you're currently on you can say:
Alexa, whose profile is this?
In turn, you'll get a response like "In Jason's profile". You can then switch between profiles one of two ways by saying:
Alexa, switch profiles.
Alexa, switch to [Name]'s profile.
If there are only two Amazon accounts links to the Echo then you can stick to "switch profiles". If you have more than one account linked to the Echo then it is much faster to switch profiles by name like "switch to Steve's profile".
Once you've switched profiles you can use all the commands you would normally use when speaking with Alexa but the commands will have access to the content of the currently active profile. (Thus, if your spouse or roommate is the huge music fan who does all the music purchasing, you'd want to switch to their profile when using the Echo as a jukebox).
Removing A Profile From Your Amazon Echo
If a member leaves your household or you simply decide to remove them from the device for other reasons, doing so is easy. To remove a household member from your Amazon Echo simply open up the Amazon Alexa app or visit echo.amazon.com as we did in the first step.
There is one element to this process we want to emphasize: once you remove someone from your Amazon Household you cannot re-add them for 180 days. If you remove someone in error you'll need to contact Amazon's support center to get them put back onto the account as you will no longer be able to manually add them in.
With that in mind let's take a look at removing someone (if you're certain you wish to remove them).
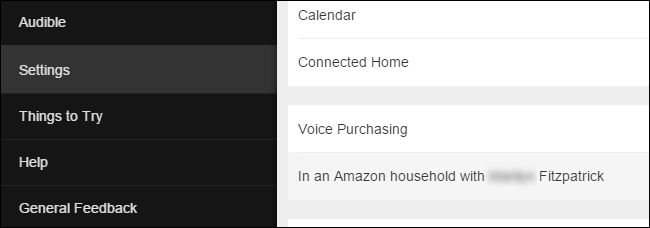
When you return to the Settings section and scroll down to the location where we originally found "Household Profile" you'll now find an entry that reads "In an Amazon household with [Name]". Select that entry.
You'll be prompted to reauthorize your Amazon credentials and then you'll be presented with the screen above that allows you to select and then remove the other user.
In addition to removing users yourself the users you've added can also remove themselves by repeating the above steps. (So if you found this tutorial because you're trying to remove yourself from your roommate's Alexa-enabled device you can repeat the above steps an instead select "Leave" beside your name to initiate the removal process yourself.)
Have a pressing question about the Amazon Echo or the Alexa voice-assistant? Shoot us an email at ask@howtogeek.com and we'll do our best to answer it.


