Quick Links
The Quick Launch bar, which was removed in Windows 7, can be added back to the Taskbar in Windows 7, 8, and 10. You can also add any programs you want to the Quick Launch bar and we'll show you how.
We're going to show you how to add programs to the Quick Launch bar in Windows 10 using an option on the Send To menu to send a shortcut to the Quick Launch bar. The procedure here works in Windows 7 and 8 as well.

Add the Quick Launch Option to the Send to Menu
To get started, we need to add the Quick Launch option to the Send to menu. To do this, press Windows+R on your keyboard to open the Run dialog box. Type
shell:sendto
in the "Open" box and click the "OK" button or press Enter.
NOTE: The procedure in this section only has to be done once. Then, you can add as many programs as you want to the Quick Launch bar using the Quick Launch option on the Send to menu.

The SendTo folder opens in File (or Windows) Explorer. Right-click on an empty area in the right pane and go to New > Shortcut.

On the first screen of the Create Shortcut dialog box, enter the following path into the "Type the location of the item" box. Then, click "Next" to continue.
%APPDATA%\Microsoft\Internet Explorer\Quick Launch

The name of the shortcut defaults to the name of the folder Quick Launch. If you want to change the name, type in a new one. Click "Finish" to create the shortcut.

The Quick Launch shortcut is added to the SendTo folder. Don't close the Explorer window quite yet.

Add an Application to the Quick Launch Bar
Now, we'll add an application to the Quick Launch bar. To add an application to the Quick Launch bar, we want to send that application's shortcut to the Quick Launch bar. In File (or Windows) Explorer, find the executable (.exe) file for the application you want to add. Generally, you'll find .exe files for programs in either C:\Program Files or C:\Program Files (x86). When you find the .exe file, right-click on that file and go to Send to > Desktop (create shortcut).
NOTE: Follow the procedures in this section for each application you want to add.

Rename the new shortcut to what you want displayed on the Quick Launch bar (if you decide to show text on the items). Then, right-click on the shortcut and go to Send to > Quick Launch.

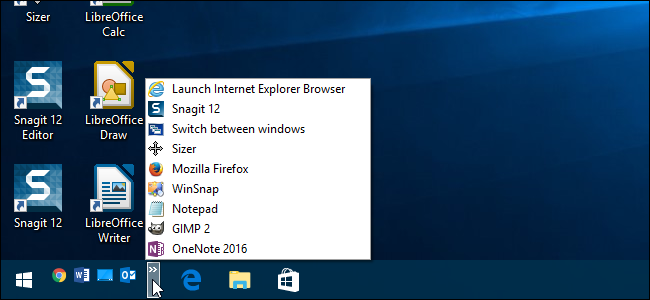
You will now see the application on the Quick Launch menu. If it doesn't display in the part of the Quick Launch menu that displays on the Taskbar, click the double arrow button to see the rest of the Quick Launch menu.

If you want the application displayed on the Taskbar instead of in the popup list of remaining Quick Launch items, you can drag and drop the application item from the popup list to the Taskbar.
Remember, you can show more applications on the Taskbar portion of the Quick Launch bar---you can see how in our guide to adding the Quick Launch menu back to Windows 7, 8, and 10.

If you decide to remove an application from the Quick Launch bar, simply open File (or Windows) Explorer, navigate to the Quick Launch folder.
%APPDATA%\Microsoft\Internet Explorer\Quick Launch
Select the shortcut for the applications you want to remove and press the Delete key.

Now that you've added the application to the Quick Launch bar, you can go back to the shortcut you created for the application on the Desktop and delete it, if you don't want it. You can now quickly access your applications without cluttering up your Taskbar or Desktop.