If you're a Windows Home Server enthusiast you probably want to test out the new version code named Vail. You might not have an extra box to test it on, so here we take a look at installing it on VMware Workstation. Getting Started You'll need the following items to get started.
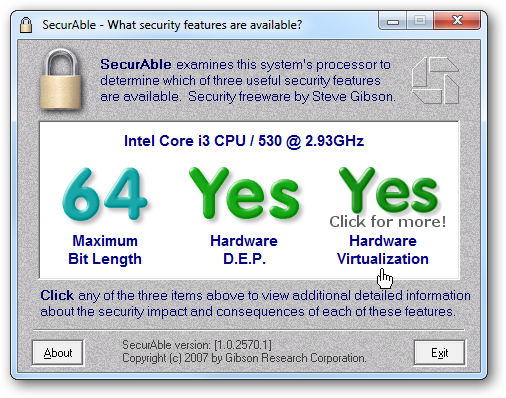
For this article we used a machine with a Core i3 processor and 6GB of RAM running Windows 7 Ultimate x64 and VMware Workstation 7.1. Hardware Virtualization To start out you'll need to make sure your machine is capable of Hardware Virtualization. If it isn't, you might want to check through your BIOS settings to enable it. Also check for and install any BIOS updates that are available for your machine. An excellent utility to quickly find out if it's capable of Hardware Virtualization is SecurAble. There is no installation needed...just download the file and run it. Install VMware If you don't have it already, download and install VMware Workstation (link below). If you already have the free VMware Player installed, you'll be prompted to uninstall that first. Don't worry about losing any VMs that you created in Player as Workstation comes with a version of Player as well.
![sshot-2010-07-22-[20-33-11]](https://static1.howtogeekimages.com/wordpress/wp-content/uploads/2010/07/sshot20100722203311.png?q=50&fit=crop&w=750&dpr=1.5)
A restart is required to complete the uninstall of VMware Player.
![sshot-2010-07-22-[20-36-22]](https://static1.howtogeekimages.com/wordpress/wp-content/uploads/2010/07/sshot20100722203622.png?q=50&fit=crop&w=750&dpr=1.5)
When you get back from the restart or are just beginning the install, go through the wizard accepting the defaults of a Typical Install. You'll also be asked to enter your license number during the process or continue with the free trial.
![sshot-2010-07-22-[20-44-07]](https://static1.howtogeekimages.com/wordpress/wp-content/uploads/2010/07/sshot20100722204407.png?q=50&fit=crop&w=750&dpr=1.5)
Again a reboot will be required to finish the installation.
![sshot-2010-07-22-[20-47-20]](https://static1.howtogeekimages.com/wordpress/wp-content/uploads/2010/07/sshot20100722204720.png?q=50&fit=crop&w=750&dpr=1.5)
Creating New Virtual Machine Once it's installed you'll see the VMware Workstation icon in the Taskbar. Launch it from there and click on New Virtual Machine.
![sshot-2010-07-22-[20-53-44]](https://static1.howtogeekimages.com/wordpress/wp-content/uploads/2010/07/sshot20100722205344.png?q=50&fit=crop&w=750&dpr=1.5)
When the New Virtual Machine Wizard starts, click on Custom (advanced) configuration.
![sshot-2010-07-22-[20-56-03]](https://static1.howtogeekimages.com/wordpress/wp-content/uploads/2010/07/sshot20100722205603.png?q=50&fit=crop&w=750&dpr=1.5)
In the next step of the wizard just keep the defaults and select Next.
![sshot-2010-07-22-[20-57-18]](https://static1.howtogeekimages.com/wordpress/wp-content/uploads/2010/07/sshot20100722205718.png?q=50&fit=crop&w=750&dpr=1.5)
Now select I will install the operating system later. This will make the install process easier by configuring the correct VMware settings first and not have it do an unattended install.
![sshot-2010-07-22-[23-29-46]](https://static1.howtogeekimages.com/wordpress/wp-content/uploads/2010/07/sshot20100722232946.png?q=50&fit=crop&w=750&dpr=1.5)
For the Guest Operating System select Windows Server 2008 x64.
![sshot-2010-07-22-[23-30-20]](https://static1.howtogeekimages.com/wordpress/wp-content/uploads/2010/07/sshot20100722233020.png?q=50&fit=crop&w=750&dpr=1.5)
Give your VM a name that makes sense. If you end up installing a lot of different VMs, giving them unique names helps keep them all straight.
![sshot-2010-07-22-[23-30-49]](https://static1.howtogeekimages.com/wordpress/wp-content/uploads/2010/07/sshot20100722233049.png?q=50&fit=crop&w=750&dpr=1.5)
For this article we didn't change the processor settings, we kept them with the defaults. This is something you might want to experiment with later though.
![sshot-2010-07-22-[23-32-54]](https://static1.howtogeekimages.com/wordpress/wp-content/uploads/2010/07/sshot20100722233254.png?q=50&fit=crop&w=750&dpr=1.5)
Now decide the amount of memory you want to allocate for the Vail VM. Keep in mind it will be using the host computer memory, so if you don't want big slow downs with other tasks while the VM is running, you can set it to the minimum requirement which is 1GB. On our system we have some memory to spare so we bumped it up to 2GB.
![sshot-2010-07-22-[23-33-11]](https://static1.howtogeekimages.com/wordpress/wp-content/uploads/2010/07/sshot20100722233311.png?q=50&fit=crop&w=750&dpr=1.5)
For the Network Type select Use bridged networking for best performance. This will give your Vail VM its own IP address and will act like a separate machine on your network.
![sshot-2010-07-22-[23-33-47]](https://static1.howtogeekimages.com/wordpress/wp-content/uploads/2010/07/sshot20100722233347.png?q=50&fit=crop&w=750&dpr=1.5)
For the SCSI Controller type you can just leave it with the default recommended LSI Logic SAS. Again you might want to experiment with these settings at another time, but for now you can leave it.
![sshot-2010-07-22-[23-34-32]](https://static1.howtogeekimages.com/wordpress/wp-content/uploads/2010/07/sshot20100722233432.png?q=50&fit=crop&w=750&dpr=1.5)
Now you need to create a new virtual disk for Vail.
![sshot-2010-07-22-[23-35-05]](https://static1.howtogeekimages.com/wordpress/wp-content/uploads/2010/07/sshot20100722233505.png?q=50&fit=crop&w=750&dpr=1.5)
Select the disk type to be SCSI...
![sshot-2010-07-22-[23-35-32]](https://static1.howtogeekimages.com/wordpress/wp-content/uploads/2010/07/sshot20100722233532.png?q=50&fit=crop&w=750&dpr=1.5)
Now you need to select the size of the virtual hard drive. The minimum requirement is 160GB, so you'll want to make sure you have enough disk space on the Host computer.
![sshot-2010-07-22-[23-36-25]](https://static1.howtogeekimages.com/wordpress/wp-content/uploads/2010/07/sshot20100722233625.png?q=50&fit=crop&w=750&dpr=1.5)
You can then specify the disk file, we just left it as the default.
![sshot-2010-07-22-[23-36-56]](https://static1.howtogeekimages.com/wordpress/wp-content/uploads/2010/07/sshot20100722233656.png?q=50&fit=crop&w=750&dpr=1.5)
You'll get an overview of the settings you selected when creating the Server VM. Look it over and if something doesn't look right you can go back at this point and make changes.
![sshot-2010-07-22-[23-37-44]](https://static1.howtogeekimages.com/wordpress/wp-content/uploads/2010/07/sshot20100722233744.png?q=50&fit=crop&w=750&dpr=1.5)
From the main Workstation screen, under Devices double-click CD/DVD so we can install the ISO image. Since Vail comes in ISO format, there is no need to burn it to disc for the VM. You might want to burn it at some point for installing it on an actual machine later.
![sshot-2010-07-22-[23-39-33]](https://static1.howtogeekimages.com/wordpress/wp-content/uploads/2010/07/sshot20100722233933.png?q=50&fit=crop&w=750&dpr=1.5)
Select Use ISO image file and browse to its location.
![sshot-2010-07-23-[00-14-24]](https://static1.howtogeekimages.com/wordpress/wp-content/uploads/2010/07/sshot20100723001424.png?q=50&fit=crop&w=750&dpr=1.5)
Now power on the machine to begin the install process of Vail.
![sshot-2010-07-23-[00-15-06]](https://static1.howtogeekimages.com/wordpress/wp-content/uploads/2010/07/sshot20100723001506.png?q=50&fit=crop&w=750&dpr=1.5)
Go through the installation as you normally would. Don't worry if you haven't installed it before, the process is pretty basic following the wizard. The VM will restart several times which is normal and the amount of time it takes will vary. On our machine it took around 30 minutes.
![sshot-2010-07-23-[00-17-24]](https://static1.howtogeekimages.com/wordpress/wp-content/uploads/2010/07/sshot20100723001724.png?q=50&fit=crop&w=750&dpr=1.5)
After the install process has completed click the I Finished Installing button.
![sshot-2010-07-23-[01-16-29]](https://static1.howtogeekimages.com/wordpress/wp-content/uploads/2010/07/sshot20100723011629.png?q=50&fit=crop&w=750&dpr=1.5)
During the installation process, it didn't take up too many resources on our Core i3 desktop, but once you start using Vail, it will use the Host's resources you allocated for it.

Now that Vail is installed on VMware Workstation you can log in and start using it. At the Press CTRL+ALT+DELETE screen select VM \ Send Ctrl+Alt+Del from the toolbar.
![sshot-2010-07-23-[03-52-06]](https://static1.howtogeekimages.com/wordpress/wp-content/uploads/2010/07/sshot20100723035206.png?q=50&fit=crop&w=750&dpr=1.5)
Now you can log into your new virtual Vail Server.
![sshot-2010-07-23-[01-24-46]](https://static1.howtogeekimages.com/wordpress/wp-content/uploads/2010/07/sshot20100723012446.png?q=50&fit=crop&w=750&dpr=1.5)
VMware Tools Now you'll want to install VMware Tools which will enhance the VM experience. From the toolbar go to VM \ Install VMware Tools.
![sshot-2010-07-23-[01-18-12]](https://static1.howtogeekimages.com/wordpress/wp-content/uploads/2010/07/sshot20100723011812.png?q=50&fit=crop&w=750&dpr=1.5)
When the AutoPlay screen comes up click on Run setup.exe to installed the tools.
![sshot-2010-07-23-[01-19-17]](https://static1.howtogeekimages.com/wordpress/wp-content/uploads/2010/07/sshot20100723011917.png?q=50&fit=crop&w=750&dpr=1.5)
Now run through the VMware Tools wizard and install it accepting the defaults.
![sshot-2010-07-23-[01-20-05]](https://static1.howtogeekimages.com/wordpress/wp-content/uploads/2010/07/sshot20100723012005.png?q=50&fit=crop&w=750&dpr=1.5)
Another restart will be required to complete the installation of VMware Tools.
![sshot-2010-07-23-[01-22-14]](https://static1.howtogeekimages.com/wordpress/wp-content/uploads/2010/07/sshot20100723012214.png?q=50&fit=crop&w=750&dpr=1.5)
There you go! You can now test out the beta version of Windows Home Server virtually. If you want to test out clients, you could create another virtual machine and connect it. You'll also be able to RDP into the virtual server so you can test out the new features. If you already have WHS Version 1 Connecter software installed on the host machine, you won't be able to install the Connecter Software.
![sshot-2010-07-25-[04-03-53]](https://static1.howtogeekimages.com/wordpress/wp-content/uploads/2010/07/sshot20100725040353.png?q=50&fit=crop&w=750&dpr=1.5)
VMware Player Remember at the beginning of this article we mentioned that any VMs you had setup in the free VMware player will be fine? Well that is true provided the install goes through successfully without and errors. You can access VMware Player from the Start Menu \ All Programs \ VMware folder.
![sshot-2010-07-23-[03-19-19]](https://static1.howtogeekimages.com/wordpress/wp-content/uploads/2010/07/sshot20100723031919.png?q=50&fit=crop&w=750&dpr=1.5)
On our tests, all of the VMs we had previously setup worked without any issues.
![sshot-2010-07-23-[02-52-39]](https://static1.howtogeekimages.com/wordpress/wp-content/uploads/2010/07/sshot20100723025239.png?q=50&fit=crop&w=750&dpr=1.5)
Conclusion That is all there is to it! The process is fairly easy since everything is wizard driven. You just need to make sure to follow the steps in the right order and select the correct options. Now you can enjoy testing out Vail without worrying about having an extra machine to run it on. Remember that Vail is still in Beta and at this point, you definitely don't want to get rid of Version 1 and replace it with Vail. If you don't have a license for Workstation they do offer a 30 day free trial so you can at least play around with Vail for a month. If you do have an extra computer collecting dust and want to turn it into a Windows Home Server, check out our guide on how to install and setup WHS Version 1. Download VMware Workstation -- Registration Required Download WHS Code Named Vail from Microsoft Connect Download SecurAble