One of the new features in Office 2016 is “Ink Equation”. This feature allows you to insert equations into Word, Excel, and PowerPoint by handwriting them. Ink Equation is designed to be used with a tablet pen on a tablet PC.
However, you can use Ink Equation with other input devices, including a mouse, and we’ll show you how to use Ink Equation with a mouse to insert an equation into Word.
First, we’ll insert an equation into our Word document. To do this, click the “Insert” tab.

In the “Symbols” section, click “Equation”.

In the “Tools” section, click “Ink Equation”.

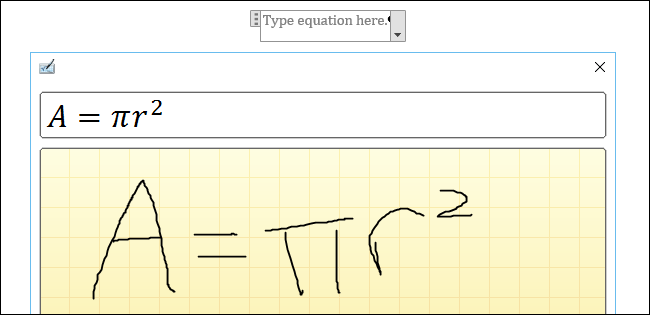
The “Ink Equation” dialog box displays. Using the mouse (or other input device) to write your equation in the light yellow grid area. You’ll see a very small black dot. That’s your cursor for writing your equation. The grid area will expand up and to the right as needed. For our example, we’ll use the equation for the area of a circle.

When you’ve finished writing your equation, click “Insert” to insert it into the equation box you added to your Word (or Excel or PowerPoint) document.
NOTE: If you need to correct part of your equation, don’t worry. We’ll show you how to do that a little later in this article.

The equation is inserted into the equation box in your document.

When entering equations, it’s a good idea to enter the whole equation before making corrections. It’s more likely your equation will be recognized correctly if you complete the whole equation. If you entered the equation for the area of a circle, you may have noticed that Ink Equation interpreted your equal sign wrong until you continued to the enter the equation, at which point, the program corrected the symbol.
Once you’ve entered your equation and you discover you need to replace part of the equation, you can erase the part you need to replace. To do this, click “Erase”.

The cursor changes to an eraser. Move the eraser over the part you want to erase, then click and drag over that part of the equation. Once you’ve erased what you want to, click the “Write” button to draw new parts of your equation.

If the program misinterpreted something you wrote in your equation, you may have been close and you can select a character to replace the wrong one. To do this, we’ll select the wrong part of the equation and correct it. Click “Select and Correct” and draw around a character in your equation that was interpreted incorrectly. A popup menu displays. If the character you meant to write is on the menu, select it. The character is automatically replaced.
If the character you want is not on the menu, use the “Erase” tool to erase the wrong character and write it again. Remember to click “Write” to continue writing your equation.

If you want to erase the entire equation before inserting it, click “Clear”. All writing in the grid area is erased.

If you use Windows Journal on a tablet to take math notes, you can copy the equations you write in that program into Ink Equation and insert them into Word, Excel, or PowerPoint. To begin, open the Word, Excel, or PowerPoint file into which you want to copy the equation and insert an equation box as discussed earlier in this article. Then, click open the “Ink Equation” tool.
Now, open your math notes in Windows Journal.
NOTE: You can open Windows Journal by searching for it in the Search box on the taskbar in Windows 10, on the Start screen in Windows 8.1, or on the Start menu in Windows 7.
In Windows Journal, we need to select the equation you want to copy to another program. To do this, click the “Selection Tool” on the toolbar.

Draw a border around the equation you want to copy. As you draw the border, a dotted line indicates how the border will be completed. When the equation is surrounded, even if you haven’t finished drawing the red dotted border, release the mouse.

The equation is now selected. Move the mouse over one of the edges of the selection and start to drag the equation…

…to the grid area on the open “Ink Equation” dialog box.

The equation, as you drew it in Windows Journal, is inserted into the grid area of the “Ink Equation” dialog box. Click “Insert” to insert the equation into your document.

This feature can be very useful if you are taking math classes or use math at work and need to convert notes into documents.