Quick Links
Upgrading your laptop's hard drive is a great way to get some extra life out of an old machine (or resurrect a dead one). Read on as we walk you through the prep work, the installation, and the followup.
Why Do I Want To Do This?
The most obvious reason you want to upgrade your laptop hard drive is because the old one is dying (or has already died). That's exactly where we found ourselves, with a dying hard drive throwing up errors left and right, and why we promptly upgraded the drive in our work laptop.
Aside from the obvious replacing-the-dying-drive scenario, there is the upgrading-to-an-SSD scenario. SSD prices have been falling for years and it's now really economical to replace the budget drive that came in your laptop with a radically faster and pretty cheap SSD. For this tutorial we picked up a 250GB SSD for under $100, no coupons, bargain shopping, or sales necessary. (Before you run out and buy a drive this second, however, do read ahead to the drive-selection section of the tutorial for some tips on ensuring you get the right drive for your laptop.)
While solid state drives improve any computer experience (we use them as primary/operating system disks in all our desktop machines too) they're a match made in heaven for laptops: they're silent, give off very little heat, consume very little power, and are very shock resistant all thanks to the lack of mechanical guts and moving parts. Further, they radically reduce your boot time and, in the process, give older laptops a much needed boost. Unless you have a very pressing need to use a mechanical drive in your laptop (e.g. you need a lot of local storage and only have one drive bay) there's no reason not to upgrade to an SSD.
Now, before we proceed, let's highlight one obvious thing: swapping out your laptop drive is not difficult and for veteran computer hobbyists who have been building computers their entire lives the rest of our guide is going to be a bit overkill in the guidance and explanation department. At its most basic a laptop HDD upgrade is simply: open back panel, pull old drive, stick new drive in, boot and install OS and you're done. But there's a bunch of little details that we (and the veteran computer hobbyists reading this) have learned the hard way over years of tinkering.
For those of you attempting your first upgrade we'll distill all those oops, errors, and hair pulling moments into a detailed walk through that ensures your blood pressure stays stable and no hair is pulled out.
Preparing To Swap The Drive
If your hard drive is absolutely dead with no chance of data recovery possible, you can actually skip this entire section as the following tips and tricks are all for readers that have some data to recover or back up. If your drive is dead you can hop right into the next section and read all about selecting and installing the new one. The rest of this section assumes either that your current drive is in fully operating condition or that it is experiencing errors but has not completely failed.
Cloning Your Original Drive
If your laptop is currently in good operating condition but you'd just like to upgrade to a new SSD then the most hassle-free option around is to clone the existing drive to the new drive and then swap them out. The short of it is that you take your brand new drive, tether it to your laptop with a special USB to SATA cable, and make a perfect 1:1 copy of the old drive to the new drive.

We've used this technique on many desktops and laptops over they years with great success. It's a really low-stress way to upgrade as you keep your OS, all your files, and other than the time it takes to clone the disk and put the new disk in you have no down time.
You can check out our detailed guide to the process here: How to Upgrade Your Existing Hard Drive in Under an Hour.
Backing Up Your Original Drive
Even if you have every intention of starting fresh with a clean install of your current operating system or an upgrade to a newer operating system, we strongly recommend backing up your original drive. This step is especially important if the drive you're replacing is experiencing errors; you want to capture a perfect copy of the data now so that you can recover as much of it as possible before the drive dies.
This backup should include both a backup of your files and a backup of the entire disk. In most instances it is sufficient to simply copy all your important files (like the contents of My Documents and other data storage folders) to a flash drive or removable hard drive. This way you have a simple and easy-to-access file backup.
The second component should be backing up the entire hard drive. We highly recommend using Macrium Reflect. Not only is it a free tool but you can easily mount the whole disk image as a drive to look for files you may have forgot to include in your personal file backup. You can read about performing a disk image in our tutorial How to Create an Image of your PC before Upgrading to Windows 10 (it doesn't matter if you're not upgrading to Windows 10, the process of creating the image is valid for any operating system and any version). If you later find you need to retrieve a file from that image, check out How to Mount a Macrium Reflect Backup Image to Retrieve Files.
Selecting The New Drive
Once you've properly backed up and imaged your disk (or if the poor old disk was so dead that wasn't a necessary step) the next step is selecting your drive. While you might have assumed this section of the tutorial would talk about drive storage size that component of the process is completely at your discretion based on how much space you need. All we have to say about drive sizes is that given the falling price of SSD models we'd recommend against buying anything smaller than a 120GB drive and encourage you to aim more for the 250GB mark or bigger (once you have your operating system and all your apps installed, 120GB is pretty cramped these days).
The really important consideration in drive selection isn't the storage size but the physical size. First there is the footprint of the drive: laptops use 2.5" drives and not the larger 3.5" drives found in desktop computers. (It's worth noting that solid state drives in general are 2.5" so even when you use them in a desktop machine you use a bracket adapter to size them up). So that's the first consideration: you need to buy a 2.5" form factor drive.

The other consideration, and one less obvious than the 3.5" vs. 2.5" form factor distinction, is the thickness of the drive. 2.5" form factor drives come in three thicknesses: 12.5mm, 9.5 mm, and 7 mm. The 12.5 mm thick drives are relatively uncommon and generally only found in beefy workstation-replacement type laptops, are mechanical, and are higher capacity (as the extra millimeters house an extra mechanical disk platter). The 9.5 mm thick is the most common mechanical 2.5" hdd thickness. Solid state drives are, almost universally, are 7 mm thick (many models even ship with a little 2.5mm spacer to make up the difference if the mounting style requires it).
In many instances you won't even need the spacer. In the photo above you can see our upgrade drive mounted in the small drive metal drive caddy from our Dell laptop. It's large enough for a traditional 9.5 mm mechanical hard drive but there's no issue mounting a newer 7 mm SSD inside it as the caddy acts as a spacer and the mount holds still hold the drive in the proper position.
Generally speaking you should run into no problems upgrading a laptop with a mechanical hard drive to an SSD as you'll be going from a thicker drive (12.5 or 9.5 mm) to a thinner drive (7 mm). Still, we want you to be aware of this often overlooked distinction so that you can check the model of your laptop and what drive size it uses before ordering a new one.
Preparing for Installation
With your backup/image secured and your new drive on hand, there's a few considerations before we actually crack open the case and start swapping parts.
The first thing we'd recommend is visiting the manufacturer's website and downloading all the most current drivers for your device. Save them on a flash drive. Even if you're just cloning the drive to a new drive things might get a little wonky and your OS might insist it needs drivers for something. If you're installing a fresh OS or reinstalling your old OS it always pays to have the drivers ready to go.
The next step, if you're not keeping the old drive as a backup, is to properly wipe your drive so you don't have to deal with data sanitizing issues once it is out of the machine. To that end you can just use trusty old Darik's Boot and Nuke.
Finally, if you're doing a fresh OS installation, get your product key and installation media before you proceed.
Installing The New Drive
This is the step that most people think of when they think of installing a new drive on their laptop: all the prep work aside the real meat of the project is changing the physical drive. Power down your laptop if it isn't already powered down, unplug it if it is plugged in, and remove the battery.
While you will need to consult with your manual and/or manufacturer to see how to access the drive compartment in your laptop, for the vast majority of laptops on the market there's generally a quick access panel, like that seen in the photo below. One tip we would highly recommend is snapping pictures of each step of the process with a camera. Laptops are a little tighter and trickier than desktops and it's very handy to have a photo to reference when you're trying to remember how something was oriented.

Carefully loosen the screws (you may not be able to fully remove them as many laptop case screws have small retention washers that prevent them from falling completely out of the case) and gently open the panel.

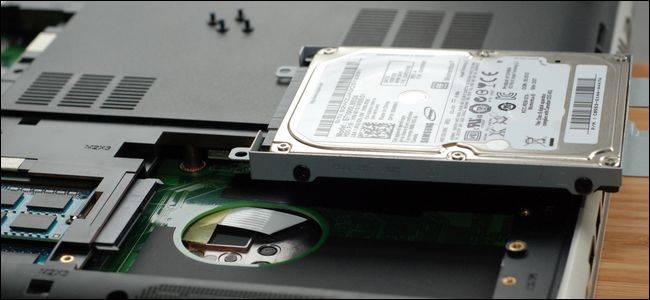
With this particular model we gain access to multiple components via the service panel. At the far lower right we find the primary hard drive bay (which houses the dead drive we wish to replace). Beside the primary drive bay you can see the two memory DIMMs, then beside that an empty mSATA slot, below that (the white rectangle with the wires) the Wi-Fi adapter, and above that section where the bare circuit board is visible there is a secondary drive bay.
Some laptops have individual service panels for each component so you'll need to open the specific one for the hard drive bay. Other laptops are built so compactly that you have to go to greater lengths to access the drive bay (such as removing the keyboard).

Loosen the mounting screws on the hard drive or hard drive caddy and gently remove the assembly from the laptop. Your primary concern here should be to 1) not drop any of the tiny screws into the body of the laptop and 2) not drag the hard drive or caddy across the circuit board beneath it.
With the assembly removed all that's left to do is swap out the old drive with the new drive. As we mentioned earlier in the guide, we didn't need to use a spacer for our drive as the drive caddy functions as a spacer.

A few loosened screws later, we've swapped the old drive out and placed the new drive in the caddy (being careful to preserve the orientation of the drive so that the connectors still line up properly) and we're good to go. Slide it gently back into place, secure any screws around the drive or the drive caddy in their original configuration, and then replace the service panel.
Wrapping Up The Installation
If you've cloned your drive there isn't really any wrap up to speak of: you should be able to boot right back into your computer as if nothing happened (albeit with a faster and/or bigger drive installed).
If you're installing your operating system from scratch now is the time to plug in your installation media (be it a disk or USB drive) and boot the machine. You'll likely need to make a pit stop in the BIOS (typically accesses via F2 during the boot process but check your screen and/or manual for instructions) and change the boot order so that removable media/USB drives rank above the DVD drive/hard drive.
After installing your operating system we would highly recommend revisiting the imaging technique we talked about in an earlier section of this article. Install the operating system, update all the drivers, install your applications, and before you actually begin using the machine take a moment to make an image of the drive. This will be your reset-to-zero recovery image should you desire to wipe the machine and start fresh (but without the hassle of reinstalling the OS and all your applications). We can't tell you how many times we've not taken our own advice regarding creating a virgin disk image of a new installation and how many times we've regretted it. It's a huge time saver to spend a few extra minutes making the disk image before putting the machine into regular use.
By following our guide you'll spend far more time preparing for the process and tidying up after than you actually spend physically changing the drives out, but the end result is a smoother experience with no worry that you forgot to backup an important file or time wasted searching for the right drivers.