You can easily convert PDF files to editable text in Linux using the “pdftotext” command line tool. However, if there are any images in the original PDF file, they are not extracted. To extract images from a PDF file, you can use another command line tool called “pdfimages”.
NOTE: When we say to type something in this article and there are quotes around the text, DO NOT type the quotes, unless we specify otherwise.
The “pdfimages” tool is part of the poppler-utils package. You can check to see if it’s installed on your system and install it if necessary using the steps described in this article.
To extract images from a PDF file using pdfimages, press “Ctrl + Alt + T” to open a Terminal window. Type the following command at the prompt.
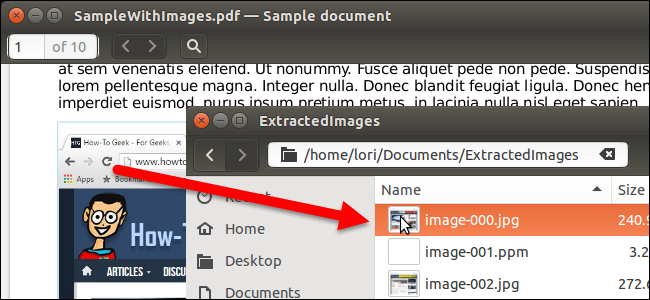
pdfimages /home/lori/Documents/SampleWithImages.pdf /home/lori/Documents/ExtractedImages/image
NOTE: For all the commands shown in this article, replace the first path in the command and the PDF filename to the path and filename for your original PDF file. The second path should be the path to the root folder into which you want to save the extracted images. The word “image” at the end of the second path represents whatever you want to preface your filename with. The filenames of the images are numbered automatically (000, 001, 002, 003, etc.). If you want to add text to the beginning of each image, enter that text at the end of the second path. In our example, each image filename will start with “image”, such as image-001.ppm, image-002.ppm, etc. A dash is added between the text you specify and the number.

The default image format is PPM (portable pixmap) for non-monochrome images, or PBM (portable bitmap) for monochrome images. These formats are designed to be easily exchanged between platforms.
NOTE: You may get two image files for each image in your PDF file. The second image for each image is blank, so, you’ll be able to tell which images contain the images from the file by the thumbnail on the file in the File Manager.

To create .jpg image files, add the “-j” option to the command, as shown below.
pdfimages -j /home/lori/Documents/SampleWithImages.pdf /home/lori/Documents/ExtractedImages/image
NOTE: You can also change the default output to PNG using the “-png” option or TIFF using the “-tiff” option.

The main image file for each image is saved as a .jpg file. The second blank image is still a .ppm or .pbm file.

If you only want to convert images on and after a certain page, use the “-f” option with a number to indicate the first page to convert, as shown in the example command below.
pdfimages -f 2 -j /home/lori/Documents/SampleWithImages.pdf /home/lori/Documents/ExtractedImages/image
NOTE: We combined the "-j" option with the "-f" option so we would get .jpg images and did the same with the "-l" option mentioned below as well.

To convert all images before and on a certain page, use the “-l” (a lowercase "L", not the number "1") option with a number to indicate the last page to convert, as shown below.
pdfimages -l 1 -j /home/lori/Documents/SampleWithImages.pdf /home/lori/Documents/ExtractedImages/image
NOTE: You can use the “-f” and “-l” options together to convert images in a specific page range in the middle of your document.

If there is an owner password on the PDF file, use the “-opw” option and the password in single quotes, as shown below. If the password on the PDF file is a user password, use the “-upw” option instead with the password.
NOTE: Make sure there are single quotes around your password in the command.
pdfimages -opw ‘password’ -j /home/lori/Documents/SampleWithImages.pdf /home/lori/Documents/ExtractedImages/image

For more information about using the pdfimages command, type “pdfimages” at the prompt in a Terminal window and press “Enter”. The command usage displays with a list of options available for use in the command.