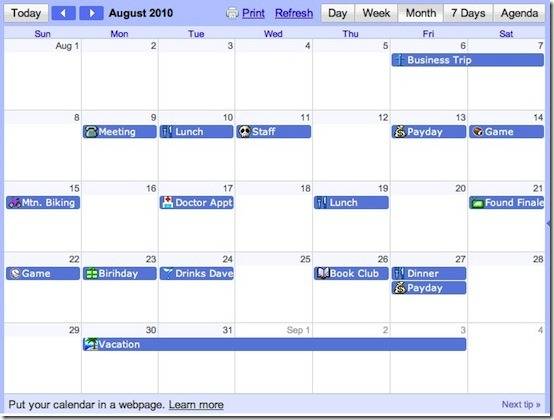
If you’re a user Google Calendar you might want some options for customizing it. If you’re tired of the default interface, today we look at Event Flairs from Google Labs that allows you to customize the look and feel of the calendar. Editor Note: This guest post was written by the guys over at TestFreaks.com where they cover gadgets and tech product reviews. Event Flairs Google Calendar is probably the most popular cloud calendar in use today. There are many reasons for this, including the fact that it can be used from practically anywhere, it works across many different platforms, and it is free. However, one thing you can say about Google Calendar is that it's not exactly pretty. In fact, using the calendar to tell the difference between an Xbox Game session with your friends and a reminder about your favorite show's season finale on television requires just too much reading for a quick glance. But Google Labs is working hard to change that. One of the latest features added to Google Calendar are "Event Flairs". Event flairs, as the name suggests, is a way to add a little flair to a given event with the addition of a colorful icon. Since a lot of us tend to scan over a calendar, the icon makes it easier to take it all in at a glance. Not to mention that it just looks nice. Compare the calendar image below with the flair added image above.

As you can see, the flair adds a lot to the calendar. But unlike other solutions, this valuable tool requires no complicated installation or browser extension. Actually adding in calendar flair to your calendar is really quite simple. Since it's a Google Lab tool, you first have to select the Google Labs icon from the top right of the calendar web page, as shown below highlighted:

Once you click the Google Labs flask, you will be presented with the dialog below. While there are several cool features of interest here, we are after the calendar flairs (see image below). Enable the flair calendar gadget by selecting the "enable" radio button. Then click save near the top of the dialog and go back to the calendar.

Okay, now that you've turned on event flairs, how do you use them? Well, it's really quite simple. Either select an existing event or create a new one, and then look to the right of the calendar. You should see the icon choices below. Simply select the icon that best fits your event. The icons will disappear, and you'll get a message that the event was updated. Congrats, you are on your way to having a very presentable Google Calendar that you can access from any browser.

Of course, having the event flair tool on the screen takes up a lot of valuable real estate. When you're not actively working with events and assigning icons, you can toggle the tool by clicking on the bar as indicated with the red arrow. If you click on the close button (purple arrow), then you will have to re-enable the event flair again. However, any assigned event icons will continue to function.

Conclusion By using event flairs, you will find it easy to make your Google Calendar not only more visually appealing, but quicker to check as well. And in our busy world today, a little time saved is money in the bank. (Please note the calendar images shown were squeezed in for the purpose of display. In actual use you would expand the image, making the event text more readable and detailed).