With iOS 9 and the launch of the new iPhone 6 model just weeks away, now has never been a better time to make sure that all the data stored on your iPhone is backed up and secure. In preparation for the big launch, we've written a guide on how you can get any important contacts, notes, texts, or music copied from your mobile device to a local hard drive or linked iCloud account.
iCloud Backup
The first method of backing up your phone is the easiest method to get your iPhone backed up, but it also manages to take the longest at the same time. To start, open up your iPhone, and find the Settings application.
Once you're in Settings, scroll down to find the section labeled "iCloud". Tap into here, and you'll be greeted with a screen that looks something like this.

This is where all your iCloud information is stored, as well as all the toggles for which information is saved to your cloud account anytime the phone is plugged in. Scroll down, and you'll see another button labeled "iCloud Backup".

If you already have it turned on it will display "On", as in the example above. If not, tap in and you'll see the following menu.

This menu contains both the toggle which controls whether or not your iPhone backs up to the iCloud account, as well as the option to manually start a backup at that moment.

As long as you have enough space left in your account, the process will begin automatically once the button is pressed.
iTunes Backup
The next backup tool is a bit more reliable than the first, and is especially good for anyone who has a lot of photos, videos, or apps on their iPhone, but not a ton of space left to spare in their iCloud storage. As is the case with most Apple products, the process of getting your data backed up in iTunes is pretty simple.
First, plug your phone into the computer you want to keep the device image on. Be sure to verify that any hard drive you're sending this to already has enough space freed up before the backup starts, otherwise you'll have to start all over again with a new location.

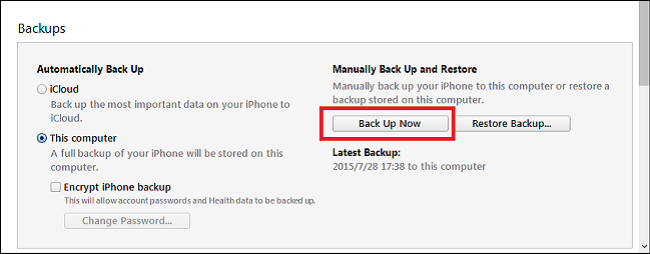
Once you have the device splash screen open, navigate down to the "Backup" box, seen below.

This is where you can configure settings such as how local backups are handled, whether they're automatically uploaded to iCloud or need to be manually sent each time you plug your device in, and allows you to manage any backups that were previously stored on the machine before.

For the purpose of this tutorial we're going to show you how to do a manual backup, though it's recommended to generally keep this setting on automatic just to be safe. To manually create a new backup or overwrite the old one, simply click the "Backup Now" button, and you're done!

Depending on how much storage you have taken up on the device and the grade of USB port you're plugged into, this process can take anywhere from five minutes to an hour.
If you're weary at the idea of keeping your iPhone data stored on a computer that might be insecure or vulnerable to viruses, you can choose to "Encrypt iPhone Backups" with a password. This will cause the backup to take a bit longer than it usually would, but comes with the added benefit of having another layer of security on top to keep your data extra safe.

Also keep in mind that if you've already got an old file stored on this machine, the iPhone won't back up over any data it recognizes as a duplicate (repeated photos, songs, etc), and will only copy over new data that's been added since the last backup was performed.

Backing up your iPhone isn't hard, but losing all the data on it during the upgrade to iOS 9 sure is. Follow these steps to be certain that no matter what happens when the new operating system eventually drops, you'll be fully prepared ahead of time for any glitches or bugs that may come.