Quick Links
Internal file sharing has been a part of the Windows operating system for years, but it's only with the introduction of version 10 that Microsoft has finally decided to give its users the opportunity to share their content with local accounts and the world at large, all from the same place.
The Share Tab
Once you click into the Share tab from the File Explorer, you'll be greeted by a breadth of different tools and options you can use to make sharing the files from your computer much faster than ever before.
A fresh addition to Windows 10, in the top left corner of every File Explorer window you'll see there are now three integrated options to get your files off your PC and out to the web with one click: Share, Email, and Zip.

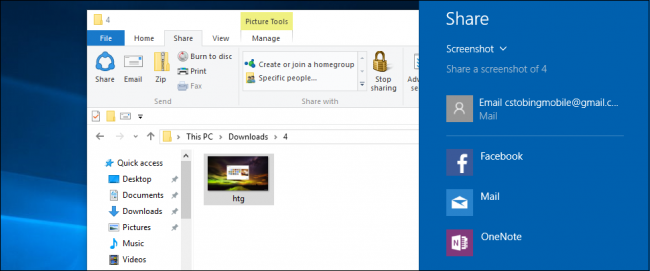
First up is the Share button, an option that will bring up a prompt that some of you might already recognize from Windows 8.1.

After the Share icon is selected, the ubiquitous Share Charm will pop out from the right side of your desktop, where you'll find several different social options depending on which apps you already have installed through the Windows Store. In this example we’ve pre-loaded the Facebook and OneNote apps, both of which are already programmed to handle picture sharing requests from a default setup of File Explorer.
As long as you’ve already logged into your respective accounts, you'll be able to immediately share any images you've downloaded or edited on your machine right from the file system, no web browser or extra email client required.
Send as an Email
Next up is the option to email pictures, documents, and files to anyone on your contact list in an instant.

To start, you should know that if you go to use the Email button (highlighted above), but find it’s been grayed out, you’ll need to go online and find a compatible desktop-based email client that Windows can recognize as a default program first.

Here I’ve opted for Mozilla’s Thunderbird to manage the request ahead of time. Once your desktop email client is installed, you'll need to set the program as the default handler of mail requests on Windows 10.

To do this, begin by entering the Settings app, and navigating to the System section.

Scroll down in the System sidebar to find the Default Apps page. Once here, choose the option to "Set defaults by app."

After the window below appears, run through the list on the left side to find the email application you downloaded and installed ahead of time.

Once the app is selected, open the link at the bottom which reads "Choose defaults for this program". For the specific purpose of activating the Mail icon in our Share menu, the toggle you need to set for Thunderbird or your preferred program is the “Send Mail Command”, seen below.

Once this is linked to the email client of your choosing, the File Explorer's Email icon will light up, and you'll be able to automatically send any file through the email client of your choice!


Share With Local and Networked Users
Next up; what if the people you want to share with aren’t an email away, but live on your same WiFi network instead? Windows 10 offers up two refreshed methods of filesharing from the days of 8.1, both of which are quickly and easily accessible from the confines of the File Explorer panel.
The first is to share with other members of your local network, given that you’ve already set a homegroup up before trying to passing files between both computers.

Once you select the user you want to share with, you can click the arrow next to their name in the prompt to configure their permissions. This is useful if you want to share a file among multiple accounts, but also prefer to maintain ultimate control of the file through administrative editing privileges.

The second method is to simply choose another user on the same machine you’re working from, and send it over to their account through the option highlighted “Specific People” in the Share tab.

Select this option, and only users registered on your local computer will see the file pop up on their desktop the next time they log in.
Zip it Up
For larger files which could prove too unwieldy for the average email client, Microsoft has also included a handy compression tool in the Share toolbar which will shrink down any files you need.
To create a .zip file for sharing, click the "Zip" icon in the top right corner of File Explorer.

Once you select this, an archive of the parent directory will automatically appear in the same folder, waiting for you to rename it.
This option is especially useful for users who need to transmit entire folders between email addresses or Dropbox accounts, and can make for a few less clicks the next time a pack of accounting reports need to get on the manager's desk ASAP.
Stop Sharing
And in case you got a bit too trigger happy with the new Share permissions, revoking ownership to a file or folder is just as easy as granting it.
If you’d prefer that a specific file is removed from the sharing ecosystem after it's already been added, you can use the same Share toolbar to stop broadcasting anything that’s accidentally been left open with the "Stop Sharing" option. This can be found both on the right hand side of the Share tab, as well as inside the standard drop-down menu, highlighted below.

Keep in mind, however, that while removing share permissions inside Windows 10 iteself is easy, any files that have already been sent to social media hubs will need to be deleted on the sites themselves. If a photo is posted to Facebook, only deleting it from the Facebook server will make it entirely private again.
File sharing was already a pretty easy job, but leave it to the engineers behind Windows 10 to simplify the process even further with the help of File Explorer's brand new Share tab.