Quick Links
Chromebooks and Chromeboxes are intended to be easy-to-use computers, but that simplicity can lead to confusion. Taking screenshots is one feature that isn't super well explained, and there are several different ways to do it in Chrome OS. We'll show you all of them.
Chrome OS 89 introduced a screenshot and screen recorder tool for Chromebooks and Chromeboxes. Before this, you had to know specific keyboard shortcuts---which still work---to take a screenshot. This is a much nicer solution, especially when using a Chromebook in tablet mode.
How to Take a Screenshot on a Chromebook
Use the Screen Capture Tool
First, we'll show you how to use the Chromebook's built-in Screen Capture tool. This tool can do both screenshots and video screen recordings.
To get started, click the clock on the taskbar---a.k.a. "Shelf"---in the bottom-right corner to open the Quick Settings panel.

Select the arrow in the top-right corner of the menu if it's not fully expanded.

Next, click the "Screen Capture" button.

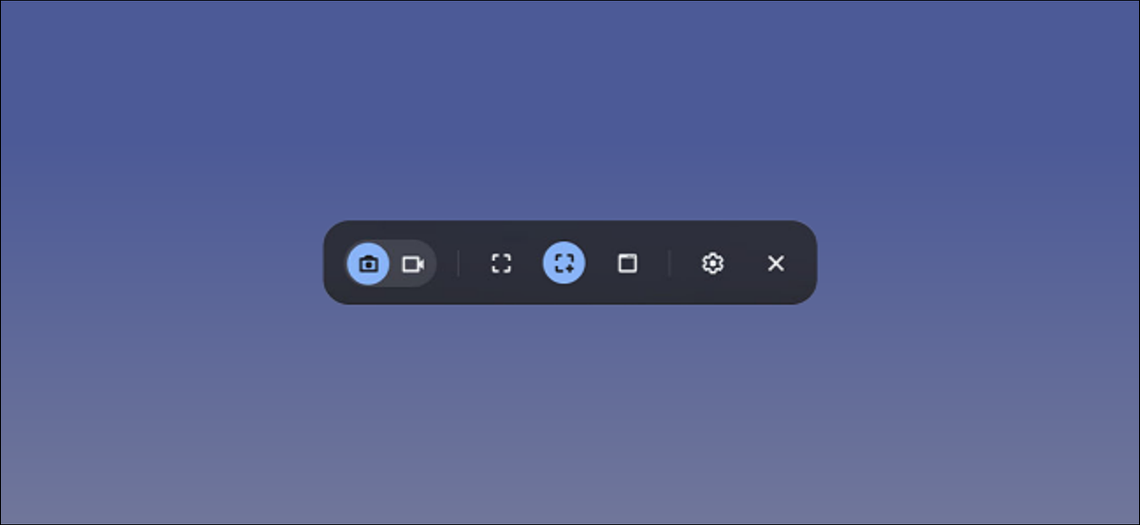
To take a screenshot on a Chromebook, make sure the screenshot tool that looks like a camera icon is highlighted.

You have three different screenshot methods. You can capture the full screen, partial screen, or a specific window. Select one of the options to proceed.

Each one of these methods works slightly differently:
- Full Screen: Click anywhere on the screen to take a screenshot of the entire screen.
- Partial: Click and drag your mouse or trackpad pointer to select an area or portion of the screen you want to screenshot, then select "Capture."
- Window: Click the window or area of the screen you want to screenshot.
Here's what that looks like for a full screenshot...

...a partial screenshot...

...and a window screenshot.

When you take the screenshot, it will appear in the bottom-right corner of the screen and automatically be copied to your Chromebook's clipboard. You can immediately "Edit" or "Delete" the screenshot from the preview thumbnail.

Use a Keyboard Shortcut
The Screen Capture tool is pretty easy to open, but you may want an even quicker option if you take a lot of screenshots. That's where keyboard shortcuts come in.
There are three keyboard shortcuts associated with the three screenshot methods mentioned above. The shortcuts all use the Window key, which is the key on the top row of the keyboard that looks like three rectangles:

Below are the three keyboard shortcuts to screenshot on a Chromebook:
- Ctrl+Window: Immediately takes a full-screen screenshot.
- Ctrl+Shift+Window: Opens the Screen Capture tool and allows you to select and take a partial screenshot.
- Ctrl+Alt+Window: Opens the Screen Capture tool and asks you to select a window to screenshot.
For the partial screenshot, you will need to drag your mouse cursor over an area to select what you want to screenshot, then click "Capture."
For the window screenshot, click the window or area of the display you want to screenshot.
After using one of the three methods, the screenshot will appear in the bottom-right corner of the screen and be copied to your Chromebook's clipboard. You can then "Edit" or "Delete" the screenshot.
Use a Stylus
If your Chromebook supports stylus input, you can use the pen to take screenshots as well. There are two methods for doing this.
Full-Screen Screenshot
With your stylus paired with your Chromebook, tap the pen icon in the taskbar.

Next, select "Capture Screen" from the pop-up menu.

The screenshot will appear in the bottom-right corner of the screen and be copied to your clipboard. You can then "Edit" or "Delete" the screenshot from the preview thumbnail.
Partial Screenshot
Tap the pen button in the taskbar.
Select "Capture Region" from the menu.

Use the stylus to select the area of the screen you want to capture. Lift the pen off of the display to take the screenshot.

The screenshot will appear in the bottom-right corner of the screen and automatically be copied to your Chromebook's clipboard. You can immediately "Edit" or "Delete" the screenshot by selecting either button.
Where Are Screenshots Saved?
Screenshots are strangely saved to the Chromebook's "Downloads" folder. Unfortunately, you can't change where screenshots are stored by default.
To access the Downloads folder, click the App Launcher icon in the bottom-left corner to see all of the apps installed on your Chromebook. From there, open the "Files" app.

Now select "Downloads" in the sidebar, and you'll see all your screenshots on the right.

As you can see, there are many options for taking a screenshot on a Chromebook. It just depends on which method works best for your situation. Now you know!