Quick Links
First smartphone screens replaced wallet pictures as the way to show off your photos and now you can put your photos right on your wrist. Read on as we show you how to sync your favorite photos to your Apple Watch.
How Does It Work?
The Apple Watch can store up to 500 photos from your iPhone (as long as the feature is enabled the Photo app on your phone and the Photo app on your watch work seamlessly together). The display quality is surprisingly good and the photos look as sharp (albeit smaller) as they do on the iPhone.
Each photo is resized, synced, and is displayed independently of the watch's connection with the iPhone (even if you're not connected to your phone you can still look at the photos).
By default they sync together right out of the box (as long as you have pictures tagged as "Favorites" in the iPhone Photo app). If you haven't used the favorites feature or you want to use a different album there are a few minor configuration tweaks you'll need to make. Let's take a look at how to configure the Apple Watch photo syncing feature now.
How Do I Configure It?
The configuration process is pretty simple but it helps to know exactly what each adjustment accomplishes.
Prep Your Pictures
In terms of preparation, you don't actually have to adjust or crop your photos (unless you're so inclined) because the syncing process automatically resizes them. That said, you'll want to check out your albums and decide if you want to use the Favorites features or set up a dedicated album for photos that will be transferred to your Apple Watch.
If you're not using the Favorites feature (and weren't actively using it before we got an Apple Watch) that's a perfect way to pick out which pictures you want on the watch. Simply open up each photo you want to sync and tap the little heart icon on the bottom of the display to Favorite it. The photo will be automatically tagged and placed in the "Favorites" album.
If you are using the Favorites feature (and you don't want all the pictures you've favorited to get dumped over to your watch) you may wish create a secondary album like "Watch Pics" so you can populate it only with the photos best suited for display on the watch face.
Configure the Photo App
Apple Watch app configuration is handled by the Watch app on your iPhone. Open up the Apple Watch app and scroll down until you see the entry for Photos.

Select the Photos entry to access the configuration options for the mobile Photos app.

The first option in the list is not relevant to syncing your photos but since we're already in here explaining everything: it controls whether or not your Apple Watch will mirror the iCloud Photo alerts received by your iPhone or you can configure custom alerts (as well as turn it off) here.

Here you can select the album. By default it is set to "Favorites". If you're not using the Favorites feature/album, tap on the entry to select the album you wish to use.

Finally, you can select the photo limit. Although the limit is displayed on the main page in megabytes, if you click on the entry to change the amount it also gives you the estimated number of photos for that amount of data (e.g. 15MB = 100 photos, 40MB = 250 photos). The smallest amount you can allocate is 5MB (25 photos) which is really more than enough for a couple good pictures of your pets/kids/spouse if you're looking to save space on your watch.
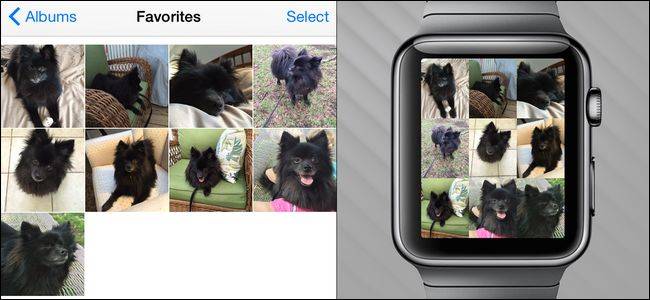
Accessing the Photos on Your Watch
Once you've set everything up on the phone side the hard work is done. Your iPhone will automatically sync the photos to your watch. To access them you simply need to open the Photo app.
Tap on the crown of the watch to bring up your watch apps.

Select the Photo app (the multi-chromatic flower icon) and you'll see a 3x3 grid of your photos. Scroll up or down with your fingertip to see more photos. Tap on a photo to zoom to just that photo and then, if you desire a closer look, turn the watch crown clockwise to zoom in closer. To return to the single photo view from the zoomed view (or from the single photo view to the grid view) turn the crown again counterclockwise to zoom out.
If you find there are photos you no longer want on your watch, simply remove them from the synced album and the watch app will take care of the rest.
Have a pressing question about your iOS device or Apple Watch? Shoot us an email at ask@howtogeek.com and we'll do our best to answer it.