Quick Links
You've seen some of our reviews about smart bulbs, you've heard chatter about smart home technology in the news, and you're curious if it's worth it. Read on as we review the GE Link Starter Kit and show you how to get started for a mere $25.
What Is The GE Link Starter Kit?
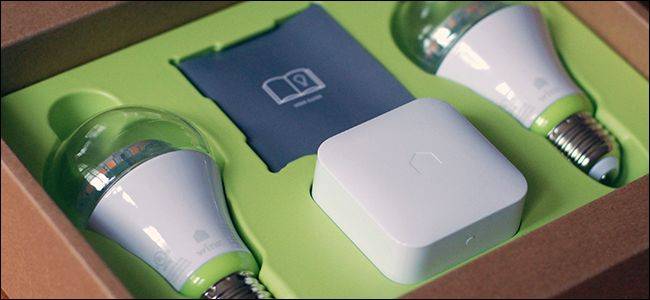
General Electric's entry into the smart bulb market is their stylish looking GE Link light bulb and the GE Link Starter Kit is their economically priced smart bulb starter kit that packages two of their Link smart bulbs with a Link smarthome bridge for an all-in-one package that will have you up and running with smarthome lighting in under ten minutes.
How economical is the arrangement? Originally priced at $50 the starter kit was a good, but not exceptional, deal. Fifty bucks for two smart bulbs and a hub system isn't a bad deal by any measure, but the Philips Hue Lux system offers two smart bulbs and a hub for $80 (and has arguably better brand name recognition in the smart bulb market).
Recently, however, retailers have slashed the price on the GE Link Starter kit from $50 down to the $25-30 range. You can pick up the kit at Home Depot for $25 and on Amazon for $37. Considering that a standalone GE Link bulb runs $15 at both retailers (and elsewhere) the starter kit is now an astounding deal; you actually save $5 and get a free hub at Home Depot and only spend $7 more than you would on the bulbs when you shop at Amazon.

The only real catch is that the Link hub (despite having the potential through future firmware updates to do so) cannot control other ZigBee bulbs and is restricted to the GE Link bulbs (seen in the three available varieties above).
That said, the GE Link bulbs themselves work just fine with other ZigBee-enabled hubs like the Wink system and the Philips Hue system and, unlike with the WeMo Smart LED Bulb system from Belkin, you're not actually locked into just using the GE Link system and can use the bulbs with other smart home systems if you opt to upgrade. Heck, even if you buy the starter kit from Home Depot at the current $25 price point you can throw the Link hub away and use the smart bulbs with another system and still save $5 over the retail price of purchasing two bulbs.
Let's take a look at installing and configuring them as well as how to use them once they're linked to your network.
How Do You Install and Configure Them?
The GE Link hub is a Wink certified device and, even though it is limited to only connecting to GE Link bulbs it still uses the Wink control software. In light of that the first step is to download the Wink control software for your mobile operating system (iOS / Android).
Plug the Link hub module into an outlet within the range of your Wi-Fi router (the indicator light will blink a light purple color as it searches for a network and waits to check and update its firmware). Leave the hub alone for the moment and return to the smartphone app.
Adding the Link Hub
Launch the app and either sign into and existing Wink account or (more likely) create a new account. Once you've finished the simple signup process you'll be kicked over to Wink app's start page. We'll need to add the Link hub to the Wink app before we can proceed.

Tap on the big "Add a product" + sign, then select "Hubs" and within the Hubs menu select "Link Hub". The app will prompt you to follow a five step process with helpful pictures.

The process is as follows (and outlined above in screenshots). Plug in the Link hub (which we already did), then connect to the hub itself by opening up the Wi-Fi controls on your mobile device and selecting the network named "QuirkySetup-XXXX". You need a brief and temporary connection directly to the hub in order to complete step two: telling the Link hub what network to connect to and what the password is. Once you've completed that step, and the Link hub can successfully connect to the network on its own, you'll get a success notification and the temporary Wi-Fi connection will close.
Adding the Link Bulbs
Now that we've linked the app, hub, and greater network all together it's time to add in the bulbs. After you get the success screen seen above and then tap "Done", the app will automatically kick you over to the configuration screen for the newly added hub.

Tap on "Add a Product", select "Lights" from the list of available options, and then scroll down until you see "Link Light Bulb".
At this point we're ready for the bulbs. Insert the bulbs you wish to pair in their respective light sockets and ensure the sockets are switched off. We'll pair one bulb at at time, repeating the following process.

Ensure all unpaired bulbs are off. Follow the wizard process until prompted with the "Connect Now" button. As soon as you get the "Link Hub is ready" screen you can turn the light bulb on. It will blink three times as soon as it links to the hub. At that point you'll be kicked over to the "Lights + Power" control panel as seen in the last screenshot above.
We'll get to that bit in a moment, but we still need to add in the second bulb (and any extras you may have purchased). On the "Lights + Power" screen tap on the menu button in the upper left corner. You'll see a blue menu just like the one we used to add the Link hub to the Wink app. Press the "Add a Product" + symbol again and repeat the entire process outlined above to add the second bulb.
How Do You Use Them?
Now that the lights are hooked up to the hub it's time to take them for a spin. The most obvious way to interact with the lights is to simply turn them on and off and you can do so from the Lights & Power control panel.

You can tap on every individual bulb to toggle it on and off as well as press-and-hold to pull up a fine tuning menu to dim them. In most situations, however, that would prove to be a tad tedious as people generally group lights together into rooms and various lighting configurations. It's easy enough to create a group, however, as seen in the screenshots above: tap on the ". . ." menu in the upper right corner, tap the + symbol, and then name your group and select which of your lights you wish to add to it. We linked our two GE Link bulbs together to create the "Bedroom" group as that's where they are installed.
Now you can use the exact same interface you have for the individual bulbs for all the bulbs in that group. That's a significant step up from adjusting each bulb individually but it's still not exactly the ease of use that comes with the whole "scene" experience you get with the Philips Hue system. Don't worry though, while it isn't as immediately obvious as it is with the Hue system (that system is, in fairness, designed expressly for lightbulbs and nothing else) there is a way to configure something just like the Hue scene system.
Tap on the menu icon in the upper left corner and then, at the bottom of the menu pane, tap on the "Shortcuts" icon as seen below.

Enter a name for your shortcut and then tap on the "Make this happen" box to select what individual light or group you want to control and what you want it to do. The shortcut system works well enough, but there is one very minor hangup you should be aware of when configuring things. If you select a group instead of individual bulbs then whatever lighting level you specify is applied across all the bulbs. If you want to control each bulb individually you need to add each bulb at the shortcut one by one and then adjust them.
Between the direct links in the Lights & Power menu (for both individual bulbs and groups) and the customizable shortcut menu to set up lighting scenes the entire control system is highly configurable and user friendly.
The Good, The Bad, and the Verdict
What do we have to say about the matter after testing the lights and software? Let's take a look at the good, the bad, and the verdict.
The Good
- The price point. At $25 you're paying less for a 2 bulb + hub kit than you are for two smart bulbs.
- The bulbs are super cool looking; we'd feel comfortable leaving them bare hanging from pendant light fixtures.
- Extremely easy to set up; both the included print documentation and the installation app are very clear and easy to use.
- Transformer-form-factor Link hub doesn't cover the adjacent electrical outlet.
- The in-box paper instructions are very clear and the Wink app is easy to setup and includes a picture-driven setup system.
The Bad
- The Link Hub can, in theory, support other Wink/ZigBee products but currently does not.
- While the Wink software is very user-friendly it is a tad cluttered (as it serves as the control app for all Wink products not just the GE bulbs).
The Verdict
Our "Bad" list here is pretty short and for good reason. The GE Link Starter Kit is, hands down thanks to recent price cuts, the absolute most economical way to get started with smart lighting in your home. It's easy on the wallet, it's easy to setup, and the only truly merited complaint we have about the entire kit is that we're disappointed that the GE Link hub unit wouldn't allow us to pair other smart bulbs (like the Cree Connected bulbs). Even then we can hardly complain, however, as the kit's hub + bulbs arrangement is even cheaper than buying two new GE Link bulbs.
The GE Link Starter Kit is exactly the kind of low-cost/low-stakes kit we'd recommend to any of our friends or family interested in playing around with smart lighting. If they hate it and prefer traditional lighting they're only out $25. If they love it, then they can easily upgrade to a bigger and beefier system while still using their GE Link bulbs and they're effectively out no money for the Link Hub. It's the easiest and most cost effective way to play around with smart bulbs on the market today.