If you're in and out of the Recycle Bin often, you might like to know that there is a way to add the Recycle Bin to the "This PC" view in File Explorer---and from there to your Quick Access section. Here's how to get it done.
Windows 10 finally lets you pin the Recycle Bin to the Start menu and we've previously showed you how you can add Control Panel and Recycle Bin to the File Explorer navigation pane. The trouble is that method changes the navigation pane in other significant ways, most notably that all items on the computer get arranged as subfolders in an hierarchy under the Desktop folder. If you like the regular navigation pane view, but just want to add the Recycle Bin to the File Explorer window, you can do that. It only takes a bit of mild Registry hacking.
Add Recycle Bin to the File Explorer Window by Editing the Registry Manually
To add Recycle Bin to the "This PC" section of File Explorer---or the "My Computer" section of Windows Explorer if you're running Windows 7---you just need to add one new key to the Windows Registry.
Standard warning: Registry Editor is a powerful tool and misusing it can render your system unstable or even inoperable. This is a pretty simple hack and as long as you stick to the instructions, you shouldn’t have any problems. That said, if you’ve never worked with it before, consider reading about how to use the Registry Editor before you get started. And definitely back up the Registry (and your computer!) before making changes.
Open the Registry Editor by hitting Start and typing “regedit.” Press Enter to open Registry Editor and give it permission to make changes to your PC.

In the Registry Editor, use the left sidebar to navigate to the following key:
HKEY_LOCAL_MACHINE\SOFTWARE\Microsoft\Windows\CurrentVersion\Explorer\MyComputer\NameSpace

Next, you're going to create a new key inside the NameSpace key. Right-click the NameSpace key and choose New > Key. Name the new key with the following text:
{645FF040-5081-101B-9F08-00AA002F954E}

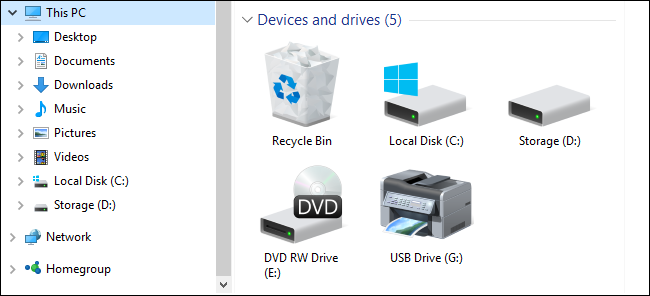
And you can now close Registry Editor. You won't need to create any additional keys or values. Test the changes by firing up File Explorer and heading to "This PC." If you already had a File Explorer window open, you may need to refresh it by hitting F5. You can also drag the new Recycle Bin item to the Quick Access section of the navigation pane to pin it there.

If you ever want to reverse the changes, just head back into the Registry and delete the new key you created. This will remove Recycle Bin from the "This PC" section of File Explorer. Just note that if you pinned Recycle Bin to the Quick Access section, it will remain there---and be fully functional---until you remove it by right-clicking and choose "Unpin from Quick Access."

Download Our One-Click Registry Hacks

If you don’t feel like diving into the Registry yourself, we’ve created some a couple of Registry hacks you can use. The “Add Recycle Bin to File Explorer” hack creates the new key you need. The “Remove Recycle Bin from File Explorer (Default)” hack deletes the key, restoring the default. Both hacks are included in the following ZIP file. Double-click the one you want to use and click through the prompts. When you’ve applied the hack you want, restart your computer (or log off and back on).
Recycle Bin File Explorer Hacks
These hacks are really just the new key we created in the previous section, exported to a .REG file. And if you enjoy fiddling with the Registry, it’s worth taking the time to learn how to make your own Registry hacks.