If you've used a Mac recently, you may have noticed tags now have a distinct presence in the Finder. Maybe you're thinking, "huh? tags?" (it's a fair response), but actually, tags are an excellent way to categorize, sort, and instantly find your important stuff.
Tags are exactly what they sound like they are. You're basically just selecting files and adding labels. These labels are just metadata for describing file content. You can add as many tags as you need, so maybe you add the tag "tax returns" to your tax returns, and you tag other tax-related paperwork as "receipts."
You can also add another tag, say just "taxes" to all your receipts and returns. That way, you can see everything tax-related in one simple search. This is just one example. Let's take a closer look at how this actually works.
Getting to Know Finder Tags Better
Here's the Finder with the default tags in the Sidebar. This was probably your first introduction to tags on a Mac.

These default tags can be easily modified. Right-click on any one and you can rename or delete it, remove it from the Sidebar, change its color, or open it in a new Finder tab. Thus, if you have a bunch of files tagged "Red," then you can click on them to see them in that Finder window, or in a new tab.

These aren't the only tags you can have though, in fact, you can have any and as many tags as you want. On our desktop we have some screenshots that we took, and we want to tag them so we can find them easily if we move them some place else.
We're going to select the files, six in all, and the click the Tags button on the Finder toolbar. From here, a menu will appear. There's all of the default tags. To add a "screenshots" tag, we type it in, and hit "Enter."

We have added the tag "screenshots" to these six images, which is saved to the files' metadata, so even if you transfer them to a different folder, drive, or even another Mac, you can still find these files with the "screenshots" tag.
Now, we have a new tag in the Sidebar, which when you click on it, will display every file to which we've attached that tag. Again, we could right-click on it and rename it, change its color, or delete it. Note that, even if you delete the tag, the files will remain.

From here, you can continue to add tags to your files, further categorizing them so its easy to find a specific group of files. When you click on "All Tags..." in the Finder Sidebar, you see all the tags on your system.

The previous icon view gives us little detail as to where these files are all located but we can change the view, and get an exact idea of where they are in the Finder.

Most of these files only have one tag attached. Adding more tags means your can define your files for easier searching. You don't have to use the Finder Sidebar to search for files by tags. Once you've tagged enough files, you can just type your query into Spotlight or the Finder search feature.
Searching for Files by Tag
Let's take a relevant example, something a lot of people deal with often. You're looking for a job, and you want to update your old resume. You actually have your old resumes, somewhere, maybe in your documents folder or a cloud folder but you're not sure where. What you are sure of is that you were smart enough to tag your job search stuff last time you updated it.
So, if we want to find old resumes, we can use our "resume" tag. We type our search and we can view results by filename or tags.

Again, the same thing with cover letters.

What if we want to see all our old resumes and cover letters in one result? In this case, we add another tag to all relevant files. First we search for our "resume" tag and add another, "job search"; we do the same thing to our "cover letters" files.
While we're at it, we can pick out the "job search" documents that are most relevant to us, then we'll simply tag them as "blue". Now, we have quite a few tag searching options for this group of files.
We'll demonstrate first using Spotlight. You can string multiple tags together into one search. This one will list all our "job search" files with the "blue" tag. Using these two tags together ensures we only see files matching this criteria versus all "job search" tags or all "blue" tags.

Spotlight is simply easier to use in cases such as this, however, you can do something similar in Finder.
First, type your search query and choose "Tags" from the menu option.

Now, add additional tags to your search query.

It is also possible to build search queries like that and save them for later. Saved searches can be named and saved wherever you like. You can also add them to the Sidebar for easy access.

s
The more precisely you define your files, the more accurate your searches will be. Simply tagging image files as "images" won't help you much because you can search for images as a "kind" of file. Tags work best if you use them to describe the content of a file rather than the type of file.
Tags Preferences
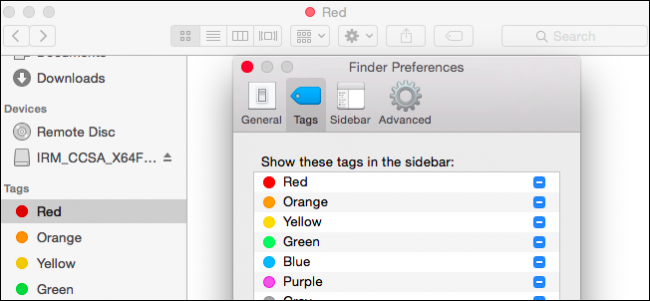
Finally, here is our Tags preference tab, which can be accessed from the Finder preferences ("Command + ,"). This is going to make your life quite a bit easier when it comes to overall tag management.
First of all, you can show or hide tags in the Sidebar. You can also hide tags from the Sidebar by dragging tags out it, but the Tags preference gives you better control over the process.

Click on the circle next to the tag to change its color or double-click on the tag's name to rename it. When you do this, all files with that tag attached to it will be updated.

At the bottom of these preferences, you can use the "+/-" buttons to add/remove tags. Note, you can select multiple tags if you want to delete more than one at once.

You can also drag tags onto the Favorite Tags area. When you do this, your tags will be added to the Finder favorites. So if we drag "job search" to "Favorite Tags," we now see them in the "File" menu.

From here select some files, and from the File menu or a quick right-click context menu, you can quickly add (or remove) favorite tags.

The more tags you add, the better the tags system in macOS works. Over time, as you keep adding them, your important stuff will be more readily and instantly available. That means less opening the Finder, opening a folder and subfolders thereafter, looking for the specific file you want, and then finally double-clicking to open it.
Moreover, over the course of time, as new files are added and old files are archived, having a good tagging scheme on your system means that it won't be as difficult to locate things that may not necessarily be a priority, but you may need from time to time.