Quick Links
Minecraft is a game that begs for creative play and customization of elements big and small. Leave no detail unattended to by following along with our simple tutorial to customize the yellow splash screen text found on the game's main menu with whatever quotes, quips, or information you desire.
Why Customize The Splash Text?
You're in the body of the article at this point which means you have more than just a passing interest in tinkering with Minecraft. While changing the splash screen text isn't exactly installing a game changing mod or even a custom map, it's a fun little way to personalize the game.
In fact, it's a perfect way to sneak in a message into the game to surprise your Minecraft loving kid on their birthday, play a light-hearted prank on a friend, or inject a bit of your own humor into your personal Minecraft installation.
Further, it's very easy to do and totally reversible with no permanent modification to the game necessary. How easy? Not only is it very easy to create and modify the necessary files from scratch (we're about to explain how it all works and show you how) but at the end of the tutorial we'll give you a veritable easy-button way to do it by providing a custom HTG download pack to get you started immediately.
If you're super impatient you can jump ahead to just grab the pack but we'd recommend you read the whole guide start to finish first because there are a few critical points (even if you're not building the pack from scratch) that will trip up the unaware.
Let's dig in and learn a little about resource packs by crafting our own as a vehicle for loading our custom splash text.
Constructing Your Splash Text Resource Pack
Before the advent of resource packs, the only way to pull off the modification we're about to perform (and many other modifications for that matter) was to manually edit the Minecraft.jar file. This file was, and remains, an archive of Minecraft's core files that includes game code and assets like in-game graphics, menu backgrounds, and the splash text we're interested in changing.
The original way to edit the splash text and other in-game assets was to open the Minecraft.jar file with a suitable archive tool like 7-Zip and replace the existing asset with the new asset. You can still edit the Minecraft.jar in this fashion if you really wish to (in Minecraft 1.8 the splash text file is located in the archive at \assets\minecrafts\texts\splashes.txt if you'd like to look at the master list or manually replace it).
While you're certainly welcome to manually edit the file and swap out the splashes.txt, we strongly recommend you follow along with us and use a resource pack instead. Why a resource pack? Since Minecraft 1.6.1 resource packs have allowed you to easily swap out Minecraft assets for third-party assets without necessitating any Minecraft.jar editing. You can load the resource pack with a mouse click or two, you can unload it the same way, and you never have to worry about screwing up anything while you're in the guts of the Minecraft.jar.
The only real reason we can think of to manually edit the jar file as opposed to using a resource pack is if you were bent on pranking a friend while leaving no evidence behind. Barring that, the resource pack is the way to go so let's walk you through building a simple resource pack now.
Creating Your Resource Pack's Structure
The structure of resource packs big and small is quite simple. The resource pack is just a nested set of folders (which can be zipped up for easy storage or distribution) that mimics the folder structure and file names of the Minecraft assets found inside the Minecraft.jar.
When you load a resource pack the Minecraft app simply looks over the resource pack directories and uses any new assets available (for those items which have no new assets, it just uses the default assets like usual). As such we can create an ultra-simple resource pack that only has one new asset in it: the replacement splashes text.
To get started, navigate to the resource pack folder of your current Minecraft installation. The resource pack folder is found in the following locations based on your OS:
Windows: %appdata%/.minecraft/resourcepacks
OS X: ~/Library/Application Support/minecraft/resourcepacks
Linux: ~/.minecraft/resourcepacks/
Once you've navigated to that location, create a folder with the name you want to use for your resource pack. We like simple and direct names so let's title the folder "Custom Splashes."
Inside the "Custom Splashes" folder, create the following folders one by one, nesting each subsequent folder inside the previous folder "assets" -> "minecraft" -> "texts". Your folder structure should look like, with including the master "resourcepacks" folder, like this:
/resourcepacks/... /Custom Splashes/...... /assets/......... /minecraft/............ /texts/
With that structure in place, it's time to populate the folders with the necessary (and optional) asset files.
Populating Your Resource Pack
Because our resource pack is so simple we only need to populate it with two required files and one optional file. The most important file in a resource pack is the MCMeta file that tells Minecraft that the collection of files is, in fact, a resource pack.
Creating the Meta File
The MCmeta file is just a text document with a modified extension. While in the base folder of your resource pack, in our case "Custom Splashes" create a new text document and past the following text into it:
{"pack":{"pack_format":1,"description":"Custom Splashes"}}
Save the file as "pack.mcmeta"; make sure that you save or rename it so that the mcmeta part is the actual file extension and not part of the file name (e.g. pack.mcmeta.txt won't work).
Creating the Splashes TXT
The next step is to create the splashes.txt file with your custom splash text phrase in it. This step is extremely simple but there is one very big catch so listen closely.
The splashes.txt file is just a plain old text file but you need to set the encoding correctly or else you'll end up with annoying artifacts in your splash text. If you use a basic text editor like Notepad to create and edit the document, you'll end up with this seemingly mysterious artifact at the beginning of your splash text.

That tiny little box contains the letters "ZWN BSP" which is a curious little artifact created when you use a text document that is UTF-8 encoded (like simple Notepad text documents are) but contains a byte order marker (BOM).
The BOM is an invisible (to the user) and optional unicode character that appears in front of the first line of UTF encoded text to signal to the application reading the text whether the text document is encoded using 16 or 32-bit integers so that the application can set the byte order correctly.
Why does the Minecraft text engine spit out a little tiny block labeled "ZWN BSP" though? The unicode BOM is a character literally called the "Zero-Width No-Break SPace" and the Minecraft text engine actually displays the character that is supposed to be invisible to the end user.
That bit of trivia aside, it's very simple to work around it and keep your splash text pretty. All you need to do is use a text editor that allows you to set the encoding to "UTF-8 without BOM". Here's a screenshot of what this looks like in the popular text editor Notepad++.

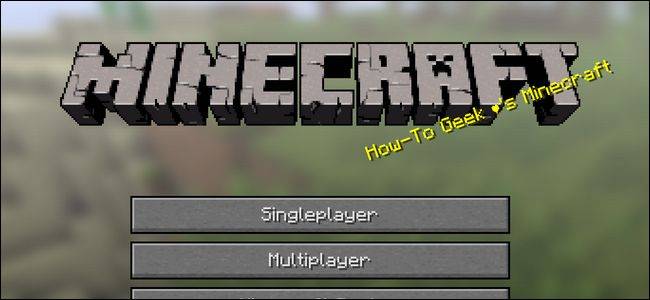
Armed with an editor that allows you to encode the text document in UTF-8 without the BOM, the rest is very simple. Navigate to the subdirectory in your new resource pack \assets\minecrafts\texts\ and create a document labeled splashes.txt. Enter as many catchy phrases or slogans as you want, one phrase per line. For testing purposes we used a single line:
How-To Geek ♥'s Minecraft
If you want to ensure that a phrase will be displayed prominently (such as a happy birthday message) limit yourself to a one-line splashes.txt so that the displayed text is limited to just that message.
Creating a Resource Pack Icon
Resource packs get a generic icon unless you include one. This step is completely optional but we like easy visual identifiers so we opted to take advantage of it.
To include a custom icon with your resource pack you just need to place a 128 x 128 pixel PNG file in the base directory of your resource pack with the label "pack.png". We snagged a free Creative-Commons licensed water drop icon and modified it slightly to stand out from the generic resource pack icons. As long as you keep it within the size and file format parameters, you can use whatever you want.
File Structure Review
Let's take a quick second to review our file structure to make sure everything is where it belongs. Your new resource pack should have the following file structure with the files exactly where we have them noted. The files we added since we created the original file structure are bolded.
... /Custom Splashes/
...... <strong>pack.mcmeta</strong>
...... <strong>pack.png</strong>
...... /assets/
......... /minecraft/
............ /texts/
............... <strong>splashes.txt</strong>
If the files in your resource pack are where they belong and you made sure to edit your text document with the whole no-byte-marker trick, it's time to try your resource pack out.
Loading Your Resource Pack
With our resource pack created, there's only one thing left to do: try it out! Fire up Minecraft to get started.

Right now, without the resource pack, the splash text is pulled from the splashes.txt inside the Minecraft.jar. Click on the "Options" button at the bottom of the screen. In the "Options" menu select the "Resource Packs..." button on the lower left.

The resource pack we just created (as well as any other resource packs you have already installed) should be displayed here. Hover over the icon for the "Custom Splashes" resource pack and click the arrow icon that appears there to move it over to the active column. Once the resource pack is listed under "Selected Resource Packs" click done to return to the main menu.
The custom splash text won't load until the menu is completely refreshed so you need to either restart Minecraft or just load a game world and exit to return to the main menu. After you do that, your custom splash text will appear like so.

Success! Now all we need to do in the future to edit our splash text messages is to return to the splashes.txt file in our resource pack and edit it with an appropriate text editor.
Downloading the HTG Custom Splashes Pack
While it's fun to create your own resource pack and see how it works, we also understand it's nice to grab an existing resource pack and jump right into editing the splashes text. You can download the exact resource pack we created for this tutorial in zip format here.
All you need to do is place it in the resource pack folder of your Minecraft installation. The only edit you'll need to make is to open up the splashes.txt document in an appropriate text editor (if you jumped all the way to the end of this tutorial looking for the download, you'll really want to go back and at least read the section above "Creating the Splashes TXT").
Save your edit, launch Minecraft, and you'll be greeted with your new custom splash text!
We're huge fans of Minecraft around here; want to learn more about the game and further customize it? Check out our extensive Minecraft tutorial list here. Have questions about a Minecraft topic we haven't covered? Shoot us an email at ask@howtogeek.com and we'll do our best to answer it.