Quick Links
Scanning a document in Mac OS X is extremely simple, but for those who might not be familiar, or are coming from Windows, it's useful to take a quick tour through how it works.
It's worth noting that a good percentage of the time you can just use your smartphone's camera and scan it to PDF easily. For most common scanning tasks, that option will work really well, and it's an especially great option for scanning a picture of a receipt to save into your digital archive.
Scanning in OS X is Easy
You can open the Printers & Scanners app through System Preferences, but it's easier to use CMD + SPACE to pull up Spotlight and type in "Scanner" to bring it up.

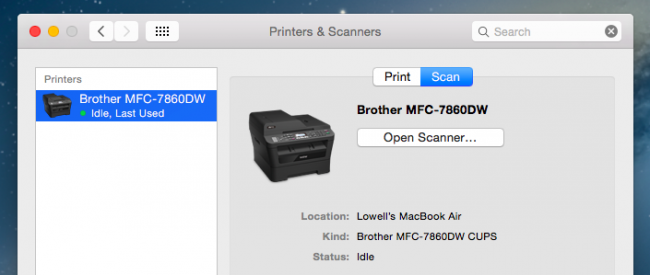
Once you've opened the preferences panel, you'll see your printer, and you'll want to click on Scan, and then Open Scanner.

At this point you'll see the Scanner window, and you can click the Scan button, but we'd recommend using the Show Details option to get into the settings for the scanner. If you have a sheet feeder, you could select that checkbox, and change the drop-down from Pictures to something else before scanning, but it's easier to just get into the details first.

Once you've arrived at the Details screen, your scanner will usually warm up and take a preview scan before you select the options for the actual scan, although this will load from the flatbed.

Most of the options make sense and are straight-forward, but we'll list out the important ones just in case.
- Scan Mode - If your scanner has a sheet feeder, you can use this to select that instead of the flatbed.
- Kind - If you only want black and white you can change to that mode for documents, although the default Color option is probably just fine.
- Resolution - You can almost always leave this at default for documents, unless you are trying to scan photographs, in which case you would want to use a higher resolution. 300 dpi will be just fine for a document.
- Scan To - You can choose a different folder than the default, which is your Pictures folder for some reason, even though the default format is PDF. It would make more sense to have Documents as your default folder, but whatever.
- Name - This is what the file is actually going to be saved as. Change this to something descriptive.
- Format - The default is PDF, but you can change it to an image format instead if you are scanning pictures. You can also use the "Combine into single document" checkbox to take everything off the sheet feeder and put it into a single document.
Once you've selected your options, which mostly consists of selecting between sheet feeder or flatbed, picking the folder, and changing the name of the document, you can simply click Scan to start the scanning process.