Quick Links
Many of us crave organization and productivity. If you already use Microsoft Office, then you already have the ultimate tool to sate that craving: Outlook 2013.
Outlook is vital in many organizations, not simply for its obvious email skills, but it’s calendaring, tasks, and contacts talents as well. A typical company can connect Outlook to an Exchange server, and everyone can share the same address book and calendars, making it a great tool for enterprise level collaboration.
Unfortunately, most folks don’t have an Exchange server set up in their home and probably don’t even know what that is. But, that’s okay, Outlook functions just as well on your home computer, and will still provide all the features that make it such a powerful productivity tool: e-mail, tasks, appointments, address books, and much more!
Working with Outlook – A Tiny Primer
Outlook isn’t going to dazzle you when you first open it. For all intents and purposes, it’s another application in the Microsoft Office ecosystem and as such, it’s going to have quite a few familiar elements.
Unlike other popular Office apps, however, Outlook is largely built around its different functions – Word is primarily for creating text documents, Excel is all about spreadsheets, PowerPoint does presentations – but Outlook is a app of many hats.
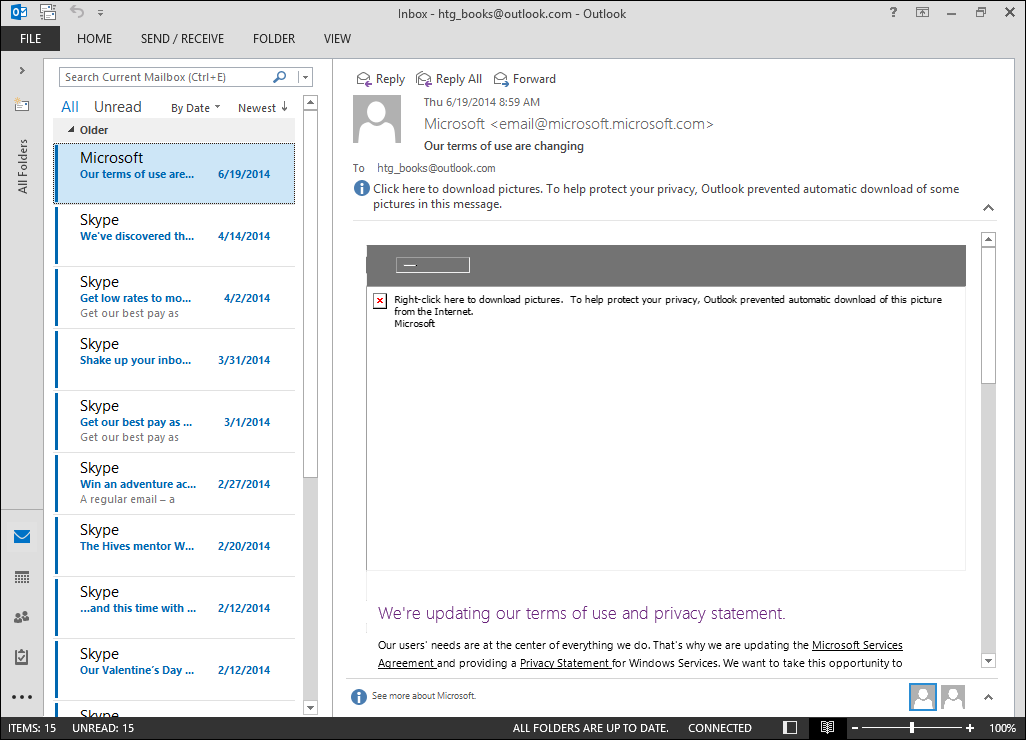
Outlook’s default view is the inbox, along the top is the Ribbon, which is hidden in this view to save screen space.
Love them or hate them, Ribbons are everywhere throughout Office. We don’t need to spend any more time going over the relative merits of their existence, obviously they’re here to stay. That said, always remember, if you want to quickly hide or show the Ribbon, just use CTRL+F1.
If you click on any of the menu functions at the top, the Ribbon shows and you can choose functions and tools. If you want the Ribbon to persist, you can use "CTRL+F1" or click the small pushpin icon in the bottom-right corner.

The Home tab on the Ribbon changes contextually depending on the mode you’re in. In the above screenshot, we see our options for Mail.
Below, the Home tab has changed to reflect the Calendar’s options. Note, the Ribbon is pinned so the pushpin has changed to an arrow in case you want to collapse it again (or use "CTRL+F1").

The remaining Ribbon tabs – Send/Receive, Folder, View and, of course File – are all largely consistent for whatever mode you’re in. We'll take a closer look at all of them in the next section.
Let’s take a quick look at how to move between modes and change your view. Along the left edge, you see the folder pane. At the bottom of this pane are shortcuts to Outlook's modes. In this example, you see icons for the Inbox, Calendar, People, Tasks, and so on.

If you click on the arrow at the top of navigation pane, it will expand the pane, which will display the folder tree for your email account.

Similarly, if you switch to the Calendar mode, you will see the applicable view in the folder pane.

Click on the three dots to access further Outlook modes, such as Notes, Folders, and Outlook shortcuts. Choose the “Navigation Options” and you can change the order in which the navigations elements appear.

Turning off “Compact Navigation” will appeal to users with larger resolution displays. You can also increase or reduce how many items appear and the order they appear.
Send/Receive
The Send/Receive tab is geared specifically toward Inbox functions but it will appear in the other modes (Calendar, Tasks, etc.) too, though they won’t have the same functionality.

For example, here we see the Calendar’s Send/Receive tab, which eschews the Server section.

Depending upon what type of mail protocol you’re using (in the first screenshot, we’re working with an IMAP account), you may or may not have the ability to only download headers, or mark/unmark messages to download, etc.
Send/Receive options are thus dependent upon how you set up your e-mail accounts, but long story short: we highly recommend IMAP.
Folder
Overall, the Folder tab is fairly consistent across all modes, with the notable exception of the Calendar. Below, you see the Inbox Folder tab, which lets you do all sorts of folder administration (if you’re not using an IMAP account, then you won’t see the IMAP tab).
The AutoArchive Settings button is a little confusing since it doesn’t really affect how your inbox automatically archives old mail. If you want to keep your mail footprint small and easier to manage, you’ll need to open the options and attend to the AutoArchive setting there. Open the Options and select the “Advanced” category.

Once you locate the AutoArchive option, click the “AutoArchive Settings…” button to open a far more helpful dialog than what you’re given from the Ribbon.

As we mentioned, most of the Folder tabs are fairly consistent throughout Outlook, except the Calendar, which caters to calendar-specific functions. For example, you don’t copy or move folders, you copy or move calendars, and so on.

For the most part, you’ll do a lot of folder administration with regard to your inbox because obviously e-mail can quickly become unwieldy and overwhelming if you don’t have a good folder structure and organization.
View
The View options contain the following essential functions. This is the View tab as seen from the Inbox.

Note the Reminders Window button, which you can open at any time to check your reminders, such as if you missed one or absent-mindedly dismissed another. If you had any reminders showing, you could choose to dismiss each one, hit the snooze button, or simply dismiss everything in one go.

The other View tabs will vary according to the mode. The following is attributed to the Calendar, which adds the ability to change the current view, arrangement, color, and layout. Again, the Layout section does a lot of the same stuff throughout Outlook, but it’s important to note that it’s not universal, so what you enable in the Tasks, or Calendar, or Email modes will not be replicated throughout the entire application.

Also, it’s important to pay attention to the Arrangement section. Here’s what the Arrangement section looks like in the Tasks mode. Notice how you can sort and change the Tasks view for maximum impact.

Using the View tab per your preferences will allow you to cut through and sort information quickly as it increases and builds over time. Your calendar won’t stay empty, your tasks will multiply, mail piles up, and so using different arrangements and layouts can help you be a great deal more productive instead of blindly flailing about.
Function Ribbons
Let’s now discuss how your options change from function to function. Here’s everything you need to tap out a basic email message, add attachments, tags, and format your text. There’s nothing overly complicated and you should be able to produce an amazing email message.

Compare that to the Task Ribbon, which is accessible by starting or opening a task. Take a moment to note just how different it is from the Message Ribbon.

Compare that to the Insert tab. The Insert tab is static throughout Outlook, you’ll be able to affect the content of your message, task, calendar event, etc. using the same options and functions.

Email messages do add an Options tab, which have quite a few useful features. Beyond the Themes, which may or may not be useful to you, there's the BCC (blind carbon copy, for when you want to hide recipients from the email header) option and Tracking functions. Overall, there’s nothing here of critical importance, but if you ever need to request a delivery or read receipt, the Options tab is the place to go.

The Format Text tab is the same no matter what function you’re engaged in, and there’s not a whole lot to talk about. This tab bears a striking resemblance to the formatting functions found in Word, so if you use Word to write and format documents, these controls will likely be familiar to you.

Finally, the Review tab is your “just-in-case” tab. You can use this tab’s proofing tools to check your spelling and grammar, find a better word, and just find out how many words are in your email/task/meeting.

The Review tab is the same throughout the Outlook application. Notice also that it contains Language functions, here you can set your language preferences and proofing preferences. You can also translate items such as if you correspond with a foreign partner or someone sends a bit of text in another language.
That’s a large extent to the further functionality in Outlook. Obviously, we skipped over a lot of specifics, but we feel that once you understand the nature of the Ribbon system. When you want to use a function, you know where to look for it.
Setting Up Your Email Account Automatically and Manually
Let’s briefly discuss setting up an email account automatically and manually. When you first start Outlook, it’s going to bug you to set up an account.

You have a choice, you can set Outlook up immediately with an email account, or you can skip this part and add an account later.

If you choose “No,” then a warning message will result to basically tell you that Outlook is pretty lame without at least one email account. Of course, you can still use it to track tasks, notes, keep a calendar, and other things, but Outlook is really an email-centric experience.

With that in mind, we’ll set up Outlook with an email account. You can initially try to do so automatically, where you will enter some cursory information about your account and the application will try to automatically detect the settings.

Sometimes this works, something it doesn’t. If it does, then you win, and you can skip ahead to the next section. If it doesn’t or you know you need to set up an additional server type, then select the “Manual setup” option and click “Next” to continue.
For the sake of expediency, we’ll set up a preexisting account using the automatic method. We’ll describe manual methods in just a bit. If you need to set up an account manually, we suggest you skip ahead to that section. In the meantime, we simply used an Outlook.com account, supplied our password, and you see the result below.

Using an Outlook.com is kind of an easy way out, if you want to set up a non-Microsoft mail, you’ll probably need to configure it manually. If you don’t know how to do that, we recommend you search for how to set up Outlook with your particular email.
That said, in our easy example, we click “Finish” and Outlook then opens up to our shiny, new inbox.
Manual Account Setup
Now that you’ve got a fairly good grasp on Outlook’s basic features, let’s return to and discuss how to set up further email accounts. There’s a good chance you’re like many other people and have two or more email accounts. Thankfully, you can set up Outlook to operate with many different email accounts including POP and IMAP, and you can have as many accounts as you can personally handle.
POP and IMAP?
So what do we mean talk about POP and IMAP?
POP or Post Office Protocol has been around forever, and if you’ve ever used and e-mail client to connect to your ISP-provided email, or fetch your mail from a webmail service, odds are you might have connected using POP. POP is great for downloading your messages.
If you set up your account to work with IMAP, Outlook will copy your online folder structure and will only typically sync a few weeks’ worth of email at a time. Your email won’t be removed from the server, and you can choose to simply download only message headers, which is fantastic if you have 1000s of messages in your folders.
So you have POP, which is obsolete and something like taking a machete to your email, and then there’s IMAP, which is more refined, modern, and better-suited if you want to maintain the same inbox online and as offline.
Like we said, we think IMAP is the far superior method.
Adding and Managing Multiple E-mail Accounts
Adding and managing multiple e-mail accounts in Outlook is very simple. If you want to add a new email account, click the “File” tab on the Ribbon and click “Add Account.” The Auto Account Setup screen will appear. If you want (or need) to manually set up your account, select “Manual setup” and click “Next.”

As we mentioned earlier, your choice between account types will likely be POP or IMAP, and setting up your account as one or the other will usually be detailed by your email provider. That is to say, if you use Gmail or Yahoo!, or even the email your Internet service provider gives you, you should consult them or the Internet for specific instructions and settings you will need to use it with Outlook.

On the other hand, if you’re using Outlook.com or other Exchange ActiveSync type service, then the information will be pretty simple to provide.

Once you have added your accounts, if you ever need to manage them you can choose the account you want to deal with from the drop-down selector at the top of the Account Information page found on the File tab.
Click “Account Settings” and “Account Settings,” again. From the resulting window, you can create a new account, repair a current one, remove it, set it as default (if you have more than one) and, of course, change any settings if necessary.

Here we see the settings for an Outlook.com account. There’s not much we can do to it, though if you recently changed your password, you could quickly fix that here.

Below is an IMAP setup, which was configured by hand according to settings provided by Google.

Whoa, there’s a whole lot more going on there, and we even have to dig into “More Settings …” to fiddle with server ports.

Remember, you only have to do this kind of stuff once, and then forget it. Unless you later change a password, or want to add/remove an account, then your work with email account settings is effectively over.
If you want to learn more about adding Gmail IMAP accounts to Outlook, we have a handy little guide that will help you out with that.
Ready, Set, E-mail!
While you may be satisfied using just Gmail or just Yahoo! Mail for daily use, if you use several e-mail accounts, such as a personal, professional, and/or work account, then having a mail client such as Outlook can eliminate switching between accounts, plugging appointments into your calendar, or managing tasks.
It's a real, viable, all-in-one-productivity solution, and given Microsoft's renewed focus on the Office suite, remains a relevant part of many user's daily routines.
Once your email accounts are set up and ready, you can start using Outlook and exploring all of its functions. You'll likely find it pretty easy to use, and there's a lot more that How-to Geek can help you out with previous articles, or by simply inquiring in our discussion forum.