If you're looking for a way to 3D render and preserve your favorite Minecraft creations, big or small, as beautiful images then look no further than Chunky. Whether you want to immortalize a whole city or a tiny cottage, it's the right tool for the job.
What is Chunky?
In a previous Minecraft tutorial we showed you how to render your entire world map into a Google Earth-style interactive map with Mapcrafter. If you’re interested in a more up-close and personal render than MapCrafter can provide, however, you need Chunky.
Where MapCraft renders your Minecraft world in totality across all available chunks, Chunky renders a tiny portion of your Minecraft world in very high detail, so it’s a great tool for really showing off a build you’re proud of.
Further, you can really dig in with Chunky and set a wide variety of options unavailable in Mapcrafter: you can use custom texture packs, set the time of day and angle of the light, adjust the light sources, and otherwise tweak the render options and appearance of your rendered chunks to achieve a perfect look.
Installing and Configuring Chunky
Visit the Chunky website and grab the most current cross-platform binary bundle. There is a Windows installer but the binary bundle is a universal Java installer and just as easy to use. Extract to a well labeled folder and run the chunky.jar file.
The installer will prompt you to pick a location:

After selecting a directory, the Chunky launcher will load. Now is the time to select the directory that contains the map file you wish to work with (the launcher defaults to the default Minecraft data directory for your OS but you can point it wherever you want). After selecting the folder, adjust the amount of memory allocated to Chunky. While it can run on a smaller amount of memory, if you have a bunch to spare you might as well speed your render up by allocating it to Chunky.

Click launch and the app will run and present the world selection screen.

Once you select a world (either from the list or using the “Browse for Specific World” option), the world will load in a top-down view.

Here’s an aerial view of the same Survival Mode castle-in-progress we used for our Mapcrafter tutorial.
Let’s say we want to render that partially finished lighthouse we’ve been working on. All we need to do is select the chunks the lighthouse is sitting on by clicking on them.

Then we simply click “New Scene” to start the rendering process. Chunky will ask us where we want the scene stored. By default, it stores your renders in /scenes/ off the main directory. Confirm where you want the new scene placed and click “OK.”
The next stop is the Render Controls panel which is paired with the Preview panel. The settings here are a bit overwhelming. We’d suggest only messing with a few of them to start with (those of you that like to dive right in would be well served to read the detailed breakdown of all the Chunky render settings here).
The first thing you want to change is the camera projection under the “Camera” tab. If you want to be able to zoom in and out like you’re viewing the game as an actual player, switch the Projection type to “Parallel.” Now you can move around freely to position your subject.

The second order of business is changing the canvas size. You can select from the drop-down menus on the “General” tab, or you can specify the size you want. To start with, we recommend doing small renders. Big renders take a lot of time and until you get the look you want, there’s no reason to waste three hours of render time on a huge poster-size print you won’t even like.
When you click the “START” button to begin the render, don’t worry if things get real weird looking for a moment. Chunky is doing frame-by-frame rendering of your scene and it looks a bit strange while it’s in progress.
When the process is complete, you’ll have a little 3D render of Minecraft creation like so.

Don’t think our simple little 3x3 chunk render here is all there is to Chunky, though. You can render as big or as small as you want. Let’s zoom out to see our whole castle complex and mix things up a little by adding in a texture pack (the same photo-realistic 256x texture pack we showed off in the beginning of our guide to Minecraft resource packs).

It took ten minutes to render the original tower just by itself but this render of the entire complex took a solid hour-and-a-half. The increased render time is a result of both the increased size of the area (18x18 chunks instead of our original 3x3) but also the overhead of rendering lighting conditions for so many additional surfaces and light sources.
Our examples are just a sliver of what you can do with Chunk. Courtesy of the Chunk sample gallery, here’s two fantastic renders that show you the kind of neat stuff you can do with it.

The first, by Chunky user 04hockey, is an up-close and atmospheric rendering that shows the inside of a medieval style church.

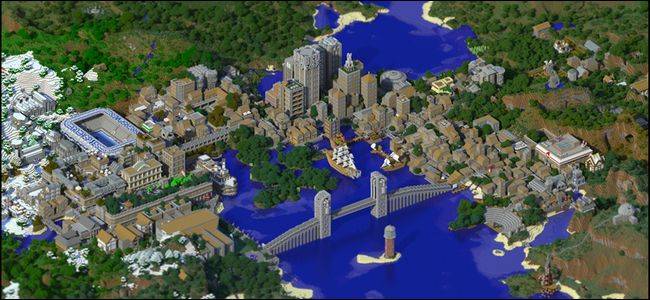
The second is a long-distance rendering of Broville, a massive undertaking by Minecraft creative team Oldshoes, which really showcases how great a render with a shallow depth of field looks.
Whether you zoom in close or pan wide with your Chunky renders, the tool offers a unique and really eye catching way to turn the creations you've worked so hard on in Minecraft into image files suitable for desktop wallpaper or even framing.