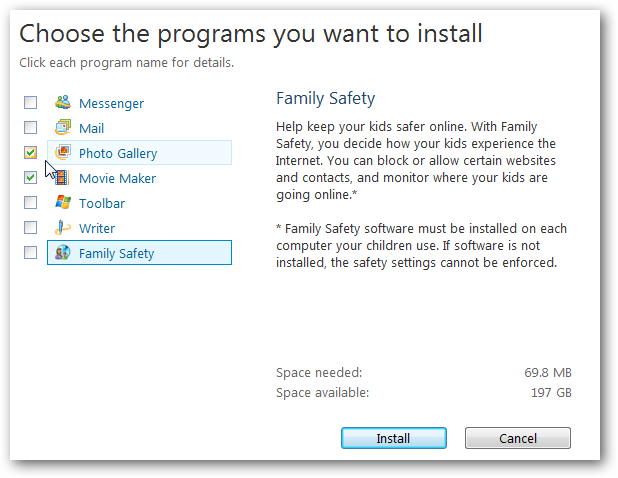
Have you ever wanted to take a TV program you've recorded in Media Center and remove the commercials or save clips of favorite scenes? Today we'll take a look at editing WTV and DVR-MS files with Windows Live Movie Maker. Download and Install Windows Live Movie Maker. The download link can be found at the end of the article. WLMM is part of Windows Live Essentials, but you can choose to install only the applications you want. You'll also want to be sure to uncheck any unwanted settings like settings Bing as default search provider or MSN as your browser home page.

Add your recorded TV file to WLMM by clicking the Add videos and photos button, or by dragging and dropping it onto the storyboard.

You'll see your video displayed in the Preview window on the left and on the storyboard. Adjust the Zoom Time Scale slider at the lower right to change the level of detail displayed on the storyboard. You may want to start zoomed out and zoom in for more detailed edits.

Removing Commercials or Unwanted Sections Note: Changes and edits made in Windows Live Movie Maker do not change or effect the original video file. To accomplish this, we will makes cuts, or "splits," and the beginning and end of the section we want to remove, and then we will delete that section from our project. Click and drag the slider bar along the the storyboard to scroll through the video. When you get to the end of a row in on the storyboard, drag the slider down to the beginning of the next row. We've found it easiest and most accurate to get close to the end of the commercial break and then use the Play button and the Previous Frame and Next Frame buttons underneath the Preview window to fine tune your cut point.

When you find the right place to make your first cut, click the split button on the Edit tab on the ribbon.

You will see your video "split" into two sections.

Now, repeat the process of scrolling through the storyboard to find the end of the section you wish to cut. When you are at the proper point, click the Split button again.

Now we'll delete that section by selecting it and pressing the Delete key, selecting remove on the Home tab, or by right clicking on the section and selecting Remove.

Trim Tool This tool allows you to select a portion of the video to keep while trimming away the rest.

Click and drag the sliders in the preview windows to select the area you want to keep. The area outside the sliders will be trimmed away. The area inside is the section that is kept in the movie. You can also adjust the Start and End points manually on the ribbon.

Delete any additional clips you don't want in the final output.

You can also accomplish this by using the Set start point and Set end point buttons. Clicking Set start point will eliminate everything before the start point.

Set end point will eliminate everything after the end point.

And you're left with only the clip you want to keep.

Output your Video Select the icon at the top left, then select Save movie. All of these settings will output your movie as a WMV file, but file size and quality will vary by setting. The Burn to DVD option also outputs a WMV file, but then opens Windows DVD Maker and prompts you to create and burn a DVD.

Conclusion WLMM is one of the few applications that can edit WTV files, and it's the only one we're aware of that's free. We should note only WTV and DVR-MS files will appear in the Recorded TV library in Media Center, so if you want to view your WMV output file in WMC you'll need to add it to the Video or Movie library. Would you like to learn more about Windows Live Movie Maker? Check out are article on how to turn photos and home videos into movies with Windows Live Movie Maker. Need to add videos from a network location? WLMM doesn't allow this by default, but you check out how to add network support to Windows Live Move Maker. Download Windows Live