There may be times when you want users of a computer not to be able to change the screen saver. Here's how to prevent it from happening.
Maybe you have PCs in a small business setting and you'd like to make sure employees don't set inappropriate images or text for the screen saver. Maybe you have a customer-accessible kiosk PC on which you'd rather settings be left alone. Or maybe you just prefer to be in control of what screen saver displays on the family PC. Whatever your reasons for locking down access to users' access to this feature, it's not difficult to do. If you have a Home edition of Windows, you'll need to make a couple of edits to the Registry. If you have a Pro or Enterprise edition, you can make edits in the Registry or use the Local Group Policy Editor.
Home Users: Prevent Screen Saver Changes by Editing the Registry Manually
If you have the Windows 7, 8, or 10 Home edition, you will have to edit the Windows Registry to make these changes. You can also do it this way if you have Windows Pro or Enterprise, but just feel more comfortable working in the Registry. (If you have Pro or Enterprise, though, we recommend using the easier Local Group Policy Editor, as described in the next section.)
Standard warning: Registry Editor is a powerful tool and misusing it can render your system unstable or even inoperable. This is a pretty simple hack and as long as you stick to the instructions, you shouldn’t have any problems. That said, if you’ve never worked with it before, consider reading about how to use the Registry Editor before you get started. And definitely back up the Registry (and your computer!) before making changes.
We've got instructions here for preventing screen saver changes by individual users on a PC or for all users of the PC. If you want to disable screen saver changes for an individual user, you'll need to log on as the user you want to make changes for, and then edit the Registry while logged in to their account. If you have multiple individual users for whom you want to changes for, you’ll have to repeat the process for each user. If you want to make the changes for all user of the PC at once, including your own account, you can just stay signed on with your account.
After logging on with the appropriate account, open the Registry Editor by hitting Start and typing “regedit.” Press Enter to open Registry Editor and give it permission to make changes to your PC.

In the Registry Editor, use the left sidebar to navigate to the following key if you want to disable screen saver settings for the currently logged in user:
HKEY_CURRENT_USER\Software\Microsoft\Windows\CurrentVersion\Policies

If you'd like to disable screen saver settings for all users of the PC at once, navigate to this key instead:
HKEY_LOCAL_MACHINE\Software\Microsoft\Windows\CurrentVersion\Policies
Note that everything about those two locations is the same, except for the hive. Items in HKEY_CURRENT_USER apply only to the currently logged in user, while items in HKEY_LOCAL_MACHINE apply to all users. No matter which you choose, the rest of the steps are the same.
If you don't see a key named "System" under the Policies key, you'll need to create one. Right-click the Policies key and choose New > Key. Name the new key "System." If a System key is already present, skip this step.

Next, you'll create a new value inside the System key. Right-click the System key and choose New > DWORD (32-bit) Value. Name the new value "NoDispScrSavPage" and then double-click the new value to open its properties window.

In the properties window for the NoDispScrSavPage value, change the value from 0 to 1 in the "Value data" box and then click "OK."

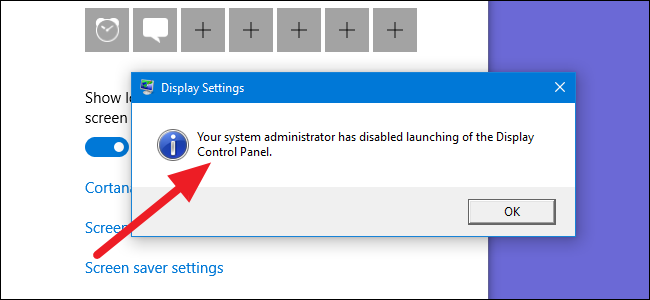
You can now close Registry Editor. The changes will take place immediately, so if you try to open up your screen saver settings, you'll see an error message. And don't worry. While the error message implies that the whole Display control panel has been disabled, the only thing we've disabled here is the ability to change the screen saver.

If you're disabling the screen saver for multiple users, you can now sign in as the next user and repeat the process. If you ever want to reverse the changes, just sign back in as the user for whom you want to make changes, go back to the System key in Registry Editor, and set the NoDispScrSavPage value back to 0 or just delete it altogether.
Download Our One-Click Registry Hacks

If you don’t feel like diving into the Registry yourself, we’ve created some registry hacks you can use. One set enables and disables the ability to change the screen saver for the currently-signed in user only. The other set enables and disables changing the screen saver for all users of the PC. All the hacks are included in the following ZIP file. Double-click the one you want to use and click through the prompts. Just remember that if you're using the hacks for the current user only, you’ll need to sign in with the user account you want to make the changes for first.
Disable Changing Screensaver Hacks
These hacks are really just the System key, stripped down to the NoDispSrcSavPage value we talked about in the previous section and then exported to a .REG file. The two hacks for the current user only affect the System key found in the HKEY_CURRENT_USER hive, while the two hacks that affect all users make changes to the System key in the HKEY_LOCAL_MACHINE hive. Running the hacks just modifies the value. And if you enjoy fiddling with the Registry, it’s worth taking the time to learn how to make your own Registry hacks.
Pro and Enterprise Users: Prevent Screen Saver Changes with Local Group Policy Editor
If you’re using Windows Pro or Enterprise, the easiest way to lock out this change is by using the Local Group Policy Editor. It also gives you a bit more power over which users have this restriction. If you’re turning off the shortcuts for only some user accounts on a PC, you’ll need to do a little extra setup by first creating a policy object for those users. You can read all about that in our guide to applying local Group Policy tweaks to specific users.
You should also be aware that group policy is a pretty powerful tool, so it’s worth taking some time to learn what it can do. And if you’re on a company network, do everyone a favor and check with your admin first. If your work computer is part of a domain, it’s also likely that it’s part of a domain group policy that will supersede the local group policy, anyway.
Start by finding the MSC file you created for controlling policies for those particular users. Double-click to open it and allow it to make changes to your PC. If you just have one user account on your PC, you can open the regular Local Group Policy Editor instead by clicking Start, typing “gpedit.msc,” and then hitting Enter. That’s what we’re going to do in this example, but if you use an MSC file to apply the changes to certain users, the steps are the same.

In the Group Policy window for those users, on the left-hand side, drill down to User Configuration > Administrative Templates > Control Panel > Personalization. On the right, double-click the "Prevent changing screen saver" setting to open its properties window.

In the setting’s properties window, click the “Enabled” option and then click “OK.”

When you're done changing the setting, you can exit the Local Group Policy Editor. Changes take effect immediately, so no need to restart the PC or anything. To reverse the change later, just go back to the same “Prevent changing screen saver” setting and change it back to “Not Configured.”