If you're particular about how Windows displays the contents of your folders, you can cut your customization time down considerably by taking advantage of File Explorer's five built-in folder templates.
You may have noticed that when you open folders with certain types of files--like pictures or music--Windows displays the contents of those folder a little differently from other folders. In Windows, every folder on your system is "optimized" for one of the five following templates:
- General Items
- Documents
- Pictures
- Music
- Videos
Windows does its best to automatically detect what kind of files are in a folder and apply the proper template. In folders with mixed file types, Windows will typically use the General Items template, unless the overwhelming majority of files in that folder fit one of the other categories. You can also set the template for any folder manually.
Even better, you can customize the display of any folder that uses a particular template and then apply those customizations system-wide to all folders that use the same template. Such customizations include the view (list, details, and so on), which columns are displayed and how, the sort order, and any file groupings. Here's how to make it all happen.
NOTE: Folder templates have been around since the Windows XP days and using them hasn't changed much over the years. The techniques in this article apply to Windows XP through Windows 10.
Step One: Customize a Folder that Uses the Template You Want to Change
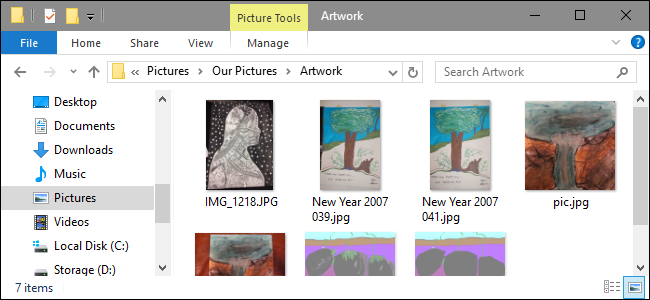
Your first step is to customize a single folder that uses the template you want to change. In this article, we'll be customizing a pictures folder and then applying those changes to all folders that use the picture template. The process is identical for customizing folders using each of the other four templates.
Open up File Explorer and find a folder you want to work with. To ensure that it's a suitable candidate, right-click the folder, choose "Properties," and then switch to the "Customize" tab. Ensure that the "Optimize this folder for" drop-down menu shows the right template. In our case, the Pictures template is selected, so we're good to go.
If the right template is not shown, you can either choose a different folder or select the proper template from the menu to apply it to that folder. When you're done, click "OK."

Now, you're ready to customize the folder. How you do this is entirely up to you. In our example, we're going to switch the view to display large thumbnails by clicking "Large icons" on the "View" menu of File Explorer. In older versions of Windows without the ribbon interface, you'll find a drop-down menu on the toolbar for making this change.

We're also going to have the pictures grouped by date by selecting "Date" from the "Group by" drop-down menu on the "View" tab.

That's all we're going to for our picture folders, but there is obviously a lot more folder customization you could do. If you're using the Details or List view, you can customize what columns appear in the view and drag your columns to different positions.
Step Two: Apply that Customization to All Folders Using the Template
When you have the folder customized the way you want it, you can now apply your customizations to all other folders using the same template. While you still have that folder open in File Explorer, click the "File" menu and then click the "Change folder and search options" command. In older versions of Windows, this command was named "File and folder options."

In the Folder Options window, switch to the "View" tab, click the "Apply to Folders" button, and then click "OK."

You can now browse around to some other folders that you'd expect to use this template and verify that your customizations have been applied.
As we mentioned earlier, when you open a folder, File Explorer examines the contents to see if it can automatically determine which folder template to use. If it can't, it will use the General Items template. You can force a folder to use any template by selecting it on the "Customize" tab of the folder's properties window.

It’s a shame that Microsoft never went any further with the idea after its initial implementation. It would be really great, for example, if we were able to create our own templates. Nonetheless, it’s still handy being able to set up the templates we do have for different types of folders and apply those templates system wide.