Quick Links
People often joke that certain places are worlds unto themselves. With this clever photo editing trick, you can take a panoramic photo of a place and turn it into a miniature planet--be it a panorama of a city, botanical garden, or marina, you can make it a world unto itself.
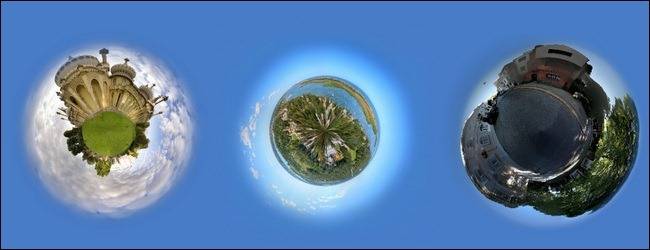
Composite by author, based on photos by Dominic Alves, Craig Conley, and Luis Argerich.
Why Do I Want to Do This?
Maybe you have seen the nifty photo planets other people have created and you want to craft your own. Maybe you would like to surprise a friend or loved one with really unique photo of their favorite place. Or perhaps you were just sitting around this morning thinking "You know, I really don't get enough use out of the Polar Coordinates function in Photoshop. I need to rectify that."
Whatever motivation you have, this tutorial is a really fun (and surprisingly quick) way to step beyond simply using Photoshop for color corrections, blemish removal, and other more mundane but necessary photo editing tasks, and to use it instead for something really quirky and fun.
What Do I Need?
For this tutorial you’ll need a few things, including:
- A panoramic photo
- Adobe Photoshop
We’re using Adobe Photoshop CS6, but the techniques outlined in the tutorial should work just fine on older editions of Photoshop.
In addition to Photoshop, you will need a suitable panorama with specific qualities (outlined in following section).
Selecting Your Panoramic Photo

A 360 degree panorama is ideal: One of the fundamental elements of this photo manipulation trick is wrapping the edges of a panoramic photo around to meet each other.
As such, you really need a 360 degree panoramic photo to create the most pleasing visual symmetry (if you use a panoramic photo of less than 360 degrees things like buildings, trees, and other structures won't line up and the illusion is ruined).
You don't have to work with a 360 degree panorama, but if you're working with narrower view, you'll have more editing work to do to ensure the edges blend nicely.
Photo by Dominic Alves.
The wider the better: 360 degree panoramic or not, the wider your photo the better. You want your image to be, at minimum, at least twice as wide as it is tall. The more skewed towards longer-than-taller your photo becomes, the more round your photo planet will be. In other words, if you want a very circular planet, use a long photo. If you want more dramatic outcroppings on your planet (like buildings and towers that jut out into space), use a shorter image.
If you look at the header image of this tutorial, you'll see three different photo planets. Planet number one's photo had roughly a 3:1 size ration with a very tall object in it. As a result, you get a compact little planet with a big protrusion. The source photo for planet number two had a whopping 8:1 width/height ratio and a pretty level horizon--the result is an extremely smooth photo planet. The final planet was based off of a photo with a 2:1 ratio and lots of tall buildings and trees in it. As a result, it has a unique bulging look like the gravity of it is pulling the trees back down to the surface.
Select a photo with relatively clear skies and a fairly open foreground: Ideally, the top quarter and lower quarter of your image will be less busy than the middle of your image, as these are the regions that will be most distorted by the editing process. For example, a panoramic image of New York City taken from an open and grassy location in Central Park would be ideal, as you would have lots of blue sky at the top, lots of green grass at the bottom, and a lot of details (via the buildings) in the middle.
If you have to err in one direction or the other, it's always ideal to have a clearer upper region (e.g. blue skies instead of all clouds).

The horizon must be level: If you're working with a photograph other than a 360 degree panorama, use the guide lines in Photoshop to ensure that your horizon is level. When turning a mountain range into a rocky planet, for example, if you don't carefully crop the photo so that the edges of the horizon meet perfectly when wrapped, you end up with something unsightly like the mismatched edges seen in the photo above.
Now at this point, you may be thinking "Well crap, I don't have anything that even remotely comes close to fitting these parameters..." Don't worry! There are tons of Creative Commons licensed photos on Flickr you can choose from to follow along with this tutorial (and in fact, we're using those very CC-licensed photos too).
You can check out CC-licensed 360 panoramas here.
Warping Your Panorama into a Photo Planet

Once you have selected your photo (we're using this enormous panorama of the Saint Augustine harbor by Craig Conley), it's time to get started.
In order for our resulting planet to end up centered and properly shaped, we need to prepare the image to be the ideal size and orientation for the warping process. To achieve this, we need the image to be perfectly square.

Square your image: Navigate to Image -> Image Size. Within the Image Size menu, uncheck the box "Constrain Proportions". Normally you would never want to change the size of an image without maintaining the proportions, but this is a special case. Once you've unchecked it, adjust the height so that it matches the width of the image.
Note: You don't need to use the exactly values we used for the width/height. We cropped the very large panorama file down to 10,000 pixels wide and then increased the height to a matching 10,000. You simply need to match the width to the height.
The resulting image, seen below, looks pretty strange:

This is a great point to do a little editing if you notice any irregularities in the color of the sky (like the light banding we see in our sky here), or you wish to clean up the very upper region of the image (anything at the top of the image will project off the surface of your planet the farthest). We opted to clean up the banding but leave the sparse clouds intact. The healing brush is a great tool for smoothing out banding in the sky.

In addition to fixing the banding with a little healing brush action, you'll also greatly improve the results of your image by creating a gradient based on the dominant color of the sky. Select the gradient tool, use the eye dropper to pick a dominate shade of blue (or gray/black/whatever color is dominant) in your sky. Apply a gradient from the top of the sky down towards your landscape using the color-to-transparent gradient. This will create a uniform band of color across the top of your image that gently fades as it moves down into the clouds and other higher objects. Why this is important will become apparent in a moment.
Invert the image: Once you've done your touchup editing (if you did any at all), you need to invert the image. This properly orients the image for the warping. Navigate to Image -> Image Rotation -> 180. This flips the image completely upside down.

Warp the image: Now that we've done the prep work, here's where the magic happens. Navigate to Filter -> Distort -> Polar Coordinates. Select "Rectangular to Polar" and click OK. Suddenly, it's all coming together:

Everything turned out great except for a little tiny bit of uneven alignment at the very top of the sphere and a tiny color variation between the blues at the very edges of the original image. We can easily fix that by zooming in and using the healing brush and clone stamp tool to blend the edges.
Let's do that now and then look at a close up of the area to confirm it looks clean:

Perfect! A few minutes cleaning up, and our jagged edge and color variant are completely removed. That's all there is to the whole process: carefully select a good panorama to build on, stretch it, flip it, warp it with the Polar Coordinates tool, and make sure to stop along the way to heal, smudge, airbrush, and otherwise massage your image a little to give the final output a nice polished look.