Office 2007 saw the addition of the Ribbon feature, which some users found confusing. However, you can use it to your advantage by adding your own custom tabs containing commands you use often. This allows for quicker and easier document creation.
We're using Word in our example, but you can create custom tabs in the other Office apps as well. This process should work in Office 2010, 2013, and 2016.
To create a custom tab, right-click on the Ribbon and select Customize the Ribbon.

The Customize Ribbon screen on the Word Options dialog box displays. The tabs available on the Ribbon are listed on the right side of the dialog box. Click New Tab at the bottom of that list.

A New Tab is added after the tab that was selected (which is the Home tab by default). To give the new tab a different name, right-click on the New Tab (Custom) and select Rename from the popup menu.

On the Rename dialog box, enter a name for the tab in the Display name edit box and click OK.

Every tab must have at least one group of commands on it. When you create a New Tab, a New Group is automatically added.

On the Rename dialog box, enter a name for the new group in the Display name edit box. You can also select an icon from the Symbol box to represent the new group when the Ribbon is resized. Click OK.
NOTE: You can add multiple groups on your tab if you want to categorize the commands you add to your tab.

Because the Home tab was selected when we created a new tab, the new tab was added right after the Home tab. You can move the tab to a different position on the Ribbon by selecting the tab to be moved and clicking either the up arrow button or down arrow button.

To add a command to the group on your tab, select a command from the list of commands on the left. You can filter the list by selecting an option from the Choose commands from drop-down list.

To add a command to the group on your tab, drag the command to right below the group name (or other command name) until you see a horizontal bar. You can also add commands by selecting the group, then selecting the command and clicking Add.
NOTE: You can use the up and down arrow buttons to rearrange the commands within the groups on your tab as well.

When you have added all the groups and commands you want, click OK to accept your changes and close the Word Options dialog box.

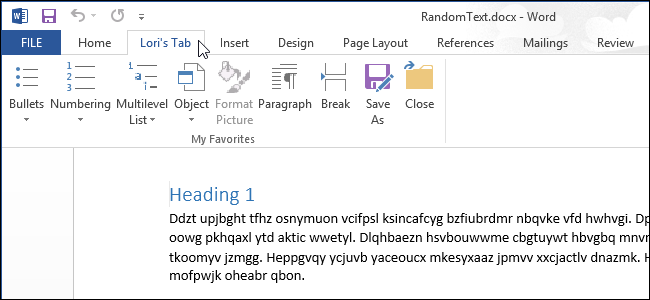
The new tab displays on the Ribbon, providing convenient access to the commands you use most often.

You can also backup your custom tabs so you can re-import them if you have to reinstall the Word (or other Office programs) or if you want to move the same customizations to a different computer; for example, if you have to replace your computer.
To backup your customizations, right-click on the Ribbon again and select Customize the Ribbon. At the bottom of the Customize Ribbon screen on the Word Options dialog box on the right click Import/Export and select Export all customizations.

On the File Save dialog box, navigate to the location where you want to save your customizations backup, enter a name for the file in the File name edit box, and click Save. You can copy this file to an external drive for safekeeping.

If you want to remove any custom tabs you've added or any changes you've made to the built-in tabs, you can reset all your customizations by clicking Reset and selecting Reset all customizations. If you only want to reset changes on one built-in tab (not on custom tabs), select the tab to be reset, click Reset and select Reset only selected Ribbon tab.

If you've selected to reset all customizations, a confirmation dialog box displays to make sure you want to do this. Click Yes to remove all changes to built-in tabs and all custom tabs you've created.
NOTE: No confirmation dialog box displays when you select Reset only selected Ribbon tab.

You can also remove a custom tab by selecting the tab and clicking Remove. This will not affect any changes you've made to built-in tabs.
NOTE: No confirmation dialog box displays when removing a custom tab, so be sure you want to remove it before you do so.

The ability to customize the Ribbon bar by creating your own custom tabs is a useful feature for making it quicker and easier to work on your documents. The commands you use most often can be grouped together, providing quick access.