Quick Links
PowerShell Remoting lets you run PowerShell commands or access full PowerShell sessions on remote Windows systems. It’s similar to SSH for accessing remote terminals on other operating systems.
PowerShell is locked-down by default, so you’ll have to enable PowerShell Remoting before using it. This setup process is a bit more complex if you’re using a workgroup instead of a domain---for example, on a home network---but we'll walk you through it.
Enable PowerShell Remoting on the PC You Want to Access Remotely
Your first step is to enable PowerShell Remoting on the PC to which you want to make remote connections. On that PC, you'll need to open PowerShell with administrative privileges.
In Windows 10, press Windows+X and then choose PowerShell (Admin) from the Power User menu.

In Windows 7 or 8, hit Start, and then type "powershell." Right-click the result and choose "Run as administrator."

In the PowerShell window, type the following cmdlet (PowerShell's name for a command), and then hit Enter:
Enable-PSRemoting -Force

This command starts the WinRM service, sets it to start automatically with your system, and creates a firewall rule that allows incoming connections. The -Force part of the cmdlet tells PowerShell to perform these actions without prompting you for each step.
If your PCs are part of a domain, that's all the setup you have to do. You can skip on ahead to testing your connection. If your computers are part of a workgroup---which they probably are on a home or small business network---you have a bit more setup work to do.
Note: Your success in setting up remoting in a domain environment depends entirely on your network's setup. Remoting might be disabled---or even enabled---automatically by group policy configured by an admin. You might also not have the permissions you need to run PowerShell as an administrator. As always, check with your admins before you try anything like this. They might have good reasons for not allowing the practice, or they might be willing to set it up for you.
Set Up Your Workgroup
If your computers aren’t on a domain, you need to perform a few more steps to get things set up. You should have already enabled Remoting on the PC to which you want to connect, as we described in the previous section.
Note: For PowerShell Remoting to work in a workgroup environment, you must configure your network as a private, not public, network. For more on the difference---and how to change to a private network if you already have a public network set up---check out our guide on private vs. public networks.
Next, you need to configure the TrustedHosts setting on both the PC to which you want to connect and the PC (or PCs) you want to connect from, so the computers will trust each other. You can do this in one of two ways.
If you're on a home network where you want to go ahead and trust any PC to connect remotely, you can type the following cmdlet in PowerShell (again, you'll need to run it as Administrator).
Set-Item wsman:\localhost\client\trustedhosts *
The asterisk is a wildcard symbol for all PCs. If instead you want to restrict computers that can connect, you can replace the asterisk with a comma-separated list of IP addresses or computer names for approved PCs.
After running that command, you'll need to restart the WinRM service so your new settings take effect. Type the following cmdlet and then hit Enter:
Restart-Service WinRM

And remember, you'll need to run those two cmdlets on the PC to which you want to connect, as well as on any PCs you want to connect from.
Test the Connection
Now that you've got your PCs set up for PowerShell Remoting, it's time to test the connection. On the PC you want to access the remote system from, type the following cmdlet into PowerShell (replacing "COMPUTER" with the name or IP address of the remote PC), and then hit Enter:
Test-WsMan COMPUTER
This simple command tests whether the WinRM service is running on the remote PC. If it completes successfully, you'll see information about the remote computer’s WinRM service in the window---signifying that WinRM is enabled and your PC can communicate. If the command fails, you’ll see an error message instead.

Execute a Single Remote Command
To run a command on the remote system, use the Invoke-Command cmdlet using the following syntax:
Invoke-Command -ComputerName COMPUTER -ScriptBlock { COMMAND } -credential USERNAME
"COMPUTER" represents the remote PC's name or IP address. "COMMAND" is the command you want to run. "USERNAME" is the username you want to run the command as on the remote computer. You’ll be prompted to enter a password for the username.
Here's an example. I want to view the contents of the C:\ directory on a remote computer with the IP address 10.0.0.22. I want to use the username "wjgle," so I would use the following command:
Invoke-Command -ComputerName 10.0.0.22 -ScriptBlock { Get-ChildItem C:\ } -credential wjgle

Start a Remote Session
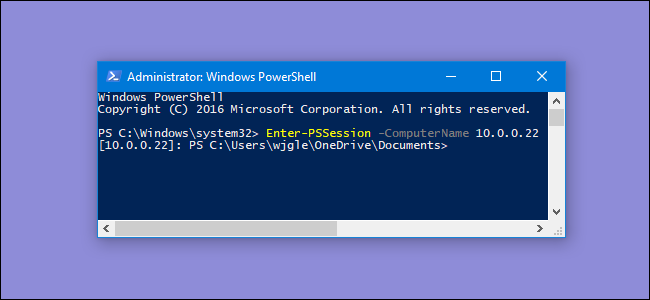
If you have several cmdlets you want to run on the remote PC, instead of repeatedly typing the Invoke-Command cmdlet and the remote IP address, you can start a remote session instead. Just type the following cmdlet and then hit Enter:
Enter-PSSession -ComputerName COMPUTER -Credential USER
Again, replace "COMPUTER" with the name or IP address of the remote PC and replace "USER" with the name of the user account you want to invoke.

Your prompt changes to indicate the remote computer to which you're connected, and you can execute any number of PowerShell cmdlets directly on the remote system.