A new hidden context menu, called the "Power User" or Win+X menu, has been added to Windows 8 and 10 that is available by moving your mouse to the extreme lower left corner of your screen and right-clicking. You can also access it by pressing Windows+X on your keyboard.
But if the items in that menu aren't enough for you, a tool called Win+X Menu Editor will let you add, remove, and rearrange items in it.
To use the Win+X Menu Editor, unzip the file and open either the x64 or x86 folder, depending on your system. You’ll find the Win+X Menu Editor and the hashlnk executable files. The Win+X Menu Editor uses the hashlnk.exe to make the changes to the Win+X menu, just like you can do manually, as we’ve talked about previously. The Win+X Menu Editor does not need to be installed. Simply double-click on the WinXEditor.exe file to run the program.

If the Open File - Security Warning dialog box displays, click Run to continue to open the Win+X Menu Editor.

On the Win+X Menu Editor window, the default three groups of shortcuts display. If you want to separate your own shortcuts from the rest of the default shortcuts, you can create a new group. To do so, click Add Group.

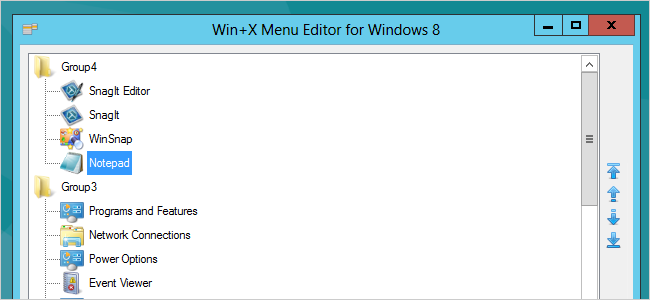
A fourth group displays at the top of the window. To add a shortcut to this new group, highlight the group and click Add Shortcut.

For this example, we are going to add Notepad to the Win+X menu. On the Open dialog box, navigate to the location of the program you want to add to the Win+X menu. Select the .exe file for the program and click Open.
NOTE: You can also add existing shortcuts to the Win+X menu. To do so, navigate to the Desktop or other folder containing shortcut (.lnk) files and select the desired shortcut.

The Win+X Menu Editor uses the name of the .exe file for the name of the shortcut. However, you can change this. We decided we wanted to capitalize Notepad on the menu. To rename a shortcut, either right-click on the shortcut and select Rename, or press F2.

The Rename dialog box displays. Enter a new name for the shortcut and click OK. You’ll notice that there is nothing in the edit box, not even the original name. You must type in a name from scratch.

Once you’ve added some more shortcuts to your new group, you can reorder them using the arrow buttons on the right side of the Win+X Menu Editor window.

When you move shortcuts, the Win+X Menu Editor uses the hashlnk program included in the download. You may see the Open File – Security Warning dialog box again. We recommend that you uncheck the Always ask before opening this file check box for the hashlnk.exe file before clicking Run. Otherwise, this dialog box will keep on displaying. We’ve tested the hashlnk.exe file and haven’t encountered any problems with it.

You can also remove shortcuts from your new group or from the default groups. Select the shortcut and click Remove Shortcut. A confirmation dialog box displays to make sure you want to remove the shortcut.

To apply your changes to the Win+X menu, click Apply. This restarts Windows Explorer, so any Explorer windows you had open will now be closed.

Your custom shortcuts are now available on the Win+X menu.

To return to the default Win+X menu, click Restore Defaults on the Win+X Menu Editor window.
The Win+X Menu Editor does not allow you to rename or move the groups or move shortcuts among the groups.