If you think Photoshop is the most powerful tool in a photographer's toolbox, think again. Whether you're using freeware, Adobe Camera Raw, or Lightroom, Raw developing tools are the best way to turn good pictures into great ones. Raw editors have very specific tools for making very fine tuned adjustments, as well as powerful, image transforming changes. But the program has a lot of new tools to learn, most of which don't appear obvious and easy. Keep reading---we'll discuss more about these powerful tools and how you can use them even if you're not equipped with a camera that can shoot in a raw format.
Does it Matter if I Don't Shoot in Camera Raw?

You might have seen this article---it's been shared in lots of photography circles, including recently on Reddit where we found it in the phography subreddit. Some will tell you that there is an advantage to shooting in JPG over your camera's RAW file format depending on the situation. While this might seem logical, we at How-To Geek don't recommend shooting in anything but raw if your camera supports it. We won't dwell on it today, but raw formats contain loads of information and unprocessed image data that is thrown away when a JPG is created. The point of raw is to take the artistic decisions out of the hands of the camera's computer and let the photographer make those decisions. These camera raw processing tools are ideally for raw files, but they can also work wonders with JPG files. So if you're not capable of shooting in anything but JPG, you can get a great image out of these raw processing programs.
How to Open Images (Including JPG) in Adobe Camera Raw
One of the most frustrating bits about the Adobe Camera Raw program is that it is buried inside of Photoshop and Adobe Bridge. You can open an image in the Camera Raw program several ways.

Open Adobe Bridge (It comes free installed with Photoshop) and simply right click on an image to tell it to open in the Camera Raw program. This is the easiest way to use Camera Raw because Bridge lets you navigate through your pictures and even force open JPGs and other files with Camera Raw.

When you open raw files with Photoshop, they are automatically opened with Camera Raw.


If you want to open JPG files in Camera Raw, find File > Open As and set your filetype to "Camera Raw" as shown above right. Then select any image file and it will open in Camera Raw.
Using Camera Raw to Edit Photographs

The most important raw developing programs have nearly identical tools. Let's look at them and how to use them to develop your images.

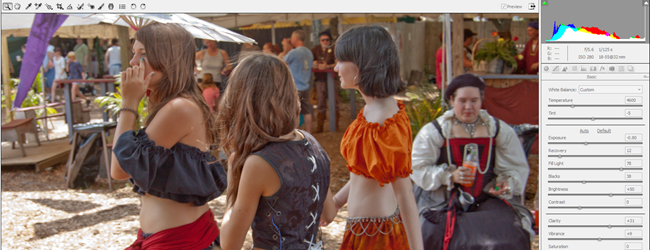
This is the histogram. You should recognize it if you've been reading our articles on Photography. It's pretty dang important and we talk about it a lot, mostly because it is so important. If you don't know, it represents the tones in your image and is the key to using many of the tools in Camera Raw.

On the left you'll find the info for the RGB values under your mouse pointer (currently null because the mouse isn't in the image) and some of the EXIF data about how the image was taken. And all those funny icons below that information? Those are all menus you can access. If you've not noticed them before, you may be stunned to see just how tweaky you can get with your raw files. We can't cover every detail, but let's hit some of the high points. The Basic Menu

|
White Balance: Adjust the white point of your image. Sliding the temperature left causes a blue shift while sliding right causes a yellower, warming shift. Tint: Just like on your television, you can shift your photo red or green. Technically, it's magenta and green because those colors are opposites in the world of photography. Exposure: Raw files more or less record all data that hits the sensor while the shutter is open. Because of this, you can simulate a longer and shorter exposure time by adding or subtracting light in fractions of stops. Recovery: Makes adjustments to the highlight areas just below the purest whites. Look for them just to the left of the right side of the histogram. Fill Light: Adjusts the mid-tones and center bulk of the histogram. Blacks: By default, Camera Raw adds some black to the image. This slider independently adjusts the amount of shadow areas in the image. Brightness and Contrast: These are the basic tools in Photoshop and here they're pretty much the same. Brightness adjusts the highlight areas but tends to brighten the entire image. Clarity: Adds or removes detail in the black channel with sharpen filters that can tighten up the image. Vibrance and Saturation: These two both adjust the intensity of the color in the image in subtly different ways. "Saturation" tends to make the image incredibly intense, cartoonish and oversaturated. "Vibrance" is more natural, even at high settings. |


Through clever application of these tools, you can work miracles on a badly exposed camera raw file. A JPG, on the other hand, will can only be pushed so much, so don't expect a badly exposed JPG to be brought back from the brink this way. Tone Curve

|
The tone curve operates two ways. This is the "Parametric" setting, which is a little different than the usual tone curve. The four sliders for Highlights, Lights, Darks, and Shadows adjust the histogram shown here starting on the right side and working to the left (Highlights on the right, shadows on the left). In addition to sliders to adjust those tonal areas, the three points under the histogram, when moved, will fence in these four areas to a specific part of the histogram. This means, if you want to adjust only the brightest highlights, you can move the rightmost slider closer to the right, and then adjust the highlights slider below. This can allow you to take a lot of control over your image if the basic sliders aren't giving you all the control you want. |

|
The "Point" setting works exactly like the Curves tool in Photoshop. We've talked about it at length before and it's still a powerful tool. Use it if you're comfortable with it. |
Detail, Sharpening and Noise Reduction

|
Easily one of the most important tools in the program, Sharpening and Noise Reduction allow pinpoint accurate control over filters on detail (like the Unsharp Mask filter) or Noise Reduction (like the Smart Blur filter). The benefit here is that Camera Raw seems to automatically adjust these filter selectively in various channels, similar to our Unsharp Mark technique we looked at a few weeks ago. Sharpening is a bit like an extension of the "Clarity" slider under the "Basic" menu and it works similarly to the Unsharp Mask filter in Photshop. If you're not familiar with it, play with it until you get a result you like---you can revert almost anything in a raw editor. Noise reduction has two basic adjustments: it will reduce camera grain in either the Luminance channel (affecting only the black and whites, not color) or in the Color channels (affecting all colors and values). |


Here's a comparison of the sharpening tool at a high setting versus the noise reduction setting at a reasonable setting. Hue/Saturation/Luminance and Split Toning


Hue/Saturation/Luminance allows you to very precisely adjust your colors in all the various primary channels at once. This can allow you a lot of micro control of your image if you prefer to edit it this way. It's great if you want to do something like dull out all colors but the reds or make your only the blues in your sky a shade darker and more intense. Split Toning (above right) can be useful, but seems mostly only for creating Instagram style effects by cooling shadows and warming highlights. Any readers that wish to contribute their uses for Split Toning, feel free to add them in the comments.


Here's split toning in action, creating the aforementioned Instagram style color adjustment. Lens Profiles


Lenses can distort light hitting the sensor. At least, certain types of lenses distort light differently than other types of lenses. When you shoot a modern digital camera, the type of lens you used is recorded in the EXIF data, and programs like Camera Raw can load profiles of that lens to correct the image in ways you might not have noticed before. These usually include warping or darkening parts of the image. You may find you like the image without the profile applied---this part is optional. Simply because you can "correct" an image doesn't mean it will actually make it look better. The "Manual" setting can allow you to distort and adjust the image with the same toolset the lens profiles use. The sliders for "chromatic aberration" can be very helpful if you're running into a lot of chromatic aberrations in your images.


The left image isn't corrected, while the right image is. The outside edges of the picture are slightly brighter and have had some light distortion removed. Effects and Camera Calibration


Buried close to the end are Effects and Camera Calibration. Effects are limited to adding grain and vignetting the sides of the photograph. Both have great tweaks available, but are pretty limited as far as effects go. Camera Calibration is a way to adjust the color profiles associated with your camera and sensor. If that doesn't sound all that appealing to you, don't worry about it. You can safely ignore it and get photos that you're happy with.


Here's the vignette effect that camera raw will apply for you in both white and black. Mostly useless, since Photoshop can probably do this better, but not bad, regardless.
Other Tools For Editing Raw

Your camera might have come with software for editing and developing raw files, and if so, you might want to give this proprietary software a shot. If not, one of our favorite programs is Raw Therapee, which has most, if not all, of the most important features in Adobe Camera Raw. Best of all, Raw Therapee is a free download for Windows.

Lightroom is also a fairly cheap but feature rich program that will develop your raw files exactly like Camera Raw will. Some photographers prefer it exclusively over Camera Raw, although the majority of the program is identical.
That more or less wraps up the less obvious tools to edit camera raw files. Do you feel like you understand the process better? Or are you more confused than before? Tell us about it (or about your experience developing your digital images) in the comments section below, or send your questions to ericgoodnight@howtogeek.com. Your thoughts and questions might inspire one of the next HTG articles!