Quick Links
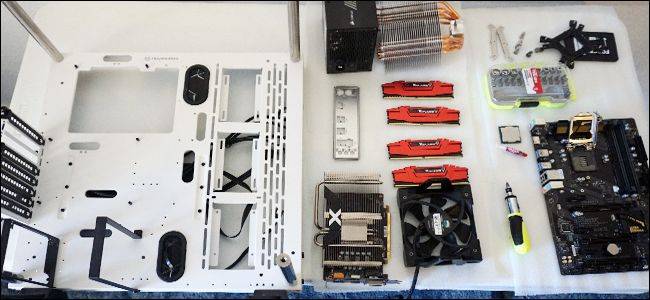
So you've selected your parts, double- and triple-checked their compatibility, and waited for economy shipping to bring them all to your door. It's time to get to the fun part: putting them all together.
Before you start, you'll want to set up a good work area. Get some kind of table with plenty of room and light, preferably somewhere that isn't carpeted. And you'll need some time: a couple of hours, maybe more if this is your first time or if you have a lot of extras.
The Tools You'll Need
All you should really need for the assembly process is a Philips-head screwdriver. A nice set of bits is handy for larger or smaller screws, but everything else you need should be provided with your case and various parts.

If your home or your workspace is particularly prone to static discharges, you might want an anti-static bracelet. This doohicky clips to a piece of metal (like the PC case) to electrically ground your hands while you're working, protecting your parts from a discharge. To be honest, it's very rare that a static shock will actually damage a PC part, and you'll probably be okay just using the anit-static bags that come with your motherboard and graphics card. But if you want to be extra cautious, it couldn't hurt.
Finally, you might want to add a couple of cups or bowls from your kitchen, just for a place to put loose screws. (Or, if you have one, a magnetic parts tray is wonderful.)
First: Examine Your Case
First, take a look at your case. You'll be able to spot the main compartment that holds the motherboard, the drive bays for hard drives and SSDs, the openings in the back for the motherboard's ports and the expansion bays for graphics cards, etc. You should have a pretty good idea where everything's going to go already---if you're not sure, check the manual that came with it (or download it off the support web page on your phone. Remove both side panels while you're at it, because you'll need access to the inside from both sides as you build.

You might notice that the PC case we're using in these photos looks a little strange. It's a Thermaltake P3 enclosure, an open-air design with an acrylic cover, designed to show off all the components and not require any case fans. We chose it specifically so you could see the components clearly in these photos, but it doesn't have exactly the same configuration as most box-style enclosure. Just imagine it with walls on an extra five sides.
Step One: Install the CPU
We're going to install the CPU and the RAM onto the motherboard before installing the motherboard itself, because it's easier than installing them once the board is fixed in place. Take your motherboard out, put it on top of the box it came in, and you'll have a nice little static-free test bench to perform these steps.
Installing the CPU used to be a bit of a nerve-wracking process, but it's become much easier as the designs have streamlined. Just try not to touch the electrical contacts on the bottom of the chip, and you'll do fine.

The CPU will be in a plastic case or some other protector when you take it out of its box. Keep it in there for the moment, and take a look at the CPU socket on your motherboard---it's that open area in the upper-left corner on almost all motherboard designs. There should be a plate that swivels up and down on a hinge (on Intel boards), and a lever that can be pressed down and clipped into the motherboard for safety (on Intel and AMD boards). Take a second to see how this mechanism works on your specific model---they vary a bit between processors and manufacturers.
Raise the plate up, then take the CPU out of its protector. Look closely at the top and bottom (without touching the electrical contacts) and see how they line up in the socket. Most CPUs also have a small arrow in the corner---in the photo below, it's on the bottom left of the chip. This will correspond to a similar arrow in the socket, so just line them up.

When you're sure you know which way the CPU fits into its socket, gently slip it in. You should be able to let it go and it will simply fall the last millimeter or two. It should be flush with the walls of the socket. Now drop the plate, if there is one---if you can't push it down all the way, stop, your CPU isn't inserted correctly. Go back to the start of this section and start over.
If you can lower the plate all the way, great. Press the lever down beneath the safety tab. You're ready to go on.

Step Two: Install the RAM
Next, it's time to install the memory modules. You'll want to do this before installing the CPU cooler, since some aftermarket ones will hang over the edge of the RAM, making it difficult or impossible to put them in after the fact.

The RAM slots are the long, shallow slots with clips on both sides, usually to the right of the processor from your current perspective. Smaller boards might have only two, larger and more expensive boards can have as many as eight. We're going to be inserting four RAM sticks (DIMMs) in our build.
Take a look at your own DIMM and its corresponding slot. Once again, you should notice that there's only one way it will fit---look at the notch in the middle of the gold contacts, and line it up with the plastic bump in the slot. This should work no matter what generation of RAM you're using: DDR3, DDR4, or something even newer. If for some reason your RAM won't fit, it's probably incompatible with your motherboard.

If you're ready to install the RAM, fold the clips on the top and bottom of the slot down. Put the RAM in, contact-first, and press down firmly. The clips should snap back into place to secure the DIMM. Press down on the RAM at the top and bottom to be sure.

Repeat the process for all the RAM modules you have. If all of them aren't parallel, push down until they are.
If you have fewer RAM modules than you do RAM slots, pay attention to which ones you fill up. Notice how the slots in the photos above alternate colors, black and grey? That's because of the way they're designed to work with memory channels going to the processor. In short, use ONLY the black or ONLY the grey slots if you're not filling them up---substituting the colors for whatever your motherboard actually uses, of course.
Step Three: Install the Motherboard
Set your case down on the table, with the front panel on your right side. Remove the case's access door and look down. That large slab of steel or aluminum is where you're going to install your motherboard, and by association, a large portion of the pieces you've bought.
The first thing you'll want to do is install the motherboard risers, small brackets that separate the motherboard from the case itself. Our ATX-standard motherboard uses six. They should be included in the box your motherboard came with or the box your case came with---if it's not clear from looking at it, take a quick look at the manual. You should be able to screw the risers into their mounting holes with just your fingers; they'll tighten in further when you screw the motherboard in place.

NOTE: Some cases don't have a big cutout near the top of where the motherboard goes, like the one in the picture above. If you're installing an aftermarket cooler, and your case doesn't have this cutout, you'll want to install the cooler before putting the motherboard in---so skip down to that section now, and then come back here. Stock coolers do not require this.
Before you place the motherboard itself in the case, install the I/O plate. This is a little piece of aluminum that fits in the back of the case, with cutouts for all of the ports on the back of the motherboard (to the left, from where you're looking now). You should be able to slip it in and click it into place without any tools, though it may take a little force. Our open-air case doesn't have a place for the rear I/O plate, so here's what it looks like most of the time:

Now, take the screws that came with your motherboard and tighten them down into the risers with your screwdriver. Make them good and tight, but not so tight that they crack the circuit board. Make sure to use every screw for every riser: these are the only things that will hold up the motherboard, and all the parts connected to it.

When you're finished, your motherboard will be sitting on the risers about a quarter-inch above the frame of the case.

Make sure the I/O plate fits flush with the case and the various ports on the motherboard, bending back the metal prongs if necessary.
Step Four: Install the Case Fans (If Applicable)

Next, install the case fans in the front, rear, and/or sides of the computer. (If they're already pre-installed in your case, you can skip this step.) Install them now so you don't have to worry about the components getting in the way later. Most of the time you'll just screw the fans directly into the case, but some gaming-branded cases may have caddies or sleds for your fans, for easy removal and cleaning. Your case manual may have more information.
Keep in mind that where you place your fans---and which direction they face---matters. If you're not sure how you should configure the fans for the best airflow, check out this guide.
Step Five: Install the CPU Cooler

If you're going to use the cooler that came with your processor (most of them include one in the box), this will be easy. The coolers that come with CPUs include thermal paste pre-applied to the contact, as do some aftermarket ones, making the process even simpler. Aftermarket coolers can range from easy to oh-god-why difficult, but we'll walk you through what we can in that realm too.
The Stock Intel Cooler
There are four mounting holes a few millimeters on all four corners of the CPU socket. Just push down on the cooler and screw them in place---on the stock Intel cooler, the screws are plastic and mounted on springs, you shouldn't even need any tools.

One the cooler is in place and secure, you'll need to plug its power cable in. There's a small three- or four-pin power port on the motherboard, very close to the CPU socket. Plug it in with the short cable to power the cooler's fan.

The Stock AMD Cooler (and Some Aftermarket Ones)
AMD motherboards come with two plastic pieces on either side of the CPU, and the AMD stock cooler will hook onto these (as will some aftermarket ones). Line up the square metal hooks on the heatsink with the plastic notches on the motherboard, then press the lever down to lock it in place.

Some heatsinks may require you to screw down the hooks instead of pressing down a lever, but all of them will lock on with some sort of variation on this method.
Large Aftermarket Coolers (for Both Intel and AMD)
If you're installing an aftermarket cooler on an Intel chip (or some AMD chips, depending on the cooler), the process is considerably more complicated. This final type of cooler contains a backplate and requires you to screw the cooler on using four mounting holes on the motherboard. (If you're using an AMD board, you'll have to remove the plastic pieces in order to gain access to these holes.)
To attach the backplate, stand the case up vertically and remove the rear panel to get access to the bottom of the motherboard.

Assemble the backplate for the larger cooler. This is required because of the larger size and weight of these coolers: they need to have a more secure footing to avoid warping the motherboard.

Most aftermarket coolers have separate instructions and parts for various Intel and AMD sockets; this one required me to put screws into specific tabs and set them up for the LGA 1151-series CPU socket.
With the backplate in place, move the case around so you're once again facing the "top" of the motherboard. Install the risers on the screws coming up from the cooler mounting plate. You may need to "hug" the case to hold the mounting plate steady while you screw down the risers with your other hand.

With the plate securely in place and the risers set, lay your case down once again in its original work position, with the front panel on your right side. Leave the rear panel removed, it will save you time later.
Continue to follow the instructions to install your specific cooler. In our case, that included screwing down these steel brackets and securing them with nuts and the included wrench, then installing a retention screw for the cooler itself.

Before you set the cooler in place, you'll need to apply thermal paste to the top of the CPU. There are a lot of different opinions about the proper technique here, but the easiest and most reliable way to go about it is "just put a pea-sized drop in the middle."

With the paste in place, set the cooler down and secure it to the mounting bracket; with our model that means clipping it in on one side and screwing it down on the other.

Finally, attach the fan onto the cooling fins (this may already be done for some coolers).

When you're done, plug the fan into the motherboard, using the same three- or four-pin power port used by the stock cooler.
Step Six: Install the Storage and Optical Drives
Our basic machine has only one small SSD for storage, but whatever form of storage you're using, it's pretty simple to get it installed. Your case will have either permanent mounting locations (like ours, right on the side) or sliding caddies that let you screw in the drive and then slide it into a slot for easy removal and replacement. Either your case or your drive itself should include screws to secure it in place. Check your case's instruction manual if it's not immediately obvious where your storage drives should go.

Our SSD drive goes in a little groove on the side of the case. I raised the case to the vertical position again, then inserted and tightened the screws from the back. Easy peasy. (The case also has larger brackets for optional 3.5-inch hard drives, which we're not using.)

Once your storage drive is in place, connect the SATA data cable to the SATA port on both the drive. There's only one way the cable can fit, and it's the same connection on both sides.

Then, plug that same cable into the SATA port on the motherboard. Repeat this process for as many SSDs or hard drives as you're planning to use.

Installing a DVD drive, if you have one, is also pretty simple. On cheaper, simpler cases, just slide it into place in the large 5.25" bay at the front and screw it down with the included screws. More elaborate cases have only one more step: screw in the runners on the side of the drive, then slide the drive into place. Like the caddies for SSDs and hard drives, this just makes it easier to take replace the drive.

In either case, plug the SATA data cable into the drive and the motherboard, just like you did for the hard drive, and you're ready to go.
Step Seven: Install the Graphics Card (and other PCI-e Accessories)

If you're using a discrete graphics card for gaming, you'll want to install it now. It uses a PCI-Express (abbreviated PCI-e, PCIe, or sometimes just PCI) slot, which opens to the outside of the case for expansion ports and is almost always found beneath the CPU socket on the motherboard.
First, determine which of your PCI-e ports uses the x16 speed lanes. It should have PCIEX1_16 or a similar designation: it will be the slot closest to the CPU and the longest (or tied for the longest). If this stuff is confusing, check out this article on using the right PCI-E accessories in the right slots.

Now remove the rear cover for that slot (or slots, if your card is big enough that it needs to have two of them removed). These little metal or plastic pieces are just there to protect your computer's insides for PCI-E slots that aren't being used. Now lower the plastic tab at the end of the slot---this works a lot like the RAM modules, but only one one side. Slide the graphics card in, starting with the side closest to the outside of the case. Press firmly down until the tab locks into place.

Then, put the thumbscrews back in where they came from, securing the card in place.

Step Eight: Install the Power Supply
You're getting close to the end here. Slide the power supply into its bay or bracket. The part that accepts the three-prong power cable (the one that plugs into the wall) should be flush with the back of the case, and accessible from the outside.

Depending on the design of your case, you may want to mount it so the fan is facing either up or down. Most people like to have the fans facing outside the case (fan up if the power supply is at the top of the case, fan down if it's at the bottom), as this will let your power supply take in cooler air. But to be honest, it doesn't make a huge amount of difference---your power supply won't overheat unless you chose one that's insufficient for your computer. If it's easier to access components the other way, that's fine, as long as there's a bit of clearance between the fan and the closest non-mesh surface.
Different cases have different spots to secure the power supply in place, but generally you're going to be using at least four screws. Sometimes you may need to screw the supply in place via the holes on the outside of the case.
When the power supply is firmly in place, it's time to plug it in to all of the components that need power from it. Remember that you can run the cables through more or less any hole, and it might be best to use the back of the case to keep things from getting tangled or catching on the fans.
From biggest to smallest:
- Motherboard: 24-pin cable (sometimes more). This is usually on the right-hand side of the motherboard in its mounted position. look at the pattern of the plastic molding around the pins: there's only one way it will fit.

- CPU: 4, 6, or 8-pin cable (sometimes more). This port is also on the motherboard, but it's somewhere near the CPU socket, often at the top left. Again, there should only be one way to plug this in.

- Storage drives and DVD drives: SATA power cables (the ones with the L-shaped connectors). Most modern power supplies will include at least one SATA power cable, often with sockets for multiple drives that you can use at the same time.

- Graphics card: 6, 8, 12, or 14-pin cable, depending on how powerful the card is. (Ours is a low-power model that gets all of its electrical power from the motherboard, and it doesn't need a direct connection to the power supply). For very powerful cards, you may need to use multiple power cables for a split connection, but again, each individual cable should only be able to fit one way.

- Case fans, coolers, and radiators: Connect the cooling equipment to the power supply with whatever it needs. Some fans with a four-pin connector can attach directly to the motherboard, but others need to be plugged into a power supply rail. You may need molex adapters or SATA adapters if you have more than two or three fans, but generally the power supply comes with enough extra cables for most basic builds.
Anything else you're likely to install should be able to draw its power directly from its connection to the motherboard.
Step Nine: Plug in the Case Controls, Audio, and USB cables
The last thing you'll need to plug in are the cables for your case---these connect the power and reset buttons, the front-mounted headphone and microphone jacks, and any USB ports on the front of the case to the motherboard.

The power buttons and lights are the trickiest here, because they're really tiny electrical cables that have to plug into very specific pins on the motherboard's I/O panel. This panel is usually at the bottom-right of the board. Depending on how your case is laid out, you'll definitely have a two-pin power cable, a two-pin cable for the light that shows you the computer's on, and possibly a two-pin reset cable and a two-pin "HD," "IDE LED," or "Drive" cable (for the little light that blinks whenever your computer is accessing its storage drive). Some or all of these might be broken into positive and negative connectors.


These get frustrating because they're tiny and hard to read. It's best to break out your motherboard's manual and look for specific instructions on the I/O panel. Our motherboard came with a handy little plastic piece that was pre-labelled, and our case has nice bright white labels on the cable itself, making the whole process fairly obvious. Double-check these connections with the motherboard manual if you're not sure about them: you need the power button to be right at the very least if you want your PC to turn on!
The USB and audio connections are more obvious: they'll plug into specific sockets on the motherboard, usually labelled as such. Our case has one for the USB 2.0 ports, another and another similar-looking one for the audio jacks, both of which plug into the bottom of the motherboard.

The bigger plastic cable for the USB 3.0 jacks goes in the side. Again, if you can't find the specific plugs for your motherboard, consult the manual---it should have a diagram either of the parts of the whole board or the specific locations of the connections for the case's front buttons and inputs.

Wrap It All Up!
You're nearly done. Before you close up your case, double-check to make sure none of the power or data cables are too close to one of the case or cooler fans, and that everything is firmly in place and locked down. Looks good? Then put the front and rear covers on and secure them in place with the thumbscrews.

Plug in the power cable to the power supply, then your monitor, keyboard, and mouse. Press the power switch. If you can see the power indicator light on the case, hear the case fans, and see the motherboard logo (known as the POST screen), you're all ready to install your operating system. Congratulations, you've successfully assembled your PC!

If for some reason the power didn't come on, unplug the PC and the accessories, then double-check these common problems:
- Did you have the power switch on the power supply in the right position? This is the switch accessible from the outside of the case; the "I" should be down and the "O" should be up.
- Did you plug the power cable from the power supply into the CPU power socket on the motherboard? This is the smaller of the two cables going from the power supply to the motherboard, usually somewhere near the CPU socket at the top of the board.
- Are all the RAM sticks securely in place, with the plastic clips clamped down?
- Is the CPU cooler connected to the motherboard for power?
- If you're using a graphics card, did you plug the monitor cable into the card instead of the video-out port on the motherboard?
- If you're using a graphics card, did you plug it into the PCI-E slot on the motherboard firmly, with the plastic clip clamped down? Did you use the correct power cable to connect it to the power supply (if it needs one)?
- Did you have the case's power switch cable in the right pins on the motherboard's I/O panel?
Once your system POSTs properly, it's time to prepare your BIOS and install your operating system. Proceed to the next article for more information.
Or, if you want to jump to another part in the guide, here's the whole thing:
- Building a New Computer, Part One: Choosing Hardware
- Building a New Computer, Part Two: Putting It Together
- Building a New Computer, Part Three: Getting the BIOS Ready
- Building a New Computer, Part Four: Installing Windows and Loading Drivers
- Building a New Computer, Part Five: Tweaking Your New Computer