If you are a big fan of both Google Reader and Firefox, you'll be interested to know that Google's iPhone version of Reader is a perfect fit for the Firefox sidebar, and with a few tweaks we can make it really fit well. We can customize it to remove the header, choose our start page, tone down the fonts and even remove the excerpts to give us a nice clean list like this one: Add Google Reader iPhone Edition to the Firefox Sidebar All you have to do is right-click anywhere on the bookmarks bar and choose New Bookmark, give it a name (or leave that blank) and put in the following URL:
http://www.google.com/reader/i/
Make sure you check the box for "Load this bookmark in the sidebar", and you are done.

Now when you click the bookmark, you'll see that it opens in the sidebar.

Change Bookmark to Open Specific Tag (or page) The first problem is that the bookmark opens to the all items view by default, which is bad for those of us with a very large number of subscriptions. I prefer to open Reader with my "favorites" tag selected by default, so we'll have to adjust this. Navigate in the sidebar to the tag that you want, and then right-click in an empty area of the page and choose "View Page Info"

Now you'll see the direct URL to that page, which you can copy to the clipboard...

And then either use in a new bookmark, or customize the existing bookmark that you created.

Now whenever you click on the bookmark, you'll see the page you'd prefer to see. Remove the Ugly Blue Border Note: For the rest of the tweaks you'll need to have the Stylish extension installed, or you can create a file named userContent.css in your Firefox theme directory and put the code there. For whatever reason, the Google Reader logo has this annoying blue border around it, but we can remove that with a quick Stylish script.

Click on the Stylish icon, choose Write Style and then Blank Style.

Give the style a descriptive name, and then paste in the following text:
@namespace url(http://www.w3.org/1999/xhtml); @-moz-document url-prefix(http://www.google.com/reader/i) {
.logo img {border:0px !important;}
}

You can click the preview button to see the changes right away:

Remove Header Entirely Instead of just changing the border, you can remove the entire header image section, since it's not really necessary. Adjust the stylish script to be the following instead:
@namespace url(http://www.w3.org/1999/xhtml); @-moz-document url-prefix(http://www.google.com/reader/i) {
.logo {display:none !important;}
}
Clicking the Preview button will show the new changes...

Adjust the Font Size The iPhone site is optimized for a tiny touch screen display, so the font is just way too big for my tastes. We can add the following line to the stylish script to make the font slightly smaller:
* {font-size:0.97em !important; }
If you are following along, the full script should now be:
@namespace url(http://www.w3.org/1999/xhtml); @-moz-document url-prefix(http://www.google.com/reader/i) {
.logo {display:none !important;}
* {font-size:0.97em !important; }
}
Now we've got a much more compact view, easier to read:

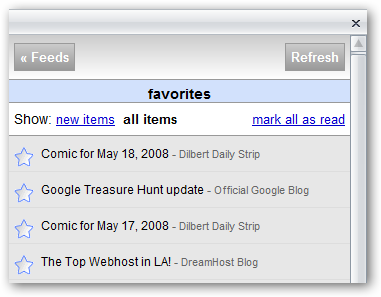
Change List to Headlines Only You'll notice that you can see the first few words of the post in the list view... personally I'd rather just show the headlines. Add the following to your script:
span.item-snippet {display:none !important;}
span.item-source-title{font-size:0.9em !important}
Now we've got a really useful sidebar application:

Full Script Here's the final version of this script, with the logo bar removed, font size smaller, and no excerpts.
@namespace url(http://www.w3.org/1999/xhtml);
@-moz-document url-prefix(http://www.google.com/reader/i) {
.logo {display:none !important;}
* {font-size:0.97em !important; }
span.item-snippet {display:none !important;}
span.item-source-title{font-size:0.9em !important}
}
This should illustrate why I'm such a big fan of Stylish.