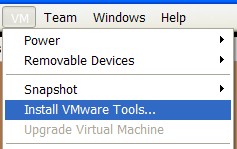
The VMware Workstation 5.5.3 release notes indicate that it includes "Experimental support for Ubuntu Linux 6.10, 32-bit and 64-bit", which means that you can install the VMware tools directly on Ubuntu 6.10 (Edgy Eft) without having to compile. If you are using a version prior to 5.5.3, you will want to follow this guide. To install the VMware tools, start by choosing "Install VMware tools" from the menu: You will see a new icon on your desktop, and a File Browser window should be opened immediately. If the file browser doesn't open, just double-click on the cdrom icon. You will see a file named VMwareTools-5.5.3-xxxxx.tar.gz. Right click it and choose Extract To. Pick a location to extract the files to.

The tools will be extracted into the folder you chose in the previous step:

For the next step, you will have to open a terminal window and change directory to the location you extracted the files to. Make sure you are inside the vmware-tools-distrib directory, and then run this command:
sudo ./vmware-tools.pl
If you have a prior version of the VMware tools installed, you will see this message:
The vmxnet network driver is in use, please stop the network by invoking the command...
You will have to use sudo before the commands instead of the way they are listed in the error message, so run these two commands before re-running the vmware tools install script.
sudo /etc/init.d/networking stop
sudo rmmod vmxnet
sudo ./vmware-tools.pl
The installation of vmware tools should proceed smoothly at this point. It's important after the installation is done to run the following commands:
sudo /etc/init.d/networking stop
sudo rmmod pcnet32
sudo rmmod vmxnet
sudo depmod -a
sudo modprobe vmxnet
sudo /etc/init.d/networking start
At this point, everything should be back up and running. You'll probably want to reboot just to make sure everything is going to start back up smoothly.