Quick Links
It's not a miracle, but these helpful tips can improve the quality of an image when enlarging from a low-resolution sample. It's surprisingly simple and quite easy. Fire up Photoshop and check it out for yourself!
At How-To Geek, we've written extensively about how it's impossible to "enhance" images and reclaim detail that is lost or isn't there to begin with. Are we changing our tune? Nope, there's nothing magical about these tips, except for the improved results you'll get when you improve your own low resolution images. Keep reading and give it a shot!
A Better Way to Enlarge Images

Here's our image at our starting point. This is zoomed to 100%, only a paltry 150 pixels wide.

As we can see, this is painfully low resolution. Let's improve things somewhat with a basic enlargement.

Navigate to Image > Image Size. Where it says "Resample Image" you can change the type of anti-aliasing used to enlarge and smooth the image. Change it to "Bicubic Smoother (best for enlargement)." By default, Photoshop uses "Bicubic."

Notice the difference in the Bicubic Smoother version on the left versus the basic "Bicubic" enlargement on the right. Changing the type of anti-aliasing can make a huge difference the edges in your image, helping to keep them smoother, less jaggy. This can make a big difference.
Improving Detail in Enlarged Images


Most Photoshop users don't go beyond RGB or CMYK. Today, we'll be using a different color mode called Lab Color. Switch any enlarged image (we're going to be using our image from before) and change it to Lab color by navigating to Image > Mode > Lab Color.


Make sure you have a channels panel open by going to Window > Channels. Then select the "Lightness" channel or click the

beside the a and b channels as shown.

With "Lightness" selected, we'll perform a Smart Sharpen filter by going to Filter > Smart Sharpen.

The settings above worked for our example quite well, but feel free to fiddle around and find your own. You'll probably want to keep your "Remove" setting to "Gaussian Blur" as shown above.


You can remain in Lab Color or convert back to RGB. Unlike a conversion between RGB and CMYK, RGB converts perfectly to Lab without any noticeable color shift. In either color mode, select your combined channelset by pressing Ctrl + 2.

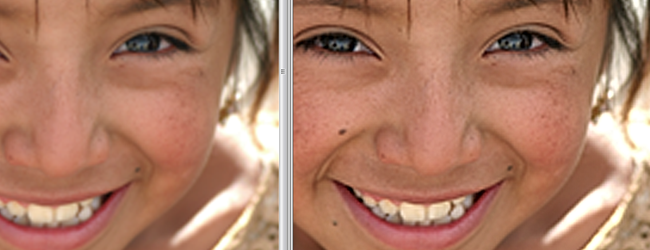
It's not perfect, but the comparison of before and after is pretty dramatic. Our updated image (on the right) has a much richer skin texture and doesn't look like it was enlarged nearly 2000% from an image 150 pixels wide.
But Wait! Wild Typography Appears!

Typography is a different beast altogether. This low resolution sample is set at only 100 pixels wide and has some big, very noticeable problems.

Resize your image to your target size. Here, we're increasing the size by 10 times and using the "Nearest Neighbor" setting to keep our edges jaggy. Don't worry, this will all make sense in a moment.

And it looks no different than before! Let's see what we can do to change that.

Apply a Gaussian Blur by going to Filter > Gaussian Blur and using a setting that blurs the edges without making the text completely unreadable.

Your final type should look something like this.


We're now going to use a "Threshold" adjustment layer. Click the

in the Layers Panel to insert one.

Is it perfect? No. Is it less blurry and jaggy? Yes, surprisingly so. But any further improvement would have to be done with the brush tool and a lot of patience. This can be a surprisingly helpful trick for anyone that has to work with typography and is often stuck with low resolution files.
While our "enhanced" image cannot ever reclaim the detail of the original high-resolution image, we can, at a cursory glance, say that we've improved our image quality, both with the typography and with the photo of the girl. Not satisfied with these tricks? Have some better ones of your own? Sound off in the comments section and let us know what you use when you have to improve a low quality image.
Image Credit: Girl at the River Near Momostenango by David Dennis, Creative Commons.