If there's an Android application you really love and wish you could run on your computer, now you can: there's a dead simple way to run Android apps on your PC or Mac without the fuss of moonlighting as an Android developer.
What Is BlueStacks?
Let's say there's a mobile game you really love and want to play it on your PC with a bigger screen and a more comfortable interface. Or maybe you've grown used to a certain Android app for managing your to-do list or calendar.
Rather than go through the hassle of installing the whole Android Software Development Kit (SDK) to emulate Android, we're going to take advantage of a really fantastic and free tool: BlueStacks. BlueStacks is essentially a self-contained virtual machine designed to run Android on a Windows or Mac computer. It comes with the Play Store pre-installed, and you can go from zero to running your favorite apps in a matter of minutes.
The entire experience is incredibly smooth on modern hardware (BlueStacks has been around for years and what was originally a pretty rocky alpha-software experience is now quite polished) and even things that previously didn't works so well (like access to the host computer's web cam or issues with applications that require GPS data) now work surprisingly well.
There are only two small quirks. First, the current version of BlueStacks only runs Android 4.4.2 KitKat, so if you need something newer than that, you'll need to install the Android SDK instead. Second, multitouch is missing, unless you're using BlueStacks on a computer with a touch screen monitor. If you are, you can use multi-touch, but otherwise you're out of luck if the app you're using requires it.
How to Install BlueStacks
To get started with BlueStacks, simply head over to their downloads page and grab an appropriate installer for your computer. We're using Windows in our example, but the process for Mac should be pretty similar.
Once the installer has finished downloading, launch it. You'll be taken through the usual app installation process, confirming at the end that you want BlueStacks to have access to the App Store and Application Communications. Make sure those two options are checked.

Next, you'll be prompted to create a BlueStacks account using your Google account to sign in. A BlueStacks account gives you access to some interesting features (like chatting with other BlueStacks users while they're playing the same games as you), but the best feature is that it syncs your settings across devices---so if you install BlueStacks on your desktop and laptop, everything is the same regardless of where you're using it.

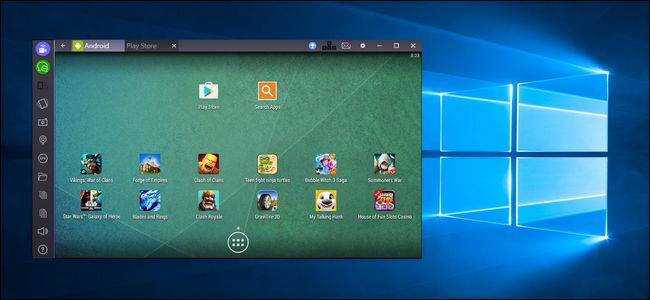
Once you complete the profile setup, you'll be presented with the BlueStacks GUI and your now-running (emulated) Android device:

Just as if you turned on a new Android tablet for the first time, you'll be run through the basic setup. Select your language, sign in with your Google account (for access to the Play Store and other features), and all the other usual stuff you do when setting up an Android device for the first time.
Speaking of signing in, be forewarned: as you perform the two above steps (creating a BlueStacks account and signing into your Google account for the first time) you'll get two security alerts from Google indicating that you just signed into Firefox on Windows and a Samsung Galaxy S5 device. This is because the BlueStacks wrapper is identifying itself as a Firefox browser and the emulation signature it's using for its Android hardware identifies itself as an S5---neither of those security emails are anything to worry about.
How to Use BlueStacks to Run Android Apps
Once you've finished the Android setup process, it will dump you right into the home screen of your new emulated Android device. Everything you know about using an Android device applies here: the settings menu is still there, the Play Store is there, and you can click on apps to launch them or open the settings menu by clicking on the app drawer. Simply use your mouse like you would use your finger on the screen (or, if you actually have a touch screen monitor, feel free to use your actual finger).
Let's start by clicking on the Play Store icon to download some apps.

You can immediately start browsing apps by category as well as by entering search terms in the white search box at the top of the screen. If you already have an Android device you use regularly, however, there's an even faster way to get the apps you use on your phone or tablet onto your emulated copy of Android---click on the menu icon, highlighted in red above. Within the slide out menu, select "My apps & games" in the sidebar.

There, by selecting the "All" tab, you can see all the apps you've downloaded using your Google account across all your different devices including both free and premium apps you've purchased.

After scrolling through our list of apps, we found a perfect Android app we really liked, but that we hadn't found a good replacement for on the desktop: Pomodroido, a Pomodoro Technique timer. All we need to do is click "Install" and boom, we've got access to Pomodroido on the desktop. It's that simple.

So what about the rest of BlueStacks' interface? There are two things you'll want to take note of: the toolbar down the side, and the navigation bar across the top. Let's start at the top, using the screenshot above as a reference point.
First, you'll note that there are tabs. Rather than force you to use a poorly emulated button combination to call the task switcher up, BlueStacks simply presents each individual Android app in a tabbed format across the top. Click on any given tab to switch to that app. On the right hand side of the navigation bar, you'll see a blue arrow icon. This is the "Upgrade to BlueStacks Premium" button. BlueStacks is free, but it does come loaded some sponsored games (and downloads new ones periodically). If you don't want to deal with the sponsored promotions, you can subscribe to BlueStacks for $24 a year.
Next to the premium icon, you'll see a tiny little icon in the shape of the WASD keys on the keyboard (a nod to the role those keys play in so many PC games). This icon is grayed out unless you are playing a game. It allows you to map functions to a game controller, as seen below with Clash of Clans. For more details on using the key mapping function, check out this help file.

Next down the row, you'll see an envelope icon. Clicking on this icon pulls down your notifications, just like when you're using Android on a mobile device, where you can then read and clear them.
The next icon, a gear, is for the settings menu. Here you can restart your emulated Android device, check for updates, change the settings for BlueStacks (found under "Preferences") or jump to the actual settings of the emulated Android device (by clicking "Settings").
The last three icons are standard Windows interface icons for minimizing the app, going to full screen mode, or closing it.
Finally, let's turn our attention to the sidebar where we find a host of useful functions.

The top two icons on the left hand side, blue and green, are for BlueStacks-specific functionality and allow you to watch other BlueStacks user's streams (or create your own) and chat with other BlueStacks users, respectively.
The next icon down allows you to change the rotation of the screen (it's only active in apps that support rotation). The next icon, a little phone that looks like it is vibrating, is a button that emulates shaking your device for apps that use a shaking motion to trigger some event. The camera icon is for taking a screenshot of your Android device and beneath that you'll find a map marker icon---if you click the marker you can set a fake GPS location for your device allowing you to place it anywhere in the world. The "APK" icon allows you to sideload applications that aren't in the Play Store, provided you have the installer file on your PC.
The folder icon launches the Windows file browser so you can select files to import to your emulated Android device. Finally, the last three icons are for copying text or images from the Android device onto your computer's clipboard, pasting from your computer's clipboard into Android, and adjusting the volume.
At this point, your Android emulator should be up and running smoothly. You know how to install new apps (and old favorites), and you've got a nice interface to help smooth over the bumps between your PC interface and the Android interface. Now go download your favorite apps and enjoy them on your big, spacious desktop PC!