If you love Minecraft, odds are you’ve found a server you enjoy playing on. Minecraft is a great game, but with Bukkit, you can run a more efficient server that’s easy to manage and is ready for advanced plugins.
An Alternative Server
We’ve already covered Minecraft, a game that geeks love, and discussed how running your own server can make things more fun. But, what exactly is Bukkit?
Bukkit is a Minecraft-compatible server crafted from the ground up. It was made to be fast, efficient, and provide a lot more flexibility. The modding community that surrounds Minecraft is pretty large, and is really inspired by the essence of the game, and Bukkit is one its products. It runs more smoothly that the official server, works well on a computer with lower hardware, and is constantly updated. Put simply, it’s lean, mean, and pretty easy to use.

What makes Bukkit so different is that it’s designed to work with home-made plugins. While the server is running, you’re able to install and load many plugins on-the-fly. It’s easy to manage users and there’s a host of documentation on everything, as well as a great community. There are plugins which allow you to summon items at will, fly, and create warp zones between areas and different worlds. There’s even a plugin system that creates a class/guild system and introduces an economy complete with in-game currency! The possibilities with add-ons like this truly are endless. Check out their About page for more information on Bukkit’s philosophy.
The only real downside to using Bukkit is that it’s not made by the official team. That means when Minecraft is updated, you’ll have to hold off upgrading until they Bukkit team releases a server that’s compatible with the new version. Typically, this can take between a few days to two weeks for a stable version, so you’ll have to wait longer for the latest and greatest features. In addition, things can be buggy even on recommended builds if plugins aren’t updated for the newer Minecraft versions. This makes it even more important for the server admin to back up regularly.
Downloading and Running
Head over to the Bukkit Project’s main page: Bukkit.org (click on the image below to view it full-size).

On the right side, you should see a panel that lists the Recommended Builds. The first one is the build that is most recommended at the moment, and below that are other builds that are older. In parentheses, you’ll see which version of Minecraft that build is compatible with. It’s always a good idea to read the posts on the left for information on bugs and development progress.
Click on the top Recommended Build. You’ll be taken to the source hub where you can download the appropriate server’s .jar file.

Click the link underneath Build Artifacts, as shown in the previous image (click image to view it full-size), and your download will begin.
Place the downloaded .jar file into a new folder.

Next, you need to create a script to run it. This varies depending on what OS you’re running and we’re covering Windows. If you’re running Linux or Mac OS, check out the Bukkit Wiki’s Setup Guide for the proper startup script.
Open up notepad, and enter the following:
@ECHO OFF
SET BINDIR=%~dp0
CD /D "%BINDIR%"
"%ProgramFiles%\Java\jre6\bin\java.exe" -Xincgc -Xmx1G -jar craftbukkit-0.0.1-SNAPSHOT.jar
PAUSE
If you’re using the 32-bit version of Java, change [%ProgramFiles%] to [%ProgramFiles(x86)], without the square brackets. If you’re using the Java Runtime 7 beta, change [jre6] to [jre7]. If you want to change the maximum amount of RAM it can use, change [Xmx1G] (for 1 GB) to something else, like [Xmx4G] (for 4GB).
Go to File > Save As. Give it a name and be sure to save it with the .bat extension.

Double click the .bat file to run the server. You’ll see a command-prompt window open.

The first time you run Bukkit, it will create the other files it needs to run properly and will create a world and a nether-world automatically. Once it’s done, we need to shut down the server.
Type “stop” without the quotes, and hit enter. This will properly shut the server down, saving all chunks of the world. You’ll know it’s finished when you see a prompt that says “Press any key to continue . . .”

Press any key and the window will close.
Configuring the Server
First of all, open the op.txt file and add your username to it. This will make you an Op and you will be able to execute any and all commands on your server. Anyone else you add to this file will be able to do the same.
Next, open up the server.properties file in notepad.

Most of the options are the same as the standard server (Official Minecraft Server Configuration, scroll down to “Tweaking the Server’s Properties”).
There are two new options in this file: allow-flight and spawn-protection.
- allow-flight is set to “false” by default. This is a server-properties toggle to prevent flying mods from working. If you want to enable flying, install a flying mod on the server and set this to “true”.
- spawn-protection by default is set to “16”. This means that other players will not be able to place blocks or build in a 16-block radius from your spawn point. Ops are not affected by this rule.
Save this file when you’re done.
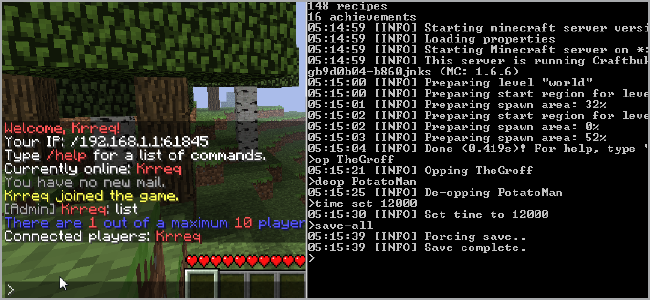
Bukkit Commands
As the administrator of your server, you can run several commands to control things. For example, Bukkit allows you to add and remove “Op” status for individual players.
In the console windows, just type the name of the command – with proper parameters, if necessary – and hit enter to execute them. You don’t even have to be playing Minecraft to chat or manage players!

Here’s a brief list of useful commands:
- op [playername] – turns a normal player into an Op.
- deop [playername] – turns an Op into a normal player.
- help – shows a list of server commands available to you.
- say [message] – broadcast a message to all players.
- kick [playername] – forcefully disconnect a player from your server.
- time [set|add] [amount] – set or add an amount (between 0 and 24000) of time to the world clock. 0/24000 is just after dawn, 12000 is just before sunset.
- save-all – force an immediate save of all world chunks.
- stop – gracefully shut down the server.
You can also, of course, enter these commands in the in-game console just like the regular server. There are many more commands available to you, so be sure to check out the CraftBukkit Command List.
Now that you’ve got Bukkit installed, you’re on your way to customizing Minecraft’s mechanics and gameplay. If you enjoy playing on a particular server, talk to the ops and tell them about Bukkit. They’ll reap the benefits as much as you will. Next time we’ll discuss adding plugins like Flight and Essentials, but until then, watch out for creepers!