Audacity novices often start with lofty project ideas, but sometimes they lack the basics. Knowing how to cut and trim tracks is basic audio editing and is a fundamental starting point for making more elaborate arrangements.
For this exercise, I'll be making a ringtone from a Castlevania: Symphony of the Night track. I have the original CD and used that so I started with better quality audio than an MP3. You can follow along with any file you like, just so you get a feel for cutting, trimming, and arranging sound clips for yourself.
I know which parts I want to edit in the track, but a quick play-through will help me look for those areas visually.

The scrubber in the above screenshot is pointing to a lull in the music, where the audio drops low or fades out. These areas are ideal spots to work with.
First, let's make sure the Selection tool is active.

Next, let's make a selection in an area of the track where we want to make an edit. Click and drag your mouse, and you'll see that the background changes to a darker shade of gray.

I know that the song changes somewhere in here. You can hit CTRL+1 to Zoom In, or click on the icon that's a magnifying glass with a plus. This will help us identify more precisely where to end our selection.

That's much better, isn't it? You can see that on the right side of the selection area, there's a spike in amplitude. That's where I want my selection to end, but it's not properly aligned. If you move your mouse close to that area, you'll see the cursor change to a hand that's pointing.

Clicking and dragging while this cursor is shown will allow you to change that particular selection boundary. You can see mine is much better now.

Repeat the same process with the left boundary. You can see my selection encompasses a quiet beginning point and a quiet ending point, which makes it sound clean and natural.
What I want to do is cut this section and move it to another area. I can just click the Cut button or hit CTRL+X.

You can see that the rest of the track after my selection got pushed up to where the selection started.

While it's possible to paste that clip in the same track at a different point, it's much easier to make arrangements using multiple tracks. Go to Tracks > Add New > Stereo Track.

Using different tracks can help keep things straight, so you can think of it like using Layers in an image editor. Sometimes, it's more work to use multiple tracks, and sometimes it's a necessity, but it's process you should familiarize yourself with if you plan to do audio editing.
Two tracks ending up being too tall for good screenshots, so I clicked on the bottom of each track area and dragged up to resize them vertically. This has no effect on the audio, it just makes it easier to see things.

And now, click where you want to paste the clip in the second track and click on the Paste button or hit CTRL+V.

Note that the bottom track has an active selection. The dark background is not in the top track at all, despite being visible in the timeline. Now, I want to change its linear placement, or in other words, move it in time. To do that, we use the Time Shift Tool.

Now you can click and drag anywhere in your selection and the whole thing will slide side-to-side. You can also have it snap to other locations, like the beginning or end.

Alright, I have it where I want it in relation to another section of the track. When you hit play, however, Audacity will play both tracks over each other. This works well for mixing different tracks, but not here. Let's insert some silence in the first track. Click on the selection tool and highlight the portion of the first track that's directly above the second. You'll see that you can snap to that area.

Next, click on the Insert Silence tool, located next to the Undo button.

This converts our selection to silence. Instead of cutting and having the latter part of the track jump forward, this will keep it as-is because the silence acts as a placeholder. Next, I decided to cut some of the audio after the pasted clip.

Finally, the portions of the track I wanted to align are properly done.
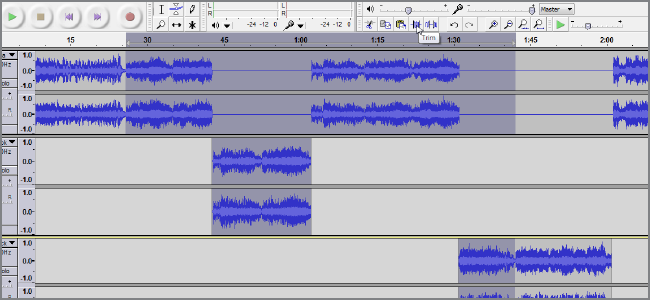
But wait, I only want the middle sections of this track! Instead of cutting out areas of the track before and after, we can use the trim tool to make this easier. Use the selection tool to highlight what you want to keep.

Adjust your start and end points, but be sure to drag your mouse down into the second track while making your selection. Notice how the dark gray background appears on both tracks in the above screenshot. When you're ready, click on the Trim Tool, which is right next to the Paste button.

You can see that the Trim Tool acts just like a Crop Tool does in image editors. The Trim Tool leaves the audio where it is, but that's not particularly useful in our case. Use the Time Shift Tool to move this so it aligns with 0 on the timeline. All done!
Since this is a ringtone for me, I went to File > Export and saved it as an MP3.

If you chose not to follow along, here are a few important points to take away from this procedure:
- Your audio selections can be changed by dragging from as close to the original boundary as possible.
- The Cut Tool removes sections from the timeline, leaving no gap.
- The Insert Silence Tool removes audio but leaves a gap.
- Pasting clips inserts them where ever the scrubber is, i.e. where you clicked last.
- The Trim Tool acts as a Crop Tool, leaving the audio where it is in the timeline.
- You can add multiple tracks and use them like layers to better arrange your audio piece.
Hopefully this exercise will give you a feel for the really basic edits you can make to tracks. They're the foundation of all of the more advanced stuff you'll be doing, so executing them quickly and efficiently will save loads of time later on. If this is your first Audacity How-To, here are the other articles in this series so far: