Quick Links
Word's rulers let you control the margins of your page and the indentation of paragraphs. They're great for precisely lining up images, text, and other elements. If you're printing a document, the rulers can help ensure that what you see on your screen translates into what you'll get on the printed page.
The trouble is, rulers aren't even visible by default in Word anymore. Here's how to turn them on, and how to make the most out of them.
Note: We're working with Office 2016 in this article. The rulers have been around pretty much forever, though, and work similarly in previous versions of Word.
Activate the Rulers
First, make sure you're in Print Layout view. On the Ribbon, switch to the "View" tab (all the way on the right). If "Print Layout" isn't already highlighted, click it now.

Now look towards the center of the Ribbon. In the "Show" section, enable the "Rulers" option. You should immediately see the horizontal ruler above your document and the vertical ruler to its left.

Note: The horizontal ruler is also visible in Web Layout and Draft view. The vertical ruler is not.
Access the Page Setup Window
Double-click any empty space on the ruler to open the Page Setup window. This is the same window you can open from the Layout tab on the Ribbon.

The "Page Setup" window shows you most of the physical layout properties of the document. The "Margins" tab lets you set the margins for the top, bottom, left, and right, which you can verify with the markers on the ruler (see below). The Gutter is extra space on the page, usually used as an extra blank space for things like comb binding (those little plastic corkscrews that make a cheap notebook). It's set as blank by default. You can also use this tab to control page orientation.

If you're printing your document, the "Paper" tab lets you can change the physical size of the paper to match different paper sizes in your printer. The default is 8.5 inches by 11 inches, the standard "Letter" size for US paper printing (215.9 x 279.4mm). You can see the result of this setting in the digital rulers on the page, with the default 1-inch margins resulting in a 7.5-inch horizontal ruler and a 10-inch vertical ruler. If you're planning on printing via a standard home printer or you're using the primary tray in your office printer, leave this as is.
Change Margins On the Fly
Margins are indicated on the ruler by the gray and white areas. The gray areas at either end of the ruler represent your margin; the white areas the active page. The scaling of the rulers seems a little strange at first. It actually starts on the far left (or top for the vertical ruler) with a number indicating the size of your margin and then counts down. When it reaches the white, active area, it starts counting up again. You can see this in the image below, where I've set the margin to two inches.

In Word's default 8.5 by 11-inch page setup, the horizontal ruler starts at 1 (indicating a one-inch margin), then resets at zero where the margin ends, then counts up to 7.5 for the remaining horizontal space. Ditto for the vertical ruler: starts at one for a one-inch margin, restarts at zero at the white space, and only goes up to ten.

Note: Word's rulers show whatever measurement you have set in File > Options > Advanced > Show Measurements In Units Of. You can change measurements to centimeters, millimeters, points, or picas. Be aware, though, that this settings controls the units of measurement used throughout Word---not just the ruler.
You can also quickly adjust margins right from the ruler. Hold your mouse over the line separating the white and gray area. You'll see the pointer turn to a double arrow and will likely see a tooltip letting you know you're point at the margin. Now, just click and drag that line left or right to adjust that margin.

Change Indents on the Fly
Those little triangle- and box-shaped markers on the ruler are quite handy. They control the indenting of individual paragraphs. Just position your cursor in the paragraph you want to adjust and slide them around. If you want to change multiple paragraphs, select the paragraphs you want to change. And if you want to change indents throughout the whole document, just hit Ctrl+A (to select everything), and then adjust the sliders.

Here's how each indent works.
Dragging the Left Indent marker changes the indentation for all lines of a paragraph. As you slide it, the other two indent markers move as well. Here, I'm moving the Left Indent half an inch in from the left margin.

Dragging the First Line Indent marker changes indentation for only the first line of a paragraph.

Dragging the Hanging Indent marker changes the indentation of all lines except the first line.

On the right end of the ruler, you'll find only one marker: the Right Indent marker. Drag it to constrain the paragraph on the right side.

Add Tab Stops
A tab stop is the location your cursor moves to when you hit the Tab key. A default Word document has no tab stops, so each time you hit the Tab key, the cursor jumps ahead about eight characters. Setting tab stops lets you better control and line up text.
Of course, Word offers enough options that things get a little more complicated than that. If you look all the way to the left edge of your document, just above the vertical ruler, you'll see the Tab Stop button.

Clicking this button lets you cycle through the different types of tab stops Word makes available. Here they are:
- Left: Left tabs are Word’s default tap stop. They're what most people think of when they think of tab stops, and what you'll likely use most of the time. Text is aligned against the left edge of the tab stop.
- Center: Center tabs align the text around the center of the tab stop.
- Right: Right tabs align text against the tab stop’s right edge and are a great way to align the rightmost digits of lengthy lists of numbers as you enter them.
- Decimal: Decimal tabs align numbers (or text) based on decimal points. They are great for aligning currency figures. Be careful, though. Text is also aligned on decimals, so if you type a sentence with a period, the period will align on the tab stop.
- Bar Tab: Bar tabs do not create an actual tab stop. Instead, they create a vertical line wherever you insert them. You could use these for putting vertical lines between tabbed columns in instances where you'd rather not use a table.
- Indents: Select first line and hanging indent options and then click anywhere in the active ruler space (the white area) to place the indent there. This works the same as dragging the indent markers the way we discussed in the previous section.
A little tip for you. If you're cycling through tab stops and don't remember what each symbol means, move your mouse away from the button and then back to activate a tool tip describing that tab stop.

To insert a tab stop, just use the button to select the type of stop you want. Now, point your mouse anywhere on the white portion of the horizontal ruler (toward the bottom of the ruler line), and then click. A symbol appears indicating the type of tab stop you've placed. This is a tab marker, showing where the text will jump to if you press the Tab button on your keyboard.

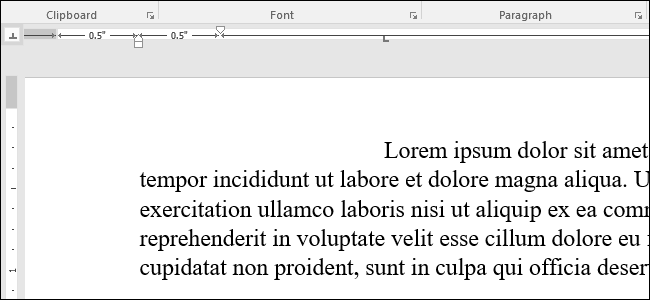
Here's an example. In this paragraph, the Left Indent is half an inch from the left margin, the First Line indent is another half inch further in, and I've set a tab stop at two inches. I pressed the Tab button with my cursor in front of "Lorem," so the text jumped to my manually-set tab point.

You can insert multiple tab markers if you want, and you can click and drag them around to reposition them on the fly.

To get rid of a tab marker, just drag it down (away from the ruler) and release the mouse button.
And, if you prefer to set up your tab stops manually (and a little more precisely), double-click any tab marker to open the "Tabs" window.

The ruler is just one of the little features in Word that packs a whole lot more functionality than most people realize. It provides a quick way to control margins, set various indents for a paragraph, and keep things in line using tab stops. Why Word leaves it turned off by default is beyond us, but at least now you know how to turn it back on and put it to use.