Cropping photos is one of the most basic, but important, photo editing skills. A crooked horizon or something distracting on the edge can ruin a great image.
I’m going to show you the basics of how to do it in Photoshop, however, the tools are very similar in any other good image editing app.
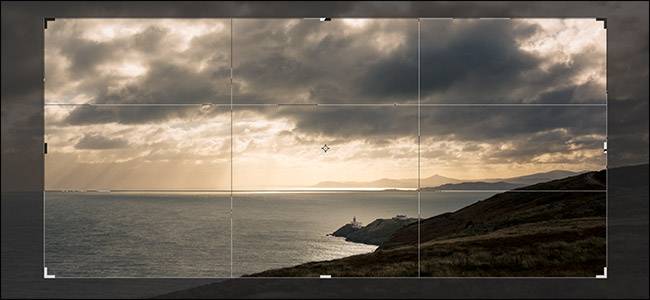
This is the image I’m using.

I love it, but there are two problems. First, there is too much of the land in the bottom right corner; I want the image to be cropped tighter to the lighthouse. Second, the horizon is crooked. I’ve highlighted that in pink below.

The way to fix both of these problems is with the Crop Tool.
Using the Crop Tool
Select the Crop Tool from the Tool Bar or press C on your keyboard.

Once you’ve selected the Crop Tool, you’ll see something that looks like this.

The dotted outline represents the new crop.
You’ve two options. First, you can use the cursor to drag a new crop around any area of the image you want.

Second, you can drag in from any of the handles to adjust the crop. If you hold down the Alt or Option key, the handle opposite will move in as well. This is the more accurate option.

If you select a ratio, like 2:3, in the upper left corner of the window, the other edges will move in as well to keep the aspect ratio the same. To constrain the crop to the original ratio, hold down the Shift key while you drag. To change the ratio, select the one you want from the Ratio drop-down in the Options bar.

You can also enter your own.

To swap the two values, click the two arrows icon. To reset the ratio, click the Clear button.
To rotate the crop, click and drag anywhere outside the crop boundary.

To move the crop, click and drag anywhere inside the crop boundary.

Before we finish, look at the top of the window, and you'll see a few options.

The Delete Cropped Pixels checkbox should almost never be checked. If it is checked, when you crop the image anything outside the crop boundary is deleted. This means you can’t re-crop the image at a later point. It’s safer to just leave it unchecked.
If Content-Aware is checked, Photoshop will attempt to automatically fill any blank areas left by the crop. It can work if the area Photoshop tries to fill in is really simple like a blue sky, but it’s best not to rely on it. Just crop your image within the boundaries.
The three icons on the right only appear when you’re cropping an image. Click the Checkmark icon to accept the crop, the Cancel icon to cancel it and the Reset icon to reset the current crop. You can also use the keyboard shortcuts Enter or Return to accept the crop and Escape to cancel it.
Using the Straighten Tool
In our example image, we not only want to put the lighthouse closer to the center of the frame, but rotate it so the horizon is straight.

While I could straighten the horizon by eye, there’s a better way to do it.
To straighten the horizon in an image, select the Crop tool and then click the Straighten button in the Options Bar.

Click at one point on the horizon and then drag your cursor so the line follows the horizon.

When you release your cursor, Photoshop will make that line the new horizon.

To accept the straightened image, press Enter.
And there you have it, a perfectly cropped and straightened image.

With the number of megapixels in a modern digital camera or smartphone, you have a lot of leeway with how you crop your images. If the horizon isn’t straight or you want a tighter framing, go ahead and fix it in Photoshop. You now know how.