Over time, old photos fade. The blacks become washed out and the whites go to grey. If there are colors, they fade too, turning different shades and making the photo look more like an antique than a representation of anything real.
If, however, you scan your old, faded photos, you can use a powerful editor like Photoshop (or one of its cheaper alternatives) to color correct them. Let's look at how to do just that.
For this lesson, I'm going to assume you have some familiarity with Photoshop. If you don't, check out our detailed eight part guide to learning Photoshop and our lessons on Layers and Masks, Adjustment Layers, and Curves. The technique is very simple, but it's easier to use if you understand what is going on.
Color Correcting a Faded Black and White Image
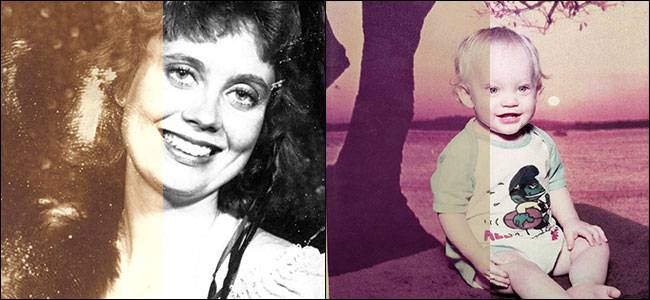
It's simpler to color correct a black and white photo, so let's start there. I'm using this old photo from Flickr user Faith Goble. It's a lovely portrait that's started to fade and discolor.

Open the image you want to correct in Photoshop.

Next, go to Layer > New Adjustment Layer > Curves.

Select the black-point eyedropper, it's circled below.

Click on what should be the darkest or black areas of the image. For this one, the feather just beside the model's neck is perfect.

That's the black point set. Things should be starting to look a little less faded. Next, select the white-point eyedropper. Again, it's circled below.

Find an area of the image that should be really bright and click it. In this case, the model's clothes look as if they're very bright so that's where I'm going to click.

The effects aren't as dramatic this time because the bright areas of this image were already pretty okay.
Adding contrast like this can be pretty blunt and it's easy to go too far. Select the Curves layer and lower its Opacity to around 90%. This will soften the effect a little.

Now the image should look something like this. It's definitely not faded any more. The last thing to do is get rid of the color cast.

Go to Layer > New Adjustment Layer > Hue/Saturation.

Drag the Saturation slider all the way to 0.

And that's it, you're done. The image is now a perfect, unfaded black and white.

Color Correcting a Faded Color Image
Let's do this again with a color image. This photo comes courtesy of fellow How-To Geek writer Cameron Summerson.

The process for correcting the contrast and color is the exact same. Open the image in Photoshop, add a Curves layer, and use the black-point and white-point eyedroppers to set the black and white points.
Once you do that, you should have something like this.

Note, to set the white point, I used the border around the image. Paper should always be very close to white. Whenever there is a border on an old image, it makes color correcting them much easier.
Although this already looks pretty good, the colors aren't perfect. Go to Layer > New Adjustment Layer > Hue/Saturation.

This time we can't just remove all the saturation. We have to play around with the Hue slider until things look right. Drag the Hue slider left and right until things look good.

Most values will look awful, but you should be able to hone in on a range that looks natural. For this photo, I found it to be around +13. It just makes everything look a little more real.
Play around with your image and see what looks best. It will probably be a value between around -40 and +40, but try them all. This isn't an exact science, so just go with something that you like the look of.

And that's it, you're done. You've taken an old, faded photo and color corrected it so it looks a lot better with just a Curves and a Hue/Saturation layer. This technique should work on almost any image, no matter how faded or discolored it is.