Photoshop has dozens of different, powerful tools, each with their own uses. You can use the spot healing brush to clean up blemishes or the brush tool to change the color of someone’s eyes.
In the toolbar on the left hand side of the Photoshop screen, you can see some of the main tools you’ll use, but did you know that there’s a second, hidden layer with even more tools?

Let’s look at how to access it.
How to Access Photoshop's Hidden Tools
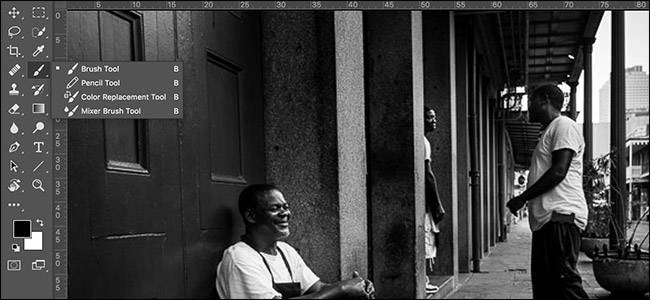
If you click on any tool---say, the Brush tool---you’ll select that tool (obviously). But if you click and hold on it, you’ll bring up an extra menu with a bunch of related, hidden tools. If you click and hold on the brush tool, for example, you'll get access to the Pencil Tool, the Color Replacement Tool, and the Mixer Brush Tool.

All this clicking and holding can get a bit awkward. The far better way to access most tools is with keyboard shortcuts. In the screenshot above, you’ll notice that all four tools have the same keyboard shortcut: B. If you just press B you’ll select the Brush tool (or whichever of the other tools you most recently selected). To cycle between them, you can press Shift+B.

Almost every tool has a keyboard shortcut, but many of the less-used tools are buried behind other tools. Here are all the default tool keyboard shortcuts and the tools they apply to. To cycle between them, hold down Shift and press the shortcut key.
- V: Move Tool.
- M: Rectangular Marquee Tool, Elliptical Marquee Tool.
- L: Lasso Tool, Polygonal Lasso Tool, Magnetic Lasso Tool.
- W: Quick Selection Tool, Magic Wand Tool.
- C: Crop Tool, Perspective Crop Tool, Slice Tool, Slice Select Tool.
- I: Eyedropper Tool, 3D Material Eyedropper Tool, Color Sampler Tool, Ruler Tool, Note Tool, Count Tool.
- J: Spot Healing Brush Tool, Healing Brush Tool, Patch Tool, Content-Aware Move Tool, Red Eye Tool.
- B: Brush Tool, Pencil Tool, Color Replacement Tool, Mixer Brush Tool.
- S: Clone Stamp Tool, Pattern Stamp Tool.
- Y: History Brush Tool, Art History Brush Tool.
- E: Eraser Tool, Background Eraser Tool, Magic Eraser Tool.
- G: Gradient Tool, Paint Bucket Tool, 3D Material Drop Tool.
- O: Dodge Tool, Burn Tool, Sponge Tool.
- P: Pen Tool, Freeform Pen Tool.
- T: Horizontal Type Tool, Vertical Type Tool, Vertical Type Mask Tool, Horizontal Type Mask Tool.
- A: Path Selection Tool, Direct Selection Tool.
- U: Rectangle Tool, Rounded Rectangle Tool, Ellipse Tool, Polygon Tool, Line Tool, Custom Shape Tool.
- H: Hand Tool.
- R: Rotate Tool.
- Z: Zoom Tool.
The following tools don’t have a keyboard shortcut:
- Artboard Tool (appears in the Move Tool hidden menu).
- Single Row Marquee Tool (appears in the Marquee Tool hidden menu).
- Single Column Marquee Tool (appears in the Marquee Tool hidden menu).
- Blur Tool (appears in own tool icon).
- Smudge Tool (appears under Blur Tool hidden menu).
- Sharpen Tool (appears under Blur Tool hidden menu).
- Add Anchor Point Tool (appears under Pen Tool hidden menu).
- Remove Anchor Point Tool (appears under Pen Tool hidden menu).
- Convert Anchor Point Tool (appears under Pen Tool hidden menu).

How to Add Your Own Keyboard Shortcuts
While Photoshop’s defaults are pretty good for most people, sometimes there will be a tool that Photoshop has hidden that you like to use a lot. Personally, I use both the Spot Healing Brush and Healing Brush Tools all the time. Having to cycle between them with Shift+J (and remember which icon represents which tool) gets very annoying, very quickly. Instead, I’ve set the Healing Brush to K.
To do that, click and hold on the ellipses at the bottom of the Toolbar and select Edit Toolbar. (In older versions of Photoshop, you’ll need to go to Edit > Keyboard Shortcuts and then select Tools from the dropdown menu to change keyboard shortcuts. We covered this method in a previous article.)

This will bring up this dialog box.

Scroll down to the Healing section and click on the Healing Brush Tool.

Enter the new keyboard shortcut you want. In this case, I'm using K.

Click Done and now the keyboard shortcut for the Healing Brush is set to K. You can use the same method to add a keyboard shortcut to tools that don’t have one, or change any of the other defaults.
In the same menu, you can also edit which icons appear in the Toolbar. If you want to have the Healing Brush appear on its own, click and drag it to an area of free space.

Now the Toolbar will look like this, with the Spot Healing Brush and Healing Brush icons side by side.

With an application as big as Photoshop, keyboard shortcuts are a must. They make your life so much easier. It’s worth spending the time it takes to learn to use them.