Quick Links
The tilt-shift effect is a weird optical illusion where a regular photo looks like a photo of a toy model. By creatively blurring different parts of the image, you trick people’s eyes into interpreting everything in it as really tiny.
A tilt-shift lens is the simplest way to do this, but they cost several thousand dollars. Instead, we’re going to mimic the effect using Photoshop.
Step One: Pick a Photo
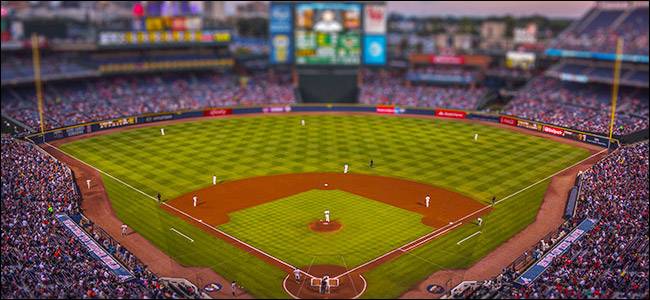
This effect will only work with certain kinds of photos. You want something that could conceivably be a miniature model. Wide angle shots of buildings or crowds from above tend to work best. I’m using this photo of Turner Field by Joshua Peacock.

Once you’ve got an image you’re happy with, open it up in Photoshop.
Step Two: Apply the Effect
Duplicate the Background layer by going to Layer > Duplicate Layer or pressing Control+J on your keyboard (Command+J if you’re on a Mac).
Next, go to Filter > Blur Gallery > Tilt-Shift. Your cursor will change to a Drawing Pin.

Click on where you want the centre of the in-focus area to be and you’ll get an overlay that looks something like this.

This looks a little complicated so lets break down what everything is:
- Click and drag on the inner circle to move the center of the blur around.
- Click and drag on the outer ring to change the amount of blur that’s being applied.
- Click and drag on the control handles on the solid lines to change the angle of the in-focus area.
- Click and drag anywhere else on the solid lines to change the size of the in-focus area.
- Click and drag on the dashed lines to change the size of the transition between the in-focus and blurred areas.

Play around with the settings until you get something that looks right. I’ve increased the Blur to 25, reduced the size of the in-focus area in the foreground, reduced the size of the transition in the foreground and increased the size of the transition in the background.

When you’re happy with your settings, press Enter. Here’s what mine looks like now:

Step Three: Add Your Finishing Touches
With the tilt-shift effect applied, your image should be well on its way to looking like a miniature model. Now it’s time to apply any finishing touches you want. I’m going to brighten my image up and add some saturation to make it look a bit more toy-like.
Go to Layer > New Adjustment Layer > Vibrance and drag the Saturation slider to the right. Around 17 looks good for the image I’m using, but go with whatever works for yours.

Next, go to Layer > New Adjustment Layer > Curves and click a point somewhere in the middle of the line. Drag it up to brighten the image. For more on using curves, check out our detailed guide.

And with that, it’s done. We’ve taken a regular photo and turned it into this cool, model-esque effect.
