Quick Links
With Rogue One coming out this weekend, the internet is in full on Star Wars fever (well, more than usual). Why not use this for a little Photoshop fun? Let's have a look at how to add a lightsaber special effect to a photo.
I'm going to keep everything as simple as possible, though to follow along, you will need to understand layers, layer masks, and adjustment layers. If you aren't familiar with these subjects, check out our guides to layers and masks and adjustment layers before continuing.
Getting a Photo Ready to Use
While you can use this technique to add a lightsaber to anything, it's a lot easier if the person in the picture is holding something you can use as a base. You can go full cosplay and get a proper costume and prop lightsaber, or do what I did and put on a dressing gown and wave a broom handle around. Whether you're dressed like Darth Vader or Darth Just-Out-of-Bed, the technique is the same.

Open the photo you want to use in Photoshop and do any basic edits you think it needs. Adding special effects like lightsabers should always be one of the last steps in your workflow. I cleaned up some small blemishes, but otherwise, my photo was ready to go.
Step One: Create the Lightsaber Base Shape
Create a new layer by either clicking on the New Layer button or using the keyboard shortcut Control+Shift+N (Command+Shift+N if you're on a Mac).

Call the new layer "lightsaber" or something similar and click OK.

We have a few options for selecting out the blade. If you're familiar with how to use it, the Pen tool is one of the best methods. However, it's quite complicated, and we can use a simpler tool to get the same effect.
Select the Polygonal Lasso tool from the Tool menu. You can also find it under the Lasso tool or by pressing the keyboard shortcut Shift+L until you get it.

Zoom in to your fake lightsaber (or to where you want it to be) and click on one of its bottom corners.

Next, click on one of its top corners. This will connect the two points.

Keep clicking around the fake lightsaber until you reach the point where you started.

Click on the first point again to finish making the selection.

The Polygonal Lasso is great for making straight edged selections, but terrible for selecting curves. We want the lightsaber to have a rounded tip so we're going to use the Elliptical Marquee Tool to do it.
Select the Elliptical Marquee tool from the Tool menu or cycle to it with the keyboard shortcut Shift+M.

Zoom into the top of the lightsaber. We want to add to our selection, so hold down the Shift key and then click and drag to start drawing an ellipse.

The Elliptical Marquee tool can be a little tricky to get right first time so the best thing to do is draw an ellipse away from your selection, then still holding down your click, press the Spacebar to move it into position.

Release the mouse and you'll have a nice selection around the top of the lightsaber.

Go to Edit > Fill, select White, then click OK.

Now the model should look like they're holding a solid white lightsaber. Press Control+D or Command+D to deselect the lightsaber.

Step Two: Create a Blur Layer
Next, go to Layer > Duplicate Layer or use the keyboard shortcut Control+J (Command+J on a Mac) to create a copy of the lightsaber layer. Drag it beneath the original lightsaber layer and rename it "lightsaber blur".

Step Three: Add the Lightsaber Effect
Select the lightsaber layer and go to Layer > Layer Style > Outer Glow. Dial in the following values:
- Blend Mode: Normal.
- Opacity: 80%.
- Size: 120px for a high-res file, 60px for a low-res file.
You can play with these values to see what works best in your photo.

Then click on the white color swatch to pick the color of your lightsaber. Set the S and B values to 100.
- If you want a red lightsaber, leave the H value set to 0.
- If you want a blue lightsaber, set the H value to 190.
- If you want a green lightsaber, set the H value to 100.
Click OK when you're finished.

Next, select Inner Glow from the options on the left side.

Enter the following values:
- Blend Mode: Normal.
- Opacity: 40%.
- Color: The same as the previous step.
- Size: 60px for a high-res file, 30px for a low-res file.

Click OK and the lightsaber should look like it's beginning to take shape.

Step Four: Add a Blur Effect
Hold down the Control or Command key and click on the lightsaber blur Layer Thumbnail. This will select the contents of the layer.

Go to Edit > Fill and for Contents, select Color...

Dial in your lightsaber color from earlier.

Press Control+D or Command+D to deselect the lightsaber blur layer's contents, then go to Filter > Blur > Gaussian Blur. Enter a value of 240px for a high-res file, 120px for a low-res file and press OK.

Now the lightsaber should really be starting to look the part. We just have a few finishing touches left to bring it all together.

Step Five: Put On the Finishing Touches
Go to Layer > New Fill Layer > Solid Color and call it Color Toning. Set the Mode to Soft Light at an Opacity of 20%.

Dial in your lightsaber color and click OK.

Create a new layer and call it Vignette. Set it's Mode to Multiply and Opacity to 30%.

Grab the Elliptical Marquee tool and draw an ellipse around the centre of your image.

Go to Select > Inverse followed by Edit Fill. For the Contents, select Black and click OK.

Press Control-D or Command-D and go to Filter > Blur > Gaussian Blur. Dial in a value that gives you a nice soft vignette (I'm using 400px) and press OK.

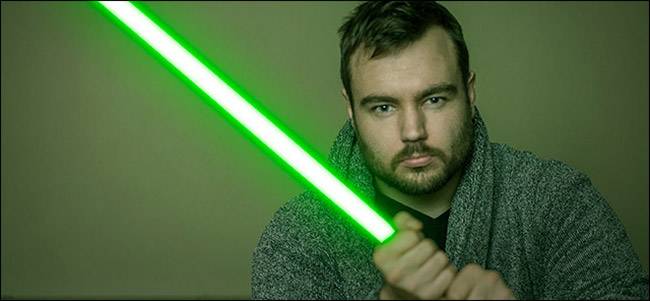
That's it---you are finished, young padawan.
