Quick Links
While the Windows File Explorer seems somewhat simplified compared to older versions, it still packs in a lot of options for controlling how you see the contents of your folders.
People have always complained about the lack of advanced features in Windows 8 and 10's File Explorer and, to be fair, it would be really nice to see things like tabs and split views for more easily managing files. Still, you can customize your folder views in a number of ways to make sorting through all your files easier. If you've been using Windows for a while, most of this stuff will be old hat to you, but you never know what new tricks you might pick up. And as bonus, once you configure these view settings to your liking, you can apply most of them to other folder windows automatically using Windows' five special folder templates.
Take Control of the Navigation Pane
The Navigation pane appears to the left of your File Explorer window by default. It shows Quick Access items you've pinned, as well as folder trees divided up into top-level categories like OneDrive, This PC, Network, and Homegroup. Yours may show additional categories, depending on what other services---like Dropbox---you have installed. Click a folder to select it and view its contents in the right pane. Click the arrow to the left of a folder (or double-click the folder) to expand or collapse it.

You can customize the Navigation pane by selecting the "View" menu and then clicking the "Navigation pane" dropdown menu.

You have four options here:

- Navigation pane. Click this option to hide or show the pane.
- Expand to open folder. By default, if you navigate through folders using the right pane, the Navigation pane stays at the top level folder. Turn this option on to have the Navigation pane automatically expand folders to show whatever folder you're currently looking at in the right pane.
- Show all folders. This option changes how the navigation pane is organized pretty dramatically, displaying all the folders on your system in a single hierarchy with your Desktop as the top folder (shown to the right). Turning on this option also adds the Control Panel and Recycle Bin to the File Explorer window.
- Show libraries. This option enables the old Windows 7 libraries feature that has been somewhat hidden in more recent versions of Windows.
Check or uncheck any of those options as you see fit.
Extend Your View with the Preview and Details Panes
The Preview and Details panes appear at the right side of the File Explorer window, but you can only have one visible at a time. On the "View" tab, click the "Preview pane" button to add the Preview pane to the right side of the window.

This will show a preview for certain file types when you click on them. For example, click on an image to see a preview on the right hand side.

Or you can select a text file to see its contents.

Other than pictures and text files, what you can preview depends on what types of apps you have installed and whether they support previewing. Microsoft Office apps and most PDF readers, for example, add preview functionality to File Explorer.
Click the "Details pane" button to view the Details pane instead. When you select any file in the current folder, the Details pane shows specific metadata about the file. This data changes depending on what type of file you're looking at, but generally includes things like the name, type of document, date modified or taken, size, and so on. It's a subset of the information you get on the "Details" tab of a files properties window.

And if you'd prefer to have no pane on the right side at all, just click whatever pane button is currently active on the "View" tab to turn the pane off.
Change Layout Options
The "Layout" section of File Explorer's View tab lets you choose from several different options for how files are displayed in your current folder, and work much like you'd expect from their names.

Choose any of the four icon layouts to display icons in various sizes. If you choose "Small icons," items are shown with the regular icon based on file type. If you choose any of the other three sizes, items are shown with thumbnail previews of the actual file. For example, below you can see the "Small icon" layout on the left. Picture files show the icon for IrfanView, my favorite image viewer. On the right, the "Large icons" layout shows thumbnails of the actual pictures.


The "List" layout is nearly indistinguishable from the "Small icons" layout. The "Details" layout also presents items in a list, but shows columns of information about various properties of the items, such as file type, size, date created, and so on.

You can click a column header to sort the items in the folder by that column. For example, clicking the "Date created" column header sorts the according to the date the file was created. You can click the column header a second time to reverse the sort order.

Drag column headers left and right to rearrange the order of the columns.

Drag the borders between columns to resize them.

You can also click the "Size all columns to fit" button on the "View" tab to have File Explorer resize all columns at once and do its best to do display all the information it can.

Add or Remove Columns in the Details Layout
File Explorer also offers lots of additional columns that are not shown by default when you switch to the "Details" layout. You can manage those additional columns by clicking the "Add columns" dropdown menu on the "View" tab or by right-clicking any column header. Select any column on the list to add it to or remove it from the File Explorer view.

And if the columns shown right on the menu aren't enough for you, just click that "Choose columns" option at the bottom of the list to open the "Choose Details" window. Here, you can choose from literally hundreds of different columns. Click a column's check box to add it to File Explorer. Use the "Move Up" and "Move Down" buttons to change where the column appears on the list in this window. And you can even select a column and then enter your preferred column width in the "Width of selected column (in pixels)" box. Of course, even if you include a width, you can always resize the column in File Explorer after you've added it.

Sort the Contents of a Window
If you're using the details layout, the easiest way to sort is by clicking column headers the way we described earlier. But you can also sort items if you're using other layouts like icons or list. Just click the "Sort by" dropdown menu on the "View" tab and pick any of the options there to sort the window accordingly. The menu also lets choose a ascending or descending order for your sort.

Note that there's also a "Choose columns" option on the dropdown menu. This lets you choose from the same columns you'd get using the "Add columns" option and, in fact, will add columns if you're in the details layout. Offering it on the "Sort by" menu just provides a quick way to add additional options you can use to sort your items.
Group the Contents of a Window
Grouping the contents of a window is kind of like adding a second layer of sorting. You can group items in a folder by any of the same column headers File Explorer offers and then you can sort using a different criteria.
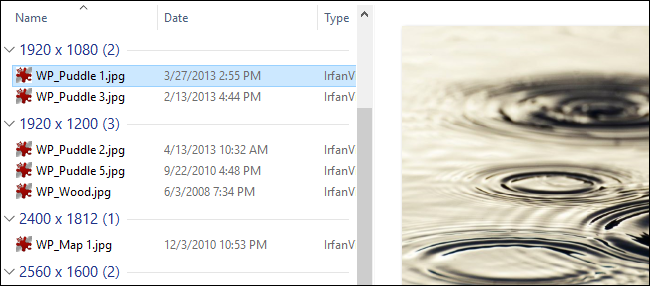
Here's an example. Say you had a folder of wallpaper images and wanted to group them by the dimensions of the image so that you could easily see which images were good for certain size monitors. You'd just click the "Group by" dropdown menu on the "View tab" and choose the "Dimensions" option. Note that all the same options are on the dropdown as when you add columns and that you can click "Choose columns" to access even more.

This would group all pictures with similar dimensions together in your File Explorer window. If you've got a long list to wade through, you can click the arrow to the left of each group to collapse or expand the group and make things easier to browse through.

Now, you could also sort the items in the folder by a different criteria while keeping your grouping intact. Say, for example, you now sorted your items by size. As you can see, the grouping remains but within each group, items are sorted according to their file size.

This opens up all kinds of possibles. If you were working with a large set of pictures, for example, you could group them by when or where the picture was taken and then sort them alphabetically. Or if you were working with something like Word documents, you could group them by who created them and then sort them by date.
Use Check Boxes to Select Items
If you don't enjoy holding down the Shift key to select a range of items or the Ctrl key to add items to your selection one at a time, File Explorer has another option for you. On the "View" menu, select the "Item check boxes" option.

Now, whenever you point your mouse at an item, a check box appears to its left. Just click the check box to add the item to your selection---no holding any special keys required.

You'll also notice that there is now an additional check box to the left of the column headers that lets you quickly select all the items in a folder.

Configure Additional Folder and Search Options
There are also a number of additional folder options available to you. On the "View" tab, click the "Options" button and then select "Change folder and search options."

You'll find all kinds of goodies in here, such as changing whether File Explorer shows hidden and system folders, shows or hides file extensions on file names, and a lot more. We've already explored how to configure folder options in Windows 10 in great detail, so we'll just point you there and you can read all about what else is available to you.