Quick Links
Double exposure images are popular at the moment. Taylor Swift’s Style music video and the True Detective opening theme both used the effect. It’s a technique where two separate photos—typically a portrait and a landscape—are blended together into one unusual image. Originally photographers took two photos (“exposures”) on the same piece of film to combine them, but now it’s usually done with software like Photoshop or GIMP.
In this guide, we'll show you how to make your own double exposure images. I’m using Photoshop, but you should be able to follow along in any other image editor. Just use the equivalent tools and shortcuts.
Step One: Select Your Images
The images you pick at the start can make or break this technique. If the images you choose are too complicated, making things look good is next to impossible.
For a portrait, you want something simple, clean, shot against a white background, and converted to black and white. This self portrait from Chris Marchant is a perfect example. It’s the image I’m using.

For the landscape, you have a lot more flexibility. Just pick something that will complement the portrait. Black and white images can be a little easier, but color images will also work. I’m using this New York City night scene by Luca Sartoni.

Step Two: Mask the Portrait
Open the portrait image in Photoshop, or your image editor of choice. The first thing you'll need to do is make a good layer mask. If you’re not familiar with them, check out our guide to layers and masks before continuing.
Since I’m working with a portrait shot against a white background, it’s relatively easy to remove with Photoshop’s automated tools. Duplicate the background to a new layer (the keyboard shortcut is Control+J, or Command+J on a Mac) and grab the Quick Selection Tool (you can tap W on your keyboard).

Drag the cursor around the white areas of the background and Photoshop will automatically select everything.

If you accidentally select some of the model, hold down the Alt or Option key and drag over the areas you don’t want selected. If you want to add other areas to the selection, hold down the Shift key.

Once you have everything selected, go to Select > Inverse or use the keyboard shortcut Control+Shift+I (Command+Shift+I on a Mac) to invert your selection. Next, go to Select > Modify > Smooth and put in a value of about 5 pixels.

This will help with any rough edges.

Finally, click the new layer mask button to turn the selection into a layer mask.
Step Three: Add the Landscape
Go to File > Place Embedded, select the landscape image you’re using, and press Embed. This will load the landscape image into the same document. Press Enter or Return to place it.

Hold down Control (Command on a Mac) and click on the mask on the portrait layer.
This will load it as a selection.

Click the new layer mask button to mask the landscape to the silhouette of the portrait.

Now things are starting to take shape.

Step Four: Fix the Background
Before continuing, let’s step back and sort the background. Although it looked pure white in the original image, there are actually some dark spots from the model’s shadow. We don’t want these in the final image.
Create a new layer with the keyboard shortcut Control+Shift+N or Command+Shift+N. Fill it with white by going to Edit > Fill and selecting White.

Drag this new layer beneath the Background copy layer but above the Background Layer.

While we’re moving layers, let’s re-position the portrait layer to the top of the stack. Drag the Background copy layer above the landscape layer as it needs to be on top for the next step.

Now the unsightly blemishes on the background are gone and it’s time to create the final effect.

Step Five: Create the Double Exposure
Select the Background copy layer and from the Blend Mode drop-down (by default it’s set to Normal) select either Multiply or Screen.

With Multiply, the portrait layer is going to darken things in the landscape layer.

With Screen, the portrait layer is going to brighten things in the landscape layer.

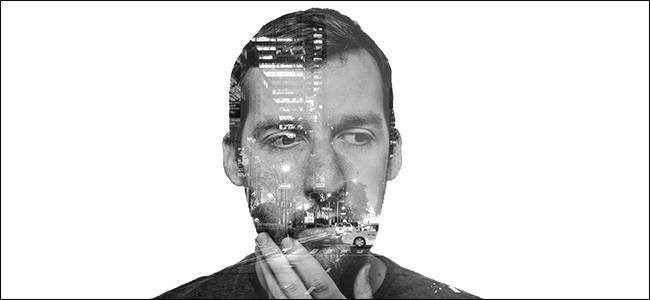
Which looks better will depend on your two images. I think Screen works better for mine so that’s the one I’m going to use. Try both options and decide for yourself.
The double exposure is now pretty much done. It’s just a matter of tweaking things to create the final image.
Step Six: Finish It Off
None of these steps are strictly necessary. Some will benefit your image, while others won’t. Play around with them and see what works best for you.
The first thing to consider doing is re-positioning the landscape. As it stands, we just dropped it in wherever Photoshop wanted. Select the Move tool (keyboard shortcut V) and click on the little chain link icon between the landscape layer and it’s mask. This will unlink the layer and mask so you can manipulate them independently.

Select the landscape layer and move it around. See where it looks best. Pay special attention to the lips and eyes in the portrait layer; they’re what most people will notice first. I prefer the positioning below.

Second, play around with the opacity of the portrait layer.
At a lower opacity, you may get a more pleasing effect. I think mine looks better at about 78% opacity.

With that done, the double exposure effect is finished. You can save your image now or continue to play around with it. It's a pretty fun little effect, and you can do some cool things if you're willing to experiment. Have some fun with it!