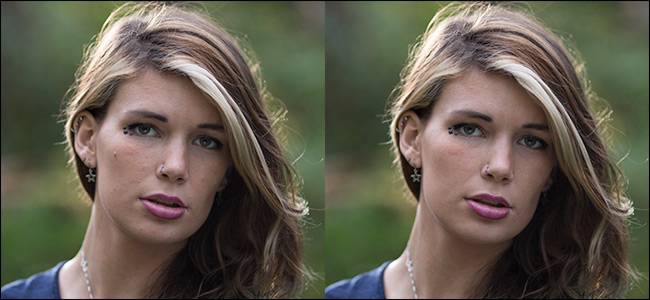
Spots. Zits. Pimples. Acne. Everyone gets them at some point or another. No one, however, needs a permanent photographic reminder of the time they had a large spot on their nose.
There is a lot of backlash at the moment against over-edited images, but sometimes, you just need a little touch up here or there to reflect what you usually look like. With Photoshop, and other image editing apps like GIMP, it’s simple to do. I’m going to work in Photoshop but you should be able to follow along with any image editor--just use the equivalent tools and shortcuts.
The Simple Way: Spot Healing Brush
Open the image you want to edit in Photoshop. It’s a bad idea to modify any of the original image's pixels, so I’m going to show you how to work non-destructively.
Start by pressing Control+J on your keyboard (or Command+J on a Mac) to select the background and duplicate it to a new layer.
Then, select the Spot Healing Brush tool from the sidebar, or by pressing J on your keyboard. If one of the other healing tools is selected, click and hold on the sidebar icon or cycle through the options with Shift+J until you get the Spot Healing Brush.

Resize the brush so that it’s a little larger than the offending blemish. The easiest way to do this is with the [ and ] keys.
Click on the pimple once, and Photoshop will go to work. It samples pixels from the surrounding area and uses them to replace the pixels to be healed.

Repeat the process for any other blemishes you want to get rid of.
The Spot Healing Brush tool can also be used to remove small creases or wrinkles. Resize the brush so it’s a little wider than the crease you want to remove and then carefully paint along it.
The Advanced Way: Healing Brush
The Spot Healing Brush is great for small blemishes that are surrounded by plenty of good pixels. When there are spots close to areas of detail, such the subject’s lips or facial hair, Photoshop’s automatic sampling won't work as well. You can see in the image below that when I try to heal the spot near the model’s lips Photoshop got confused. It tried to use some of the color from the model’s lips to cover the spot.

To overcome this, you need to use a slightly more advanced tool. The Healing Brush is similar to the Spot Healing Brush, but rather than letting Photoshop pick the sample area, you have to choose what to sample.
If you have the Spot Healing Brush selected, you can change to the regular Healing Brush with the keyboard shortcut Shift+J. Alternatively, click and hold on the sidebar icon for the healing tools and select the Healing Brush from the list.

For removing spots, make sure that the Healing Brush is set to Aligned, and Sample: Current & Below. Diffusion controls how quickly Photoshop blends the sampled pixels. In most case, a middle value of around 4 or 5 is perfect.
Hold down Alt (or Option on a Mac) and click on an area to select a sample. You want to pick an area that’s as similar as possible to the one to be retouched. For example, if a spot sits directly on the subject’s lip line, sample from a similar point further down their lip.
Resize the brush so that it is slightly larger than the spot you want to heal. Click on the blemish, and Photoshop will do its magic.
Repeat the process until you’re happy with how the image looks. Remember to select a new sample for every spot.
Removing acne is easy. It's not a permanent facial feature so if the image you're editing is going to be seen by people, it's worth spending the 30 seconds in Photoshop to deal with it. There's no need for your Facebook, LinkedIn, or even Tinder, profile picture to not reflect the best you.