Quick Links
With iOS 10's new "Recognized Faces" feature, you never have to spend time looking for photos of friends and loved ones--all your photos are automatically cataloged and right at your fingertips.
Recognized Faces: Local Face Recognition On Your iPhone
iOS 10 has a slew of new features, many of which are pretty well hidden away if you're not actively scouting for them. Among those stealthy-but-fantastic new features is an update to the Photos app that brings facial recognition technology, dubbed "Recognized Faces", right to your iOS device. The Photos app will now analyze all the faces in the photos you take with your iOS device and group them together based on faces.
Unlike the recognition technology you might be used to on Facebook or Google Photos, the iOS 10 recognition system is totally local. All facial recognition processing happens on your iPhone or iPad, rather than being sent to Apple's servers. For the privacy conscious who want the usefulness of facial recognition but aren't so keen on Apple processing all your friends' faces, this is a welcome change. It also means the facial processing works even if you're offline.
With all that in mind, the recognized faces feature needs a little input and attention from you to really shine, so let's dive right in.
Where to Find Recognized Faces
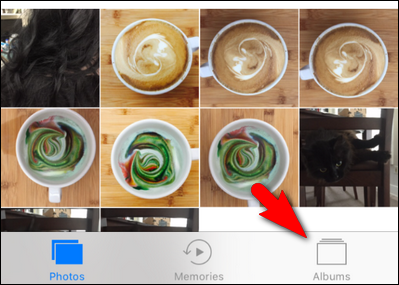
While the new feature might be called "Recognized Faces", the implementation of the feature in the Photos app is actually tucked away in the "People" album. To access it open up the Photos app and then locate and select the "Albums" icon at the bottom of the screen.
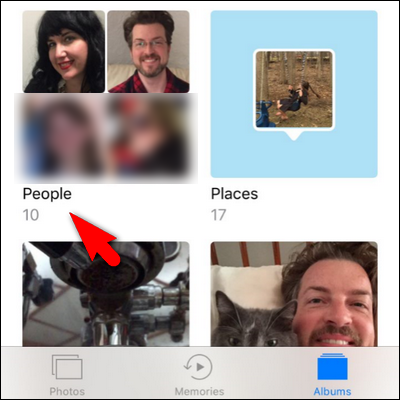
Inside the Albums menu, you'll see an entry for "People" located among your existing albums with a little 2x2 grid of recognized faces. Select the album.
Now that we've located the face recognition hub, let's run through the ins and outs of using it.
How to Add Names
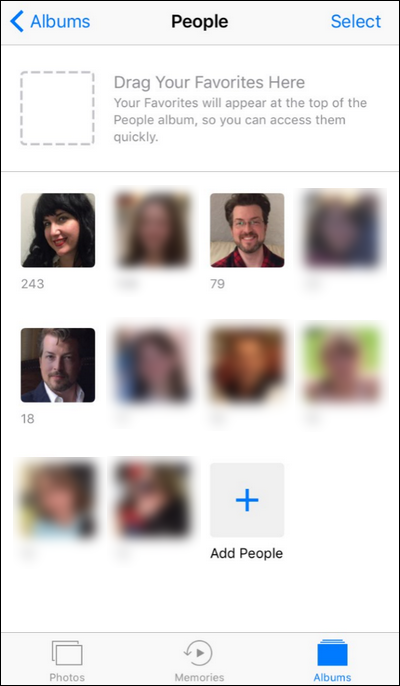
When you first look at the People albums, you'll see a grid of nameless faces sorted by number of photos, as seen in the screenshot below.
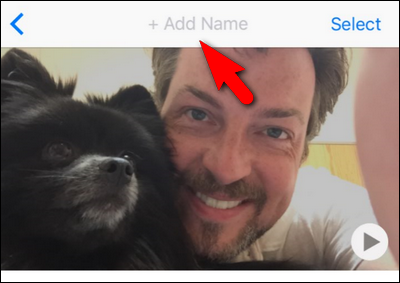
To get started, pick any particular face from the crowd. Don't worry if there are multiple entries for one person (we'll tidy that up in a moment). Once you've select a face, click on "+ Add Name" to add a name to the face.
Add a name to the face. Notice that it prompts us to select an entry from our contacts list.
There are no additional features if you use an actual contact entry, such as the ability to see a person's photos if you look at their contact in your contact list. As it stands now, it's just a form of helpful auto-fill that suggests names based on your contacts. (Though Apple may make this useful in the future.) And, as an aside, remember that all the facial recognition and tagging is done on the phone, and adding a friend's contact information here doesn't link the photos on your phone to some Apple database.
Once you've created an entry for a name, you can also scroll down to the bottom of the entry and look for the "Confirm Additional Photos" link to add additional photos.
Every photo is simply a "Yes" or "No" selection.
In our testing, the app never suggested a photo that wasn't the person in question, but it was kind of tedious to sit there and click "Yes" over and over again. If it has already pooled a bunch of related photos together, it's far faster to say "Yes, those additional 120 photos are also Steve" than to sit there and click "Yes" repeatedly.
How to Merge Duplicate Entries
Now that we've created a single entry, let's look at merging entries. You may have noticed that my lovely face appears in two locations in the suggested people page we just looked it. Apparently as good as facial recognition software has gotten, it still struggles with differentiating between chubby-big-beard-in-the-winter Jason and skinnier-short-summer-beard Jason--no worries though, this is exactly what the "Merge" feature is for.
To merge two entries together, first pick one and name it (as we just did) and then do the exact same thing for the second entry in the list. Select the album, and click that "+ Add Name" button...
...then type in the same name, and it will suggest an existing person from the album you created in the previous step. Select the matching entry.
When asked to confirm you wish to merge the people entries, select "Merge".
Once selected, all the photos from original named entry and the new unnamed entry will be merged together into a single entry in the album.
How to Set Favorites
If you have a lot of different people in your photos, you may wish to set a favorites. This puts entries for certain people, like your kids or spouse, right at the top of the People album. Doing so is quite intuitive.
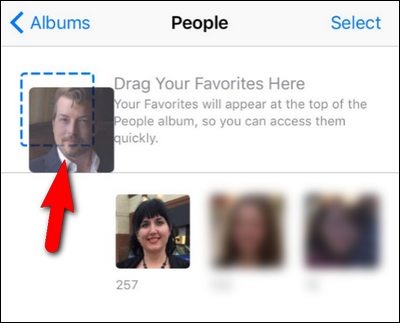
Simply select an entry in your People album and drag it up onto the dotted blue box.
The end result is the select person now appears at the top, with a larger thumbnail.
Once you've set a few favorites and you no longer wish to see the list of unnamed suggestions, you can click "Show Favorites Only" and the People album will be populated only with the favorite people you've named and tagged as favorites.
How to Manually Add Entries
Finally, before we leave our tour of the new recognized faces feature, there's one last thing to look at. You may have noticed as you played around with the app that the number of suggested people (as well as which people were suggested) changed as you created named people, marked them as favorites, and even opened and closed the app.
If you want to create a named entry for someone you know you have a photo of but don't see on the suggestion screen (or that was there but vanished) you can do so by looking for the "+" icon labeled "Add People" at the bottom of the main People album interface. Select the icon.
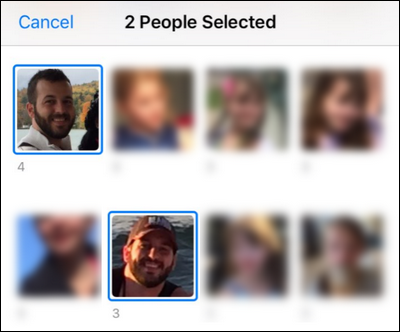
Here you'll find a wide array of faces--the face detection algorithm is so uncannily sharp you'll even find entries for faces that were on billboards in the background of your photos. The "Add People" screen is particularly nice, from a time saving standpoint, because it allows you to select multiple groupings of photos of the same person, like so:
Once you've selected your groupings you can then either select "Add" at the bottom of the screen (for a single group) or "Merge" (if you've selected multiple groups). This will either add the single group, or merge and add the multiple groups, respectively, to the main People album where you can tap on the group of photos and assign a name. It's absolutely worth the extra effort here to scroll a little bit and make sure you've captured a good chunk of photos of a particular person as it's so much faster to tap "Merge" once, than to add or tag the photos using any other workflow in the Photos app.
That's all there is to it! While looks like a rather simple (and seemingly hidden) feature in iOS 10's updated Photos app is actually a pretty sophisticated way to comb through all your photos and have automatic detection of your friends' and family members' faces.

