Quick Links
Android 7.0 Nougat made some pretty big improvements to notifications, but there's one feature that's gone unsung. Now, you can easily manipulate an app’s ability to generate notifications directly from the notification shade.
One of Android’s best features has always been notifications. But as time has gone on and the OS has grown, developers have essentially learned to “abuse” the notification system (whether intentional or not), so Google started giving users more control of which apps could generate notifications in Lollipop. Unfortunately, that process was still several taps deep, and thus more work than many users were willing to put—especially for multiple apps.
Ideally, you'd be able to silence or turn off notifications from the offending app's settings, and you should try that first. However, if the app doesn't offer the options you want, Nougat offers a second line of defense. In 7.0, Google added quick notification controls that are directly accessible from the shade, as well as more advanced controls in a few different places. Here’s how to get a grip on those notifications once and for all.
Nougat's New In-Shade Notification Controls
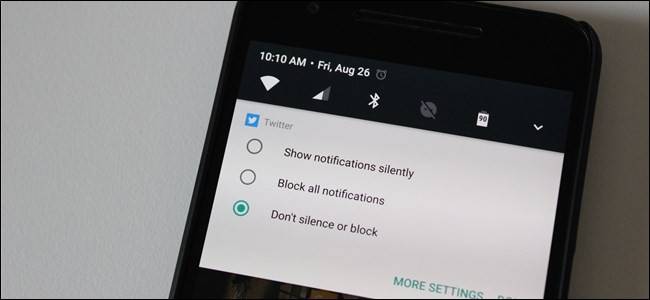
So let's say an app is being particularly annoying. The next time it sends you a notification, find it in the shade, and give it a long-press.

This will open a new menu that give you three options: Show notifications silently, Block all notifications, or Don’t silence or block (this is the default option). If you want to continue to get notifications from this particular app but don’t necessarily want to be alerted every time, the first option is perfect. If you never want to see another notification from the app, use the “block” option.

If that’s enough for you, then you’re actually done here. But there’s also a “More settings” button at the bottom, which takes you directly into that app’s more advanced notification settings. This is where you can block all notifications generated by the app, show them silently, control what shows up on the lock screen, or allow the app to override Do Not Disturb settings. It’s also worth mentioning that if you elect to show the notifications silently, you can’t tell it to override Do Not Disturb settings (because, you know, it can’t override if it doesn’t make a sound).


That’s it—simple, but super effective.
Go Even More Granular with Nougat's Experimental Notification Settings
Want even more control? Man, you're greedy. Thankfully, Google has even more granular controls for you to fiddle with--they're just tucked away in the secret System UI Tuner.
To enable this hidden menu, pull down the notification shade twice, then long-press on the cog icon. When you let go, it will spin around and a little wrench will appear next to it. There will now be a new entry called “System UI Tuner” at the bottom of the Settings menu.


Go ahead and jump into the System UI Tuner, then tap the “Other” option.

The second option in this menu is “Power Notification Controls.” Go ahead and tape on that, then enable the feature by flipping the little toggle.


These controls are broken down by levels, with five being the most lenient, and zero blocking all notifications:
Level 5
- Show at the top of the notification list
- Always full screen interruption
- Always Peek
Level 4
- Prevent full screen interruption
- Always peek
Level 3
- Prevent full screen interruption
- Never peek
Level 2
- Prevent full screen interruption
- Never peek
- Never make sound or vibrate
Level 1
- Prevent full screen interruption
- Never peek
- Never make sound or vibrate
- Hide from lock screen and status bar
- Show at the bottom of the notification list
Level 0
- Block all notifications from this app
Like I said, it’s super granular.
Okay, so now that you’ve enabled the feature and know what each level does, how do you actually use it? Well, there is a new option in every app’s setting. So head into Settings > Apps and pick one. In the app’s main “App info” screen, tap the on the “Notifications” option.

In this menu, you’ll see a slider—this is where those levels from earlier come into play. I currently have Twitter at Level 2, because I don’t want to be interrupted, but I still like to see that I have new notifications. As you cycle through the various levels, new options will show up at the bottom. For example, on Level 0, there are no other options. Why? Because that blocks all notifications. There’s no need for further options.


On Level 2, however, you can control lock screen notification. Move up to Level 3, however, and the option to Override Do Not Disturb becomes available.
Here’s the best thing about Power Notification Controls: you don’t have to set it for every app you have installed. In fact, this is really great for apps that you either want to block completely, or for those that you’d like to give priority. All others will continue to operate with the default level. It’s also worth mentioning that once you enable Power Notification Controls, it will be the default option moving forward. So if you long-press a notification to change its settings, you’ll now the get slider instead of the simpler three choice menu.

Really, what this comes down to is choice. While many users will be completely fine with the stock notification options, some will want more much more granular control over certain apps. Thankfully, Nougat gives you a ton of options.