Android 7.0 Nougat brings a lot of new features and refinements to the table, like the ability to customize Android’s Quick Settings panel with custom tile containing unique toggles and even app or web shortcuts.
The introduction of the new Quick Settings Tile API not only makes it possible for the panel to be customized, but also allows developers to create custom tools designed specifically for the Quick Settings area. One such tool is called “Custom Quick Settings,” and it allows users to build just that: custom tiles for the quick settings area—including app shortcuts, browser links, and more. It’s an incredibly powerful, yet easy-to-use tool.
This guide was written for Android 7.0 Nougat, but the app we're using also works with Android 6.0 Marshmallow--just under a slightly different set of behind-the-scenes rules. You have to enable the System UI Tuner before using Custom Quick Settings, but otherwise it should work the same as it does on Android 7.0. Also, if your device is rooted, it can add and delete new tiles automatically. For unrooted devices, however, you have to do this manually (which is what we'll be doing in this guide).
Before you get started with Custom Quick Settings, you’ll need to install it and get it set up. When you start it up for the first time, the app will guide you through giving it permission to modify system settings so it can create the tiles.


It’s worth noting that there are two versions of Custom Quick Settings: free and pro. While the free version is great to get started with, the pro version ($1.50) really unlocks the app’s full potential with more custom icons and more detailed custom actions. I’m using the pro version in this guide, but you should be able to easily follow along with the free version.
If there’s one thing you should know about Custom Quick Settings before jumping in, it’s that it can be a little touchy. By that, I mean that if you don’t do things in a certain order, it can get a little bit buggy and crash. If you follow along in order, though, it works perfectly.
It's also worth mentioning that at one point, it somehow duplicated my Bluetooth icon, and I'm not sure why. A reboot fixed the issue and I wasn't able to replicate it, so I'm not sure what caused it. Either way, a quick reboot will fix it once you've finished creating your custom tile.

Okay! So with that, let's get started. With the app in the foreground, tap the little plus sign in the bottom right corner.

The “Add Tile” dialog will show up telling you exactly what to do: pull down the notification shade twice to show the quick settings menu, then tap “Edit.”


In the Edit menu, scroll down and find the tile titled “CQS: Tile 0” and drag it to the top section. Once it’s in place, tap the back button.


The app should detect the new tile and automatically switch to the “New Tile” edit menu in the Custom Quick Settings app, which is where you’ll start customizing your new button.

First things first: let’s add a title. I’m going to be creating a quick setting for Pokémon GO, because you never know when a wild rare Pokémon will spawn and you need to access the app right that second. To keep it short and sweet, I’m going to just name it “PoGo”—remember, this is going in a small area, so brevity is key with tile names. Tap the “Tile Title” section to give it a name.


Next, add an icon. Just tap the “Tile Icon” button, which will show a list of options: Built-in icons, Custom icon, App Icon, or Icon Pack. It’s worth noting that some of these are only available in the pro version of the app (like Custom Icons). I’m just going to use the app’s stock icon, so go ahead and choose “App Icon” here.


A list will generate, so scroll to the app you want to use and tap it. Note that the QS area only supports white icons, so Custom Quick Settings will basically just white-out the stock icon. It works well with some apps—mostly ones that have transparent backgrounds and a simple icon, like Chrome—but for Pokemon Go I’m going to be stuck with a square. I’m okay with that.

Now for the important stuff: action. Tap on the “Tile Click Action” button to define what you want this shortcut to do. Again, there are a handful of options here: None, Launch app, Launch other, Launch URL, and Toggle. while "none," "app," and "toggle" are all pretty self-explanatory, "other" is a little vague. This is basically a more advance settings that can execute things like Nova Actions or other activities.

For the sake of simplicity, however, we're just adding an app. Go ahead and tap “Launch App.”


Another list will generate, so just scroll down to the app you want to add to the menu.

From here, you can also set a double-click action. Basically, this means tapping the tile twice can do a secondary action, making this shortcut super useful. I’m actually going to use this option to launch a custom URL—go ahead and tap “Tile Double Click Action,” then “Launch URL” (assuming you want to add a URL to your tile, if not, skip this step).


I’m adding PoGoToolkit as my secondary action, because the evolution calculator there is super helpful when trying to decide which of your 74 Eevees to evolve. After you’ve added the URL, just tap “OK.”

Finally, there are a few extra options you can choose: Collapse Notification Tray and Unlock Device. Those are pretty self-explanatory: if you’d like to close the tray after executing the intended command, check the first box; if you’d also like for it to to unlock the phone, check the second. Easy-peasy.

With that, your custom tile is finished. Just tap the circular check mark icon at the top. Done.
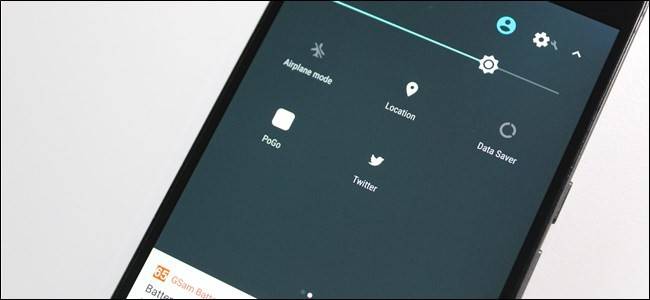
The new tile will now be in place in the Quick Settings menu. Exit the Custom Quick Settings app, pull down the shade, and give it a go.

This is just the tip of the iceberg for what’s really possible with the Quick Settings API. As Android 7.0 gains adoption, we’re likely going to see more and more developers release unique and interesting apps that utilize this new API. Unfortunately, it’s still unclear how this will work with manufacturer skins (Samsung and LG have both disabled the System UI tuner on Marshmallow, so apps like Custom Quick Settings won't work), so that’s something we’ll just have to wait to find out.